|
12.3 Filtering
Filtering images—i.e., deciding
which ones to post-process and which to skip (or even delete)—is
probably the most time-consuming aspect of digital bird
photography. Because digital cameras allow you to take many more
photos than you would have been likely to take with a film camera, the
tendency among many photographers nowadays (including both amateurs and
pros) is to take far more photos than necessary. The good thing
is that this affords more opportunities to get an exceptional
photo—e.g., a chance capture of the bird very briefly assuming a novel
pose. The bad thing is that you then have to sift through massive
numbers of image files later on, to find the ones worth keeping and/or
publishing. In many cases, that process of sifting through images
can take far more time than it took to actually capture the images out
in the field. In this section we’ll discuss methods for
efficiently filtering large numbers of image files.
The first issue we’ll focus on is learning how to
decide which images to keep and which to discard. This is mainly
a problem for beginners. The key is to be very picky when
choosing which photos to “publish” (i.e., which ones to post on your
web page). A wise man once said: “An amateur photographer is one who
shows all of his photos—even
the not-so-good-ones—to the world. A professional photographer is simply
an amateur who has learned to show the world only the few photos that turned out
exceptionally well.”1
This has some truth to it. If after taking 10,000 bird photos you
were to pick out the best three and show those to a random person, it’s
reasonably likely they would be impressed with those three
photos—especially if they got the impression that you had taken only
three photos in total. The point is that the vast majority of
bird photos that most people take are dull and uninteresting to other
people. By taking enormous numbers of photos and keeping only the
best 1%, you’ll begin to see how a successful photographer can build up
a portfolio of stunningly impressive images. The trap that many
beginners fall into is that they get impatient and want to keep 75% of
their photos. Of course there’s nothing wrong with keeping all of
your photos, but if you plan to share your art with the world, it’s
better to hide the 99% that are run-of-the-mill images and reveal only
the 1% that are remarkable. That’s where filtering comes into
play.
Before you can perform efficient filtering of large
numbers of photos, you need to find a convenient way to quickly view
images. If Adobe Camera Raw (ACR) loads quickly on your computer,
then you can simply use ACR to preview images. On some computers,
however, the time it takes ACR to load your image after you
double-click the filename in the file browser is simply too long.
On some operating systems, the file browser provides its own built-in
preview functionality. The figure below shows one mode of the Finder utility in Mac OS X version
10.6 (so-called Snow Leopard),
in which previews of multiple files are shown in a 3-D lineup. By
resizing the Finder window you can enlarge the preview thumbnails so as
to provide more detail. In many cases, this preview will be large
enough to allow you to decide very quickly whether a photo is even
worth opening in ACR.
Fig.
12.3.1: Efficient filtering of vast numbers of image files requires some
way to quickly preview each image. The Finder in Max OS X
provides a
quick preview of each image; though the preview is small, it’s enough to
assess overall scene composition and exposure. Images that pass
that test
can then be opened in the Preview utility of OS X for a closer
look. Similar
utilities are available in Microsoft Windows and Linux.
When the tiny
thumbnail isn’t informative enough, you can sometimes get a quick
preview of a file by opening it in some lightweight utility program
rather than opening it in ACR. In Mac OS X you can open image
files (even RAW files, for supported cameras) in the built-in Preview program that comes with Mac
OS X. This program loads quickly, so that on some computers it is
more efficient to open files in Preview first, rather than in
ACR. For those images that look promising in Preview, you can
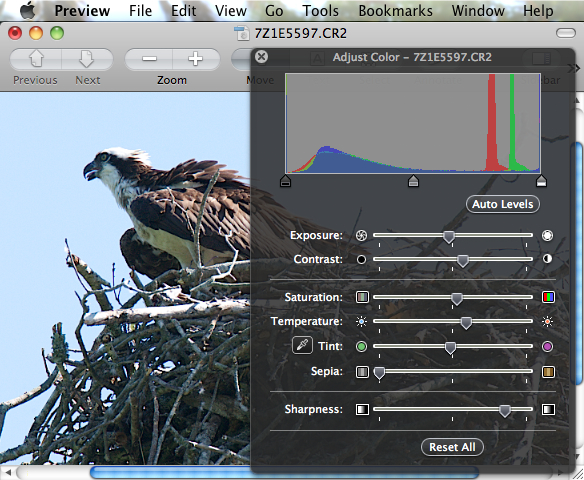
then close them and re-open them in ACR. The Preview program in
Mac OS X also allows some image manipulation, which is useful inasmuch
as the manipulations that it performs are very fast. Thus, if you
open a photo in Preview and it appears blurry, you can quickly discover
how sharpenable the image is by adjusting the Sharpness slider in Preview.
This technique will give you only a rough indication of the
sharpenability of the photo, but with practice you can develop some
intuition for which photos seem to be sharpenable enough in Preview to
warrant opening them in ACR and proceeding with full
post-processing.
To reiterate, the point of all this is to quickly
identify those images that do not have the potential to become great
images, so that you can quickly discard those files and move on to more
promising ones. It’s all about managing your time and avoiding
wasted effort. As you get practice with large-scale filtering,
you’ll naturally fall into a rhythm that allows you to work most
efficiently on your particular computer system.

Fig. 12.3.2:
Assessing image sharpenability in the Preview utility of
Mac OS X (similar utilities are available for other operating systems).
This utility can open RAW files very quickly—sometimes more quickly
than Photoshop. If the image looks good in Preview, it’s then
worthwhile
opening it in ACR/Photoshop for full post-processing. Note that
if ACR
opens quickly on your computer, you can skip the Preview step.
Note that when we say that filtering is about discarding images, we don’t
necessarily mean deleting
those images. For images that are clearly of no use
whatsoever—e.g., that are totally blurred, or massively underexposed or
overexposed—you may indeed want to simply delete them during
filtering. On Mac OS X systems, deleting a file in the Finder can
be done instantaneously by pressing the key combination Cmd-delete, so deleting files
needn’t take any more time than simply skipping them. For images
that aren’t defective per se, but appear rather unexciting, you may
instead want to skip them rather than actually deleting them from your
hard drive, in case you later find a use for them. I rarely
delete files anymore, since the rate at which hard drives have gotten
larger over the years has kept pace with my rate of taking photos (and
the rate at which the file sizes have increased, due to the megapixel
race). However, the good thing about deleting files that are
clearly useless is that later searches through your archive can proceed
more quickly, since there will be fewer files to examine. Note
that most operating systems nowadays have a trash can mechanism, so that after
deleting a bunch of images you can go back and make sure you really
wanted to delete them before emptying the trash can (which permanently
deletes the files).
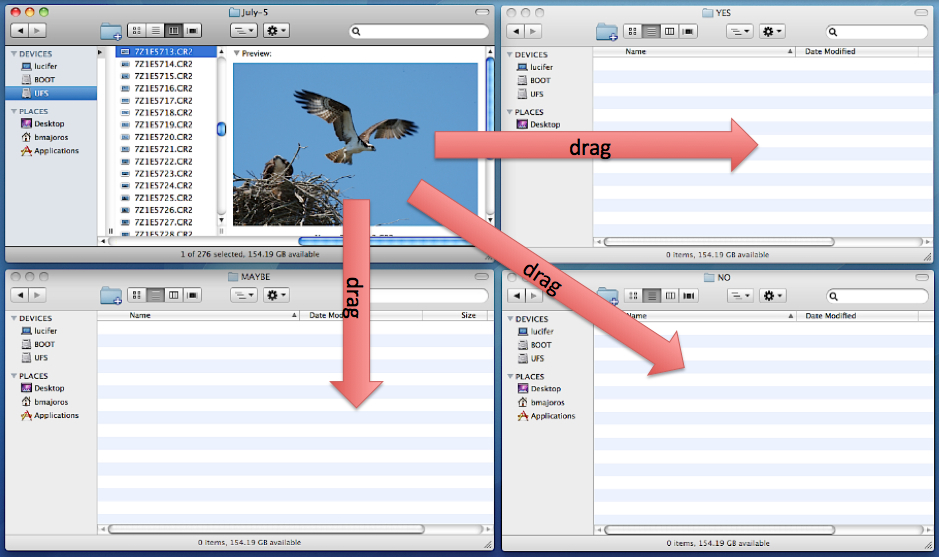
The way I like to filter a directory of images is to
create three subdirectories, called YES, MAYBE, and NO. As I
preview the images, I note which ones I definitely want to publish, and
I drag those into the YES folder (see the figure below). For
those that are clearly of no use to me, I drag them into the NO
folder. All others I drag into the MAYBE folder.

Fig. 12.3.3:
Filtering images via drag-and-drop. I classify my images
into quality categories (best to worst) and drag them from the main
directory to an appropriate subdirectory. When all images have
been dragged to a subdirectory, I then review the highest quality
category and possibly subdivide those as well. The goal is to pull
out the “best of the best” and publish
only those.
When deciding
which files to drag into the YES versus MAYBE or NO folders, I apply
what I call the BBLP rule,
where BBLP stands for Beautiful
Bird, Lousy Photo. Whenever I see an image of mine that
depicts a bird that is clearly a beautiful specimen, but that has been
poorly captured in the image, I say that it is a beautiful bird, but a
lousy photo. Many beginners have difficulty skipping over photos
that depict what they know are beautiful birds, but that have been
captured by a truly horrendous photo (whether due to blurring, poor
exposure, or any other technical or aesthetic shortcoming). For
some people this can be a severe mental block, because they fail to
acknowledge that a photo can be lousy even if the bird that was
photographed is a truly beautiful specimen. They may even feel
that by deleting the photo they’re somehow offending the bird.
This is where the mantra of BBLP comes into play. Telling
yourself that the bird is beautiful but the photo is lousy may allow
you to more easily detach yourself emotionally from some of your more
mediocre images, so that you can focus more fully on the more promising
images in your collection.

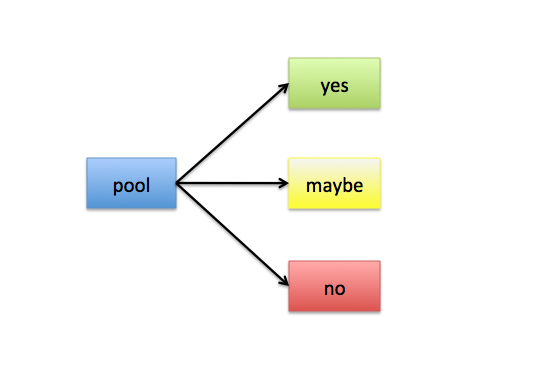
Fig. 12.3.4: My
classification schema for image filtering.
I quickly classify each image into the YES, MAYBE, or NO
categories. The YES photos will get uploaded to my web site;
all the others will remain unused.
After performing an initial pass to classify all
files as YES, MAYBE, or NO, the main directory will then be devoid of
image files. At this point I then look to see how many files are
in the YES subdirectory, and ask myself whether I’ve got too many or
too few YESes. If I think there are too many YES files, I’ll then
re-examine each and every file in the YES subdirectory and
painstakingly find the least promising among them, which I then drag
from the YES subdirectory into the NO subdirectory (or perhaps into
MAYBE instead). Conversely, if I realize that the YES
subdirectory contains fewer images than I’d like, I may decide to
re-analyze the files in the MAYBE subdirectory and drag the very best
of those into the YES subdirectory. I’m also careful to make sure
that no two images in my YES bin look too similar to each other; if
I’ve got many excellent images of a bird in the same pose or very
similar poses on the same perch, I’ll force myself to pick only one.

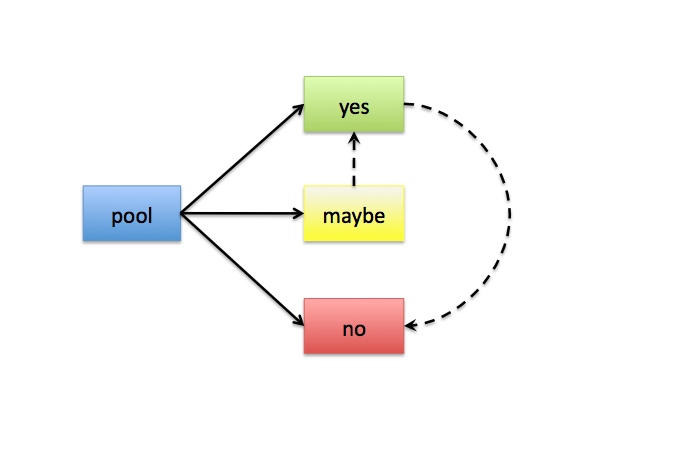
Fig. 12.3.5:
After the initial filtering step, you can then revisit some
of the decisions you’ve made by dragging some of the best MAYBE
photos into YES, and/or dragging some of the more questionable
YES photos into MAYBE. These decisions are often very difficult
to make, so it’s good to make a second pass through the entire set,
preferably after resting your eyes for several hours, to see if you’ve
changed your mind about any of the images.
Once I’m satisfied that the images in the YES subdirectory
are indeed those that I want to publish from this set, I move the
entire contents of the YES subdirectory back up to the parent
directory, and then consolidate the MAYBE and NO sets into a single
subdirectory called UNUSED. In this way, I still have access to
the unused images from each set, in case they prove useful at a later
date (such as for documentation purposes). The YES photos I’ll
typically upload to a single photo album or blog on my web site.
Note that filtering can be applied either to your
RAW archive or to your collection of post-processed JPG images.
Indeed, there is good reason to apply filtering to both. During
post-processing, I generally perform a simpler form of filtering on the
RAW images: I simply skip through the files in each each directory
until I find one that piques my interest. I then post-process
that image into a JPG file, which goes into my (separate) JPG
archive. Once I’ve gone through all the RAW files in a given
directory, I then perform a separate pass of filtering on the
post-processed JPG files, using the YES/MAYBE/NO protocol described
above. The YES images then get uploaded to a single page on my
web site. If a client then finds an image on my web site that she
or he wants to re-publish in another medium, s/he can simply send me
the URL (internet address) of that photo from my web site. I then
track that JPG back to its RAW file and then re-process the image to a
higher-resolution JPG or TIFF which I can then deliver to my client.
Filtering mountains of image data is a tiring
process. Keep in mind that many of the post-processing decisions
you make (including your filtering decisions) can change as your eyes
get tired, your attention span shortens, or the lighting in your work
space changes. During subsequent post-processing sessions I often
double-check images that I’ve already post-processed, and often I’ll
find that I feel differently today about an image that I post-processed
(or filtered) yesterday. This is a natural part of the artistic
process. Just remember that post-processing images can be at
least as difficult as capturing them in the field, and deserves at
least as much effort and attention if you want to achieve your full
potential as a digital artist.
1 Liberally adapted from a quote by Ryszard
Sytnik.
|
|
|
