|
7.9 Flash
Extenders
In bird photography, the primary
purpose of the flash (if and when it’s used) is in most cases to
illuminate the bird, not the
entire scene. Judicious manipulation of the flash ratio typically
provides for adequate background illumination via ambient light, so
there’s usually little need for
illuminating the background via flash.
Unfortunately, most flash units are designed to provide
uniform illumination over the whole frame, and they do this by
spreading
their light out over a wide angle. For our purposes, that’s
highly wasteful: significant quantities of light are being wasted on
parts of the scene that we typically don’t care about (very
much). Although most dedicated DSLR flash units have a “zoom” control that allows you to vary
the width of the emitted beam of light (via a sliding parabolic
reflector inside the flash head), it’s typically not flexible enough to
allow you to focus the light into a narrow beam that would correspond
to, say, a finch at 25 feet. This is where the flash extender comes in.
Fig.
7.9.1 :
The “Better Beamer” flash
extender, mounted on a Canon
580EX II flash unit. The extender uses a plastic lens to
concentrate
the light rays into a narrower cone, thereby illuminating the bird
better.
I never leave home without my Better Beamer!
Although flash extenders are
popularly thought to increase the “power” of the emitted light by making it
brighter (thereby allowing it to travel further), what they really do
is redirect the emitted light into a narrower beam (or cone) than that
originally emitted by the flash head. They do this using a fresnel lens, which works just like
any other lens—by redirecting and focusing light rays. Thus, the
light rays that would have been wasted on the background are instead
redirected (and concentrated) onto the subject.
Fresnel extenders are very cheap (around $30 US for
a small one) and can be extremely effective; they’re also easy
to build yourself, as we’ll see shortly. Not only do flash
extenders allow for more intense illumination of a subject at a fixed
distance, but for subjects that are close they also allow you to
conserve battery power by using lower flash power levels to achieve the
same amount of subject illumination. Given the insatiable thirst
of flash units for battery juice, this latter advantage is by no means
a trivial one.
The most popular flash extender for bird photography
is, by far, the celebrated Better
Beamer (pictured above) by Walt Anderson. I recently had
the pleasure of shooting with Walt at Crane Creek (now
called Magee Marsh) in Ohio—a famous hotspot for warblers and warbler
photographers in spring. Of the photographers using flash at
Magee Marsh this past spring, nearly all of them were using the Better
Beamer. I’ve personally bought three of them. However, I
now use a larger and more powerful beamer that I constructed from
readily-available items from the local art supply store—for about $20
(US).

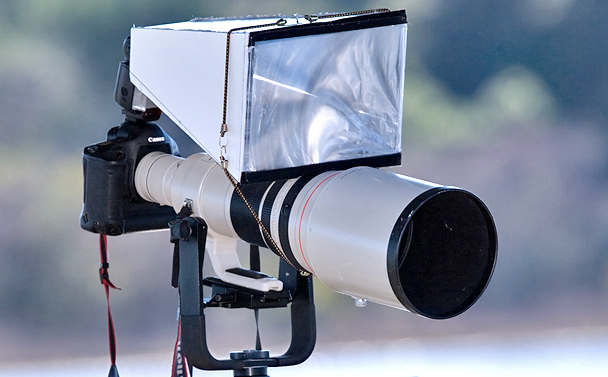
Fig. 7.9.2 :
Even better than the Better Beamer. This monster flash extender
was easy and cheap to construct, and provides an amazing amount of flash
output. This results in greater “reach” for my flash,
and also results in reduced
battery usage when shooting birds that are close.
A “monster beamer” like the one shown above can emit
a fairly powerful beam of light (though not powerful enough, as some
have suggested, to cause intervening vegetation to wither and
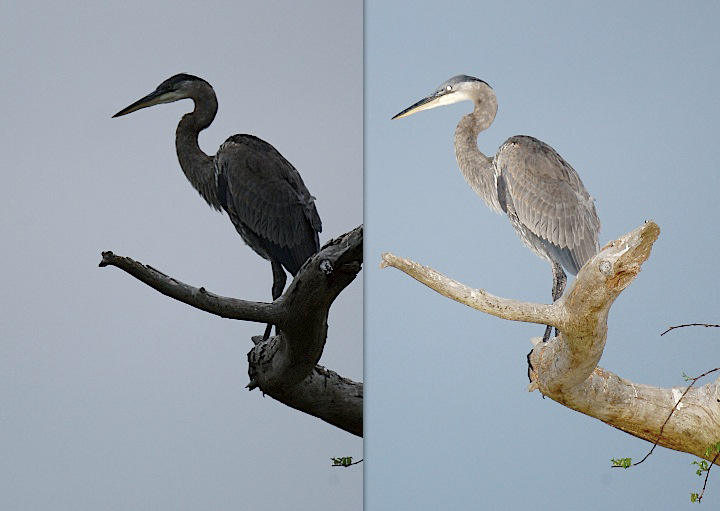
die). The great blue heron (Ardea
herodias) shown below was
photographed at a distance of roughly 200 feet (as indicated by my
len’s distance readout) in predawn lighting. The image on the
left was taken with no flash, while the image on the right was taken
with flash. Even at 200 feet, the flash (with monster extender)
was able to light up the entire bird and its perch, revealing far more
detail than what the non-flash exposure provided.

Fig. 7.9.3 :
Night and day. A heron at 200 feet in pre-dawn, shot without
flash (left) and
then with flash(right) using the monster beamer shown in the previous
figure. Notice that
the flash has not only improved the lighting and color, but has also
resulted in more visible
detail in both the bird and the branch. The eye shine alone
attests to the brightness of the
flash light; fixing this eye-shine in Photoshop would be fairly easy.
Building a monster beamer like this is simple and inexpensive.
The parts are obtained from local stores, including WalMart, Barnes and Noble (for the fresnel),
and Michael’s (art
supply). Plans for building such a device are given in section
4.3.2.*
There are several important things to keep in mind
when using a flash extender. The first is that the use of a flash
extender can cause irreparable damage to your equipment, and possibly
even personal injury or death. That's worth repeating:
| The use of a flash
extender can cause irreparable damage to your equipment, and possibly
even personal injury or death. |
The following story was related to
me personally by a very reliable source.
A fellow who had been photographing birds outside his window in the
early morning left for work, leaving the tripod-mounted camera rig
(with flash and fresnel extender attached) still pointing out the
window. Because the window was facing the sun for a significant
portion of the day, the sunlight was magnified by the fresnel, causing
heat to build up in the flash unit. When he returned from work
that evening, he found that his flash unit had been transformed into a
molten mass of plastic—completely melted by the
concentrated sunlight. Although the flash unit had been totally
destroyed, the owner was just thankful that a house fire hadn’t been
started in the process.
I’ve personally had two flash units become partially
melted by small fresnel extenders,
while out in the field photographing birds. In both cases, the
damage was entirely inconsequential, since the melting was limited to
the external plastic housing of the flash (you may have noticed the
duct tape covering part of the flash unit in Figure 7.3.1 in section
7.3). Nevertheless, it’s worth
stressing here that if you use a
flash extender (of any brand, or even home-made), be careful at all
times, especially with tripod-mounted rigs, to ensure that your camera
isn’t left pointing toward the sun. Damage can occur when you
leave your tripod-mounted rig for several minutes to talk with
passers-by, or possibly even when sitting in traffic with your gear on
the front seat of your car.
Another potential problem with the use of flash
extenders is that they can, over time, cause your flash head to “slouch”. This isn’t necessarily
true of all flash extenders. For those that are fully supported
by the flash head itself, if they’re mounted far out on the head their
weight can cause the head to point progressively lower over time,
resulting in noticeable differences in illumination levels between
upper and lower portions of a bird or scene. If you use the Better Beamer, the
recommended positioning of the extender (fully back
against the vertical part of the flash head) should prevent this
problem, though many photographers fail to read the instructions and
position the extender out at the very end of the flash head, where it
exerts the greatest torque.
The problem of partial illumination of the bird or
scene can occur even without the “slouching” problem described above.
For extremely close subjects, the use of a flash extender can result in
vignetting—i.e.,
dark image corners around a bright center. When
working with close subjects I always remove my flash extender to
eliminate
this problem.
Finally, it’s worth briefly addressing the “zoom” setting that’s available on many
dedicated flash units. This setting is typically given in
millimeters and represents the angle of view of a lens with the given
focal length. For example, a flash zoom setting of 50mm should
result in a cone of light sufficient to illuminate the entire visual
field as seen through a 50mm lens. The flash units I’ve used
offer zoom ranges from about 28mm to 105mm—far smaller than the focal
lengths used in typical bird photography. When using a commercial
flash extender, consult the documentation of the product to determine
the recommended zoom setting for your flash. For home-made
extenders, the optimal zoom setting will depend on the specifics of
your design, though my experience (and that of those I’ve talked to)
suggests that different zoom settings are often indistinguishable in
the field.
* I’m deeply
indebted to several local photographers from Conowingo Dam in
Baltimore, MD for the idea of building the large extender—particularly
Andy J., who loaned me his home-made extender during my trip to the dam
in 2008. My deepest thanks go to Andy for his many, highly useful
suggestions that have substantially improved the quality of my
photography. Thanks, Andy!!
|
|
|
