|
11.5 Removing
Unwanted Items
Though some may object on
ostensibly puritanical grounds, the ability to remove extraneous items
from an image—e.g., leaves, sticks, bird feeders, etc.—is one of the
great
advantages of using a powerful tool such as Photoshop to postprocess
your images. The example below speaks for itself.
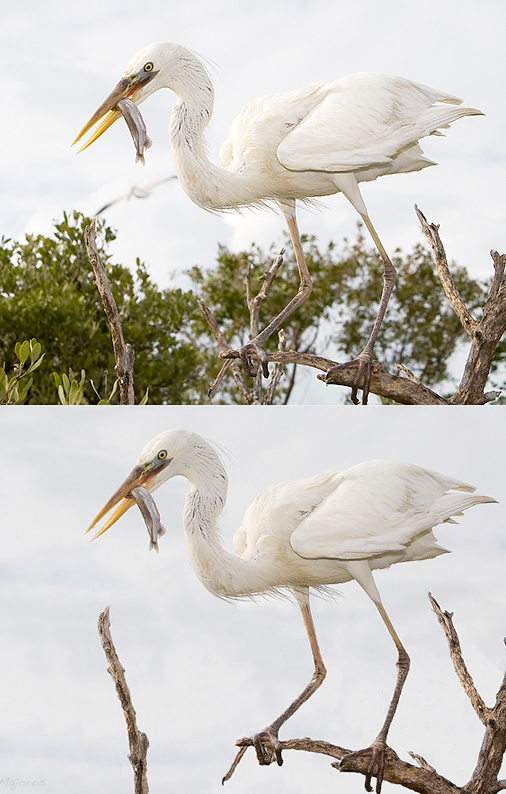
Fig. 11.5.1:
Removing distracting foliage from the background can help
to focus attention on the bird and its immediate substrate. The
Clone
Tool in Photoshop is exceptionally useful for such tasks. Cloning
onto
a new, blank layer is advisable, so that mistakes can be more easily
corrected later.
In this example, the green leaves in the background have been
painstakingly removed from the bottom image, resulting in a more
striking depiction of the bird. Indeed, this technique has the
potential to so transform the image that the bird ends up appearing as
if it was photographed in an entirely different environment from where
it was actually seen.
The primary workhorse of this technique is the Clone tool in Photoshop. On
Apple Macintosh computers, this tool allows you to choose a source
location by holding the Option
key while clicking the mouse cursor on some part of the current image
(or even another image open in a separate window); on Windows computers
a similar key combination performs the same function. Once you’ve
indicated the source location via Option-click,
you can then begin drawing at another location in the image using the
normal click-drag mouse
technique that you’ve no doubt become familiar with in your
explorations of Photoshop. Each click-drag operation with the
mouse will result in a corresponding region of the source location
being cloned (i.e., copied)
to the destination location, which is indicated by the current mouse
cursor position. At any time you’re free to re-set the source
location via another Option-click, which will then affect all
subsequent click-drag operations.
This technique can obviously be used to effect vast
changes to entire regions of an image. In the above example,
portions of the sky in the original image (top pane of the figure) were
cloned into the bottom of the image so as to eradicate all evidence of
leaves (bottom pane of the figure). This particular example
required about forty minutes of intense mouse work to fully remove all
of the leaves from the image. For the larger regions I used a
large-radius clone brush to rapidly erase vast stretches of leafy
background from the image. After this was accomplished, a smaller
clone brush was used to carefully attend to the margins of these leafy
regions bordered by foreground elements such as sticks, legs, and
toes. The figure below gives another example in which a suet
feeder was erased from the image by cloning background pixels over it.
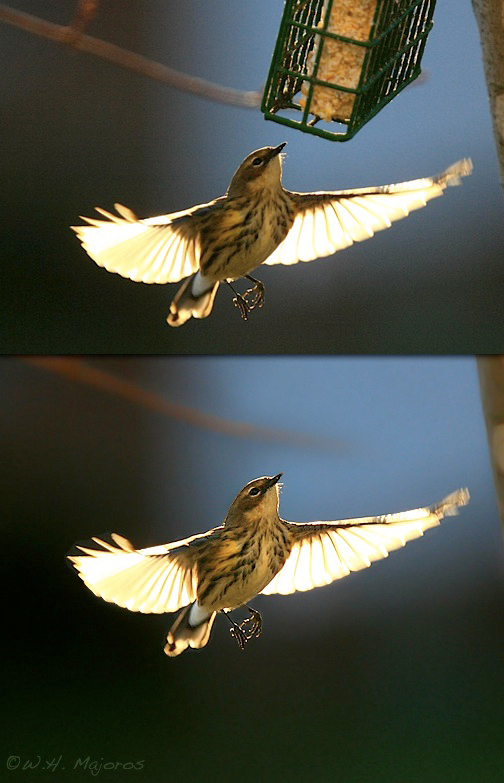
Fig. 11.5.2:
The use of the clone tool to remove distracting elements
is a very powerful technique. Just make sure you let your viewers
know that your digitally manipulated image is intended to serve solely
as an artistic rendering of the bird, rather than as true photographic
documentation of actual bird behavior or biology. Art and science
should always be clearly distinguished—except in those
cases in which
they are one and the same.
When choosing a
brush for cloning, there are a number of important considerations to
keep in mind. First is obviously the brush size. For large
areas, a large brush is obviously recommended, for the sake of
time. For careful work around the margins of the subject, a
smaller brush is advisable, as mentioned above. In both cases
(large-scale and fine-grained) you’ll want to consider the hardness of the brush
carefully. Initial work at large scales can typically use a
hard-edged brush, while closer, more detailed work often requires a
soft-edge brush for blending with foreground edges. The earlier
example in Fig. 11.5.1 provides one counter-example to the latter
suggestion: when brushing around the lower branches a hard-edge brush
was used so as to create a harder edge to the branches, making them
appear more immediate or up-front.
Cloning in Photoshop is an entire art form of its
own. A variety of techniques can be called for in creating smooth
transitions around the edges of the cloned region. The use of
soft-edged brushes is an obvious technique. I like to use a
large, hard-edged brush to do the main work, and then to clean up the
edges using a smaller, soft-edge brush, possibly with reduced opacity;
this also works fairly well for removing halos and shadows and the
like. You can also use the Blur
tool to smooth transitions
after you’ve cloned in a region from elsewhere. Be sure to view
all of your cloning work with a critical eye afterward, since it’s easy
during cloning to fail to notice obvious artifacts, such as textural
anomalies that are repeated close to each other. A combination of
edge softness and tasteful opacity can help to remove many anomalies,
but don’t underestimate the effort that may be required if you want a
truly flawless result. For images that you’ll only be posting on
the internet, a flawless result may not be terribly essential; for
large prints on expensive media (such as canvas), you’ll want to be
more exacting so as to reduce expensive re-printing costs later after
you discover the artifacts in print.
When cloning in Photoshop, I highly recommend using
a new, blank layer as the destination for the cloned pixels, rather
than cloning directly onto the existing image layer. Creating a
new, blank layer is a simple as clicking the appropriate icon in the Layers palette. You may need
to activate an option in the clone tool to allow it to clone from all
layers, or from merged
layers. Because the cloned pixels will be written to the new
layer, rather than destructively overwriting the pixels of the existing
image layer, you’ll be able to more easily modify the results of your
cloning operation later if necessary. A common example is when
cloning close to the edge of the bird: if you accidentally over-write
some of the pixels making up the bird, you can later fix the mistake
very simply by engaging the Eraser
tool, and then simply erasing the few pixels of the new layer that
occlude the bird. Because you haven’t modified the pixels of the
underlying image layer, the original pixels are still available and can
be made visible either by erasing pixels from the clone layer or by
creating a layer mask and
then masking out the offending pixels via the mask (see Chapter 13 for
instructions on using layer masks).

Fig. 11.5.3:
The parameter bar of the Clone tool in Photoshop. I only ever
modify the opacity, brush size, and edge hardness of the brush, and
sometimes
turn off the Aligned check-box. Note that some of these
parameteres can also
be set by right-clicking your mouse on the image, to bring up a
floating
dialog box.
A feature of the clone tool that bears mentioning is
the Aligned check-box.
Normally, you’ll want this box to be checked. Recall that before
cloning any pixels to the new location you had to Option-click to
indicate the source location from which the pixels would be
copied. You then performed a click-drag to copy a series of
pixels to the destination region. Each subsequent click-drag
faithfully copied pixels relative to the original source
location. That is, if you moved your mouse 50 pixels to the right
before performing the next click-drag, the source pixels would be
correspondingly taken from a location 50 pixels to the right of the
previous source location. If you were to instead uncheck the Aligned box in the clone tool’s
parameter bar, then for each successive click-drag, the source location
for the cloned pixels would revert each time to the original point
where you had Option-clicked. This latter behavior can be useful
if you want to clone the same texture to a multitude of
locations. Most of the time, however, you’ll want to keep the Aligned box checked.
Note that the Clone
tool isn’t the only way to clone image elements. You can also
select a region with your favorite selection tool (see section 10.6),
copy that region to a new layer via Cmd-J
/ Ctrl-J, and then drag that
region to a new location via the Move
tool. We used this technique in section 11.2
to copy textures
into areas of an image that suffered from clipped highlights. One
advantage of this alternate technique is that you can also rotate the
cloned layer and adjust its opacity if necessary.
As already mentioned, an important issue in cloning
is to make sure that you don’t introduce obvious artifacts, such as via
repeated elements. After performing extensive cloning, it’s often
worthwhile to follow this with a second round of cloning (preferably on
a new, blank layer) in which you attend more carefully to the issue of
repeated elements. Whenever you identify a case of blatantly
repeated pixel patterns in the cloned region, during the second pass of
cloning you can obliterate one copy of the pattern via another cloning
operation (from a different source location, possibly with lower
opacity and multiple passes of the mouse cursor).
Not all uses of the Clone tool need be as dramatic
as those exemplified above. In the figure below we show the use
of this tool to remove a shadow around the bird.

Fig. 11.5.4:
The clone tool can also be used to remove shadows and other
halo-like artifacts from your image. In the top pane, the bird
has a shadow
along its leading edge, due to the ghosting effect of ambient light
(the bird
was frozen via a short flash duration). In the bottom pane, much
of the
shadow has been erased by cloning in background pixels from nearby.
In this example, the bird in the top pane shows a shadow, primarily
along its direction of forward motion. The bird was frozen in
flight by an extremely short flash duration, but because the ambient
light was comparable in brightness to the flash, a ghosting effect
occurred. In the bottom pane we’ve removed most of the shadow via
the Clone tool. In this case, areas of the background were cloned
in close to the bird to erase the shadow. A Clone brush of
between 5 and 10 pixels was used, initially with a hard edge to cleanly
paint around the bird’s contour, but then with a soft edge to restore a
smooth gradient further out.
Note that the source and destination of the cloning
operations used in the previous example were mere pixels apart, and in
some cases even overlapped slightly. When the source and
destination are so close, you’re effectively pushing pixels, or smearing them, in some
direction. Photoshop has a tool which is dedicated to such
small-scale smearing applications, called the Smudge tool:

The Smudge tool is what may be referred to as a blunt instrument—it can be useful
when making an initial stab at correcting a problem with an image, but
will usually require follow-up work using some other tool providing
greater precision or subtlety.
Note also that the shadow in the above example is
somewhat reminiscent of the types of artifacts that sometimes occur
when you separate the bird from the background and apply filters such
as noise reduction to the
background. A halo or
shadow often results, due to edge
effects of the filter. These can sometimes be prevented
from occurring by locking the transparent pixels in the layer, and/or
by erasing a thin band of pixels around the subject that has been
spliced out into another layer. If you still end up with a halo
effect, you can use the above cloning technique to manually paint away
the artifact.
Another type of
artifact that you’ll often want to remove in postprocess is dust spots—small, dark circles resulting from
dust specks on your imaging sensor (see section 2.8
for instructions on
cleaning dust from your imaging sensor). The Spot-healing brush is extremely
handy for this task (you can also remove blemishes using a similar tool
in ACR, or using the Clone tool
in Photoshop, but the Spot-healing
brush in Photoshop is typically the easiest). Set the brush size
to be slightly larger than the dust spots, and simply click once on
each spot. In rare cases the Spot-healing
brush will do a poor job of matching the replacement pixels to the
surrounding area, and in these cases you can use the Clone tool with a soft-edged brush
to clone over the dust spot from an area just a few pixels away.

Fig.
11.5.5: Some dust spots are hard to find during postprocessing.
Using
the Hand tool to rapidly move the image back and forth can help your
eye to
pick up these cryptic defects. Keeping your fingers on the H and
J keys will
allow you to switch rapidly between the Hand tool and the spot-healing
brush.
It’s easy to
miss a few dust spots during post-processing, especially when you’re
concentrating on fixing more obvious issues. Some dust spots are
indeed very subtle (such as the one circled in red in the above
figure). One method for finding the more subtle spots is to
invoke the Hand tool and then
“shake” the image by dragging it back and
forth very rapidly with the mouse (you may need to press the F key a
few times to get into Full Screen
mode). If you keep your fingers on the H and J keys, you
can rapidly switch between the Hand
tool and the Spot-healing
brush, allowing you to find and fix all of the dust spots in the
image in no time flat.
Other elements that you may wish to remove via
cloning are plumage defects (such as missing feathers), parasites (such
as bird ticks), and dirt adhering to the bird’s feathers. As
always, keep in mind that once you start using the Clone tool to fix
blemishes in the image, you’re no longer working with a photograph, but
rather an idealized, artistic rendering of the bird. Be sure to
make plain to your viewers that the image has been subjected to digital
manipulation, and is intended to be viewed as art, rather than as
photographic documentation of reality. As long as you do so,
there’s absolutely nothing wrong with making these types of digital
manipulations in the name of pure aesthetics.
|
|
|