2.2
Point-and-shoot Cameras: Digiscoping
For many birdwatchers,
the easiest
way to get your feet wet with digital bird photography is via what has
come to be known as digiscoping—i.e.,
using a small, “point-and-shoot” camera in conjunction with a
spotting
scope in order to capture magnified images of birds as they appear
through
the scope. Since many birdwatchers already own spotting scopes,
this is
often a very economical way to “try out” bird photography: if after
trying it out for a while you decide that you get more enjoyment out of
merely looking at the birds
(without all the fuss and bother of also
trying to photograph them), you won’t have wasted much money on
specialized photographic gear.
Figure 2.6 illustrates the basic concept
of digiscoping. Upon finding a bird, you would focus your
spotting
scope on the bird by looking directly into the eyepiece and adjusting
the scope’s focusing mechanism until the bird appears to be in
focus.
You then remove your eye from the eyepiece and place your camera
(typically an inexpensive point and
shoot, or P&S,
camera) up to the eyepiece where your eyeball had been just a moment
ago. Finally, you press the shutter-release button on the camera and
snap the photo. Alternatively, you might watch the LCD screen on
the
back of the camera while holding the camera up to the eyepiece, to wait
for the bird to do something interesting, before snapping the photo.
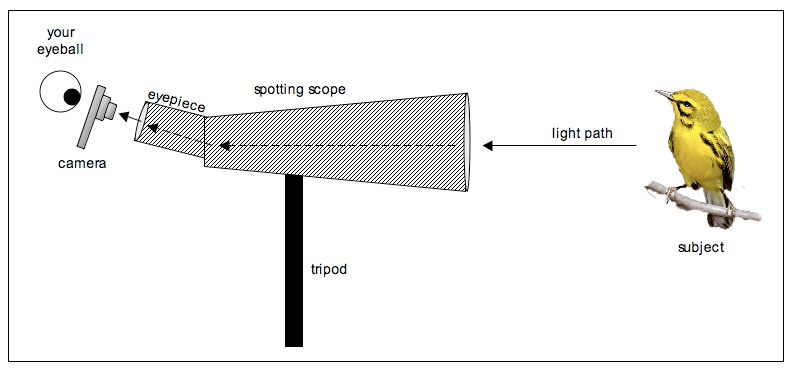
Fig. 2.6:
The concept of digiscoping. A simple,
point-and-
shoot camera is held up to the eyepiece of a spotting scope
in order to capture the image as seen through the eyepiece.
This is the TTE (through-the-eyepiece) form of digiscoping.
There are a
number of important things to note about the figure above. First,
I have not
depicted the manner in which the camera is held up to the eyepiece of
the scope. In traditional digiscoping, this is accomplished by
simply
holding the camera in your hands; this obviously requires steady hands,
since any significant movement or tremor during the exposure will
result in a blurry image. As we will discuss shortly, there are more
reliable alternatives to simply holding the camera in your hand during
digiscoping.
There is also the issue of magnification.
A spotting scope will provide
considerable magnification beyond what any P&S camera will be
natively capable of providing. Most spotting scopes have a zoom control, which varies the
magnification as seen through the eyepiece, but the camera itself may
also provide some zooming capability—whether optical zoom or digital
zoom (or both). Generally speaking, digital zoom (in the
camera, not on your computer) is a gimmick
that should be avoided entirely; all this feature does is to blow up
the pixels and make them larger, which you can easily do (and with more
control) later in software (i.e., after you’ve uploaded the photos from
the camera into the computer).
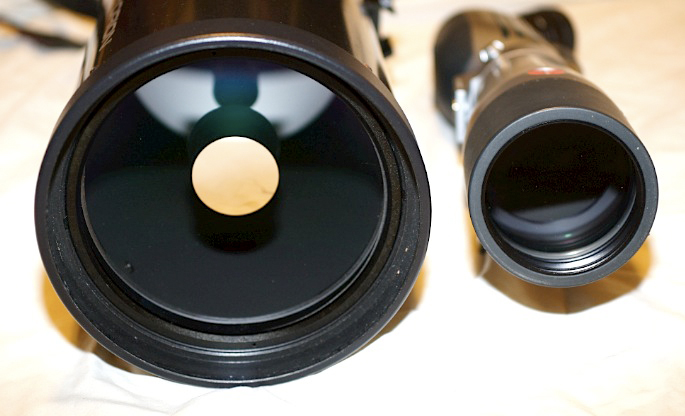
Fig. 2.7: An
astronomical telescope (left) versus a typical spotting scope (right).
The astronomical scope is a 150mm Orion Maksutov, which runs about $600
US;
the spotting scope is a 77mm Leica Televid APO, which runs about $1500
US.
Note that when the diameter doubles, the light-gathering capacity
quadruples.
The magnification through a spotting scope typically
ranges from 20x to 60x. For birds further away—such as the bald eagle nest shown
below in Figure 2.8, which was about three football-field lengths away
from
the camera—more magnification is
needed. For
magnifications in the 100x to 300x range, an astronomical telescope can
be an
effective and economical solution. Maksutov or Schmidt-Cassegrain telescopes with
a 5 or 6
inch diameter can be had for about $500 US, and these collect enough
light to support magnifications of over 100x (via a combination of
eyepieces and 2x barlows),
though they are bulky and heavy and can therefore be very difficult to
lug out into the field.
 Fig. 2.8: Bald
eagle nest photographed through an astronomical telescope. The nest was
about
Fig. 2.8: Bald
eagle nest photographed through an astronomical telescope. The nest was
about
three football-field lengths away. A 6-inch Maksutov telescope was used
to obtain high
magnification without losing light. Nikon D50 (6
megapixels) with Sigma 50mm lens.
The camera’s lens was hand-held against the scope’s eyepiece.
Keep in mind
that higher magnifications generally result in a narrower field of view—that is, as you increase the
magnification you see more detail on the bird, but you see less and
less of the surrounding landscape due to the “telescoping”
effect. You also reduce the brightness of the image. In the
case
of astronomical telescopes (and a number of high-end spotting scopes),
eyepieces can be exchanged as easily as lenses on a DSLR camera, and
this provides the preferred means of changing magnification. Zoom
eyepieces may be convenient for framing
the shot (i.e., choosing the zoom level which gives the most pleasing
magnification and field of view), but they tend to degrade image
quality; a non-zoom eyepiece will generally give you a sharper image
than a zoom (and we’ll see in section 3.2 that
this is also generally
true of zoom versus prime
lenses in the case of true DSLR lenses). In terms of the amount
of
light collected by the telescope, even large-diameter Maksutov and
Schmidt-Cassegrain scopes can provide too little light for effective
bird photography on cloudy days or in shade, as many of them operate in
the neighborhood of f/12 (we
haven’t defined f-numbers
yet, but will do
so in section 3.1).
A major difficulty in digiscoping is that of holding
the camera steady. A number of manufacturers now sell mounting hardware
that you can use to firmly fix your P&S camera in the appropriate
position over the eyepiece of the scope. This solves the
steadiness
issue (for the camera, at least, though not for the telescope) but
renders the entire rig somewhat less convenient when bird watching is the primary objective
and bird photography only the
secondary objective, since frequently mounting and unmounting of the
camera can become tiresome. An additional advantage, however, is
that with the mount you may be less likely to damage either the
telescope’s eyepiece or the camera’s lens by inadvertently grating the
two together. The prices for these mounts range from about $15 US to
$350 US.
When the camera being used for digiscoping is a DSLR
rather than a simple P&S model, there is an additional (and
potentially very significant) advantage to using a specialized camera
mount. In traditional digiscoping, the light path passes through a very
considerable amount of glass: there is the main objective lens of the
scope as well as any other lenses, prisms, or mirrors within the main
body of the telescope; then there is the eyepiece, which may comprise
10 or more individual glass elements in the case of zoom eyepieces; and
then there is the built-in lens on the body of the P&S camera,
which may utilize a number of distinct glass elements. Every time the
light path passes into yet another glass element, some of the light is
lost due to reflection, resulting in both diminished brightness and
also loss of image quality; also, since all of those glass elements
have to be precisely aligned at the factory during manufacturing,
systems with larger numbers of optical elements tend to show greater
variability in alignment accuracy (and resulting image quality), and
may be more vulnerable to being knocked out of alignment during normal
use in the field.
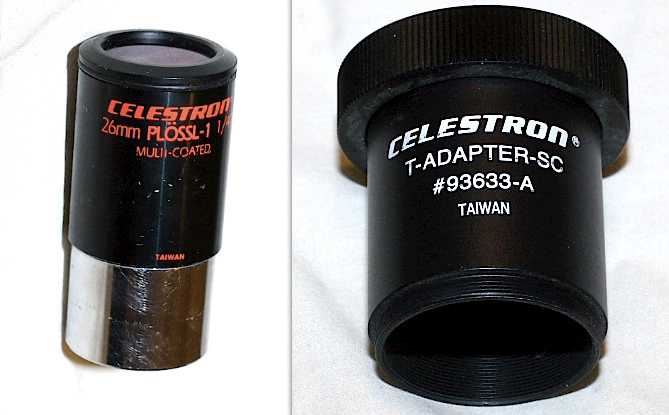
Fig. 2.9:
Eyepiece (left) and T-adapter (right). By removing the eyepiece from a
telescope and installing a T-adapter and T-ring (not shown), the
telescope will
directly mount onto a DSLR just like a normal lens (minus autofocus
capability).
Special camera mounts are available for many scopes
which allow you to remove both the scope’s eyepiece and the camera’s
lens (if it’s a DSLR), so that the scope body (minus eyepiece) acts as
a dedicated camera lens. This often reduces quite substantially the
number of glass elements through which the light path must pass, and
results in noticeable improvements in image quality. In the case
of
astronomical telescopes, these mounts are typically known as T-rings (which attach to the
camera) and T-adapters (which
attach to the scope); the T-ring firmly attaches to the T-adapter, so
that the camera and scope are firmly fixed together. In addition to
reducing camera shake, these mounts also help to ensure that the
camera’s focal plane is properly aligned to the scope’s focal plane,
which is extremely difficult to ensure when simply holding the camera
up to the eyepiece with your hands.
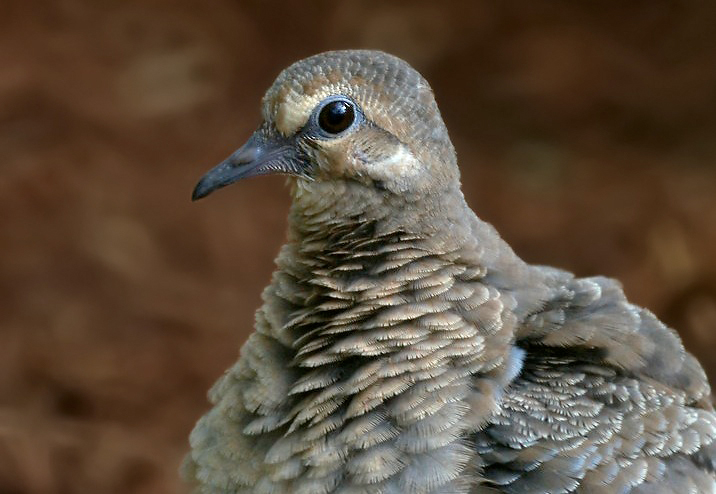
Fig. 2.10:
Mourning Dove digiscoped using a Nikon D50 (6 megapixels) attached
to a 6-inch Maksutov telescope (fixed aperture f/12) via a $15 T-ring.
The camera’s
lens and the telescope’s eyepiece were removed from the light path,
producing a
sharper image. Effective
focal length was 1800mm (not counting the camera’s 1.5x
crop factor). 1/200 sec, ISO 400.
Figure 2.10
shows a Mourning Dove (Zenaida
macroura) photographed through a 6-inch Maksutov telescope with
the camera attached directly via T-ring/T-adapter (i.e., with the
camera’s lens and the telescope’s eyepiece removed from the light
path). Note that this image has been processed in Photoshop;
nevertheless, it provides some indication of the amount of detail which
can be captured via digiscoping. Mourning doves are among the
easiest
of birds to photograph, since they tend to remain perfectly still for
long periods of time, and are often quite tame. Digiscoping of
birds in motion—especially birds in flight—is a challenge I have not
personally been able to successfully meet.
Fig. 2.11: A
Canon 30D camera (at left) attached to a 6-inch astronomical
telescope via a T-ring and T-adapter. An enormous rig like this must be
tripod-mounted due to weight and optical leveraging.
An
additional
note is in order, regarding the large magnifications achievable via
digiscoping. Because spotting scopes and astronomical telescopes
generally do not offer any sort of image
stabilization (section 3.5) feature such
as
those found on high-end camera lenses from Canon, Nikon, and other
manufacturers, the use of high-magnification scopes can result in
frequent image blur due to the phenomenon of optical leveraging—i.e., the fact that small
vibrations due to hand tremors or even the slightest breeze get
magnified into large shakes that blur the image, with the magnitude of
the resulting shake being a direct effect of the magnification factor
of the scope. The issue is, unfortunately, compounded by the fact
that higher magnifications are accompanied by an increased need for
light, so that on any but the brightest of days, the camera will be
forced to resort to slow shutter speeds to gather enough light for a
proper exposure. A complete discussion of light, shutter speed,
and
image blur is postponed to Chapter 6. For the time being, note
simply
that obtaining tack-sharp, properly exposed images via digiscoping can
require substantially more skill, effort, and luck than via traditional
telephoto lenses, especially those supporting autofocus and image
stabilization functions.
A few more examples of images digiscoped through my
6-inch Maksutov telescope with a 6 MP camera are shown below.
Note that the strange background artifacts in the second image are the
result of using a mirror lens
(see section 3.14).
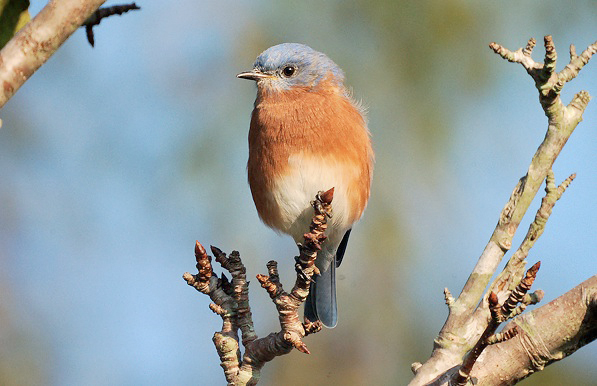
Fig. 2.12:
Eastern Bluebird (Sialia sialis) photographed through a $600
astronomical
telescope (1800mm focal length) with a 6 MP camera (Nikon D50).
This was one of
my favorite early photos, and I still have a large, framed print of it
in my home.
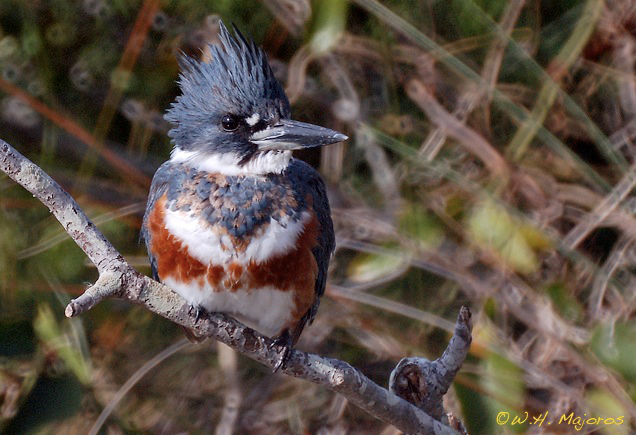
Fig. 2.13:
Belted Kingfisher (Megaceryle alcyon) photographed through Maksutov
telescope with 6 MP camera. Background artifacts (doughnuts,
etc.) like those visible
here are also seen when using cheap, mirror lenses. 1800mm, f/12,
1/250 sec, ISO 400.
|