|
| Whereas Part I of
this book provided guidance on buying the equipment you need
for high-quality bird photography, Part
II gives instruction on the
effective operation of that equipment. We begin with the
technical
aspects of operating the camera and the external flash so as to capture
sharp images that are properly exposed
(i.e., well-lit). After
this
we expand the discussion to a broader range of practical issues that
are relevant when shooting in the field, such as choosing the right
angle and composition, making
the best use of light and background
colors, and capturing the bird in the ideal pose. We’ll conclude Part
II with some pointers on turning your yard into an aesthetic
bird-photography studio. |
Chapter
6
Operating
the Camera
In
Chapter 2 we reviewed the basic technology underlying today’s
DSLR’s.
As we now consider the effective operation of the camera in the field,
we’ll rely on a number of concepts introduced in that earlier
chapter.
Though we’ll briefly review essential concepts where necessary, it may
be useful to skim through Chapter 2 at various points
in order to most effectively digest the material presented here.
6.1
F-stops, Shutter Speeds, and ISO
The very first task in learning to
use your DSLR is to master the skills involved in obtaining a good exposure—that is, in getting a
photo in which the bird is lit well
enough that you can discern sufficient detail in the bird’s plumage and
other features. Of course, the “correct” exposure of a bird
depends to a very large degree on what you’re trying to achieve,
aesthetically, with the image that you’re crafting: you may want the
scene to have a dreary, subdued mood, or you might be trying to achieve
a “high key” effect in which the photo is
excessively bright, for
artistic reasons. For now, however, we’ll concentrate on the more
basic task of maximizing the amount of detail visible in the bird, and
leave the more artistic considerations for later.
As explained in Chapter 2, there are three
settings that you can manipulate in the camera in order to affect the
exposure (brightness) of an image: the aperture, the shutter speed,
and the ISO setting.
The aperture is the easiest to understand:
a wider hole, or aperture, will let in more light per unit time,
resulting in brighter images. The aperture that we’re talking
about here is the diaphram
(or iris) located within the
lens.
This diaphram can be opened or closed to varying sizes, resulting in
changes to the amount of light that passes through the lens.
Recall from section 3.1 that a larger aperture
(wider hole) corresponds
to a smaller f-number; thus, f/8 lets in more light than f/11.
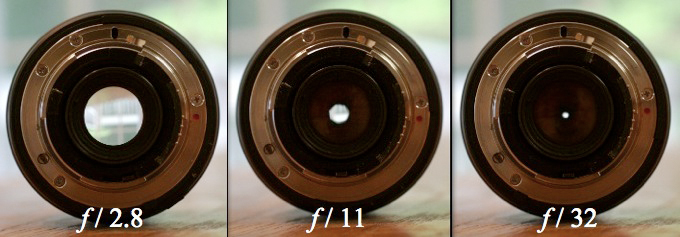
Fig. 6.1.1 :
F-numbers and aperture are inversely related. As the f-number is
varied from
2.8 (at left) to 32 (at right), the aperture decreases in size.
This is counter-intuitive, but it’s
absolutely essential to remember this fact when shooting in the
field. Otherwise, you’ll
find yourself adjusting exposure parameters in the wrong direction,
resulting in useless shots.
Light passing through the lens (and diaphram) only
reaches the imaging sensor when the shutter is open, and the amount of
time that the shutter is open is dependent on the shutter speed.
Obviously, if the shutter opens and closes very quickly, less light
will reach the sensor than if the shutter opens and closes
slowly. Thus, a faster shutter speed results in a darker exposure.
Fig. 6.1.2 :
The three exposure parameters in DLSRs (left-to-right): ISO, shutter
speed, and aperture.
The aperture limits light via space constraints, the shutter speed
limits light via time constraints,
and the ISO setting artificially amplifies the signal (and noise) from
the imaging sensor after
exposure has already taken place.
Finally, we have the ISO setting. Recall from
section 2.5 that the ISO setting controls the
amount by which the
analog output of the sensor (the signal,
as well as any attendant noise) is amplified before being converted to
digital pixel encodings. Because higher signal
values result in brighter pixels in the resulting image, turning up the
ISO (i.e., increasing the amount of amplification) will cause the
resulting image to look brighter (though possibly also noisier).
We thus have the following simple rules:
If
you want a brighter image...
|
If
you want a darker image...
|
| decrease
the shutter speed |
increase
the shutter speed |
enlarge
the aperture
(decrease the f-number) |
constrict
the aperture
(increase f-number) |
increase
the ISO
|
decrease
the ISO
|
Table. 6.1.1 :
The Fundamental Rules of Exposure.
Note that if you’re shooting in
Manual Exposure mode, you can apply these rules
directly. However, if you’re shooting in
one of the Automatic Exposure modes
(section 6.3) you’ll instead need
to adjust a pseudo-parameter called “exposure
compensation”, because in
the Automatic Exposure modes, the camera tries to
maintain a constant brightness by trading off one parameter for
another. All of
this is explained in section 6.3.
For example, if you take a photo
(in manual exposure mode—section 6.3)
and then, upon
reviewing the image on
the camera’s LCD, decide that it’s too dark, you can make sure the next
photo (of the same scene) turns out brighter than this one by either
increasing the ISO,
enlarging the aperture (i.e., using a smaller f-number), or decreasing
the shutter speed (or some equivalent combination). If after
making the adjustment(s) to these settings, you find that the next
photo is still too dark, then you can simply adjust one or more of the
settings further and try again, and repeat this process until you get
an image that has just the right amount of exposure. This
trial-and-error process may seem slow and wasteful, but in time (with
experience in the field) you’ll get better at adjusting these three
settings rapidly and in the proper amounts, so as to hone in on the
right values with fewer trials.
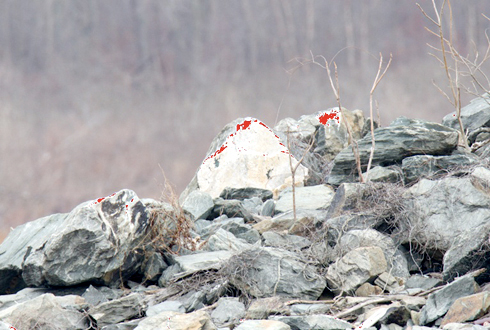
Fig. 6.1.3 :
Finding the right exposure settings via highlight alerts. This
rock was
the whitest object I could find at the beginning of a shooting session
at a bald eagle
hotspot. Adult bald eagles have white heads, so I chose my
exposure parameters
so as to avoid overexposing white objects. The red indicator
pixels show that
I was clipping some highlights. After seeing this on my camera’s
LCD, I turned
down the exposure until the highlight alerts indicated no clipping of
highlights.
Now we need to consider some of the complications
involved in adjusting these three parameters (aperture, shutter speed,
ISO). The good news is that there isn’t a single, unique
combination of the three parameters that results in the “correct”
exposure. Once you’ve found a setting that gives you an exposure
that you like, it’s possible to change two or more of the parameters
(in the proper way) and still get the same overall level of
brightness. For example, if you were to turn the f-number down
one “click” on your camera’s aperture dial
(say, from f/8 to f/7.1),
and then turn the shutter speed up
one click on your camera’s
shutter-speed dial (say, from 1/320 to 1/400), you should find that the
resulting exposure hasn’t
changed. That’s because the larger aperture (smaller f-number)
has been counterbalanced by the increase in shutter speed. This
is called reciprocity. Reciprocity works by trading off “stops” of light between
parameters. A stop of
light corresponds to a doubling/halving of the shutter speed (or ISO),
or multiplying/dividing the f-number
by 1.4 (the square root of 2). In practice, you can usually
forget about the exact definitions (multiples of 2 versus 1.4) and just
think in terms of clicks on the parameter dials.
So the good
news is that you’re not looking for a
needle in a haystack: a number of different combinations of ISO /
aperture / shutter speed will typically give you a good exposure, and
you just need to find one of
those combinations. The bad news is
that there are secondary effects of adjusting these parameters—that
is, other effects besides just changing the exposure. As we
explained in section 3.7, for example,
enlarging the aperture not only
increases the amount of light collected, it also results in a shallower
depth of field
(DOF). Sometimes you’ll want to do both (increase
brightness and decrease DOF), and in those cases you can achieve that
by adjusting the aperture. If, however, you don’t want to
change the DOF, then you’ll have to resort to changing one of the other
two parameters (ISO or shutter speed) in order to adjust the exposure.
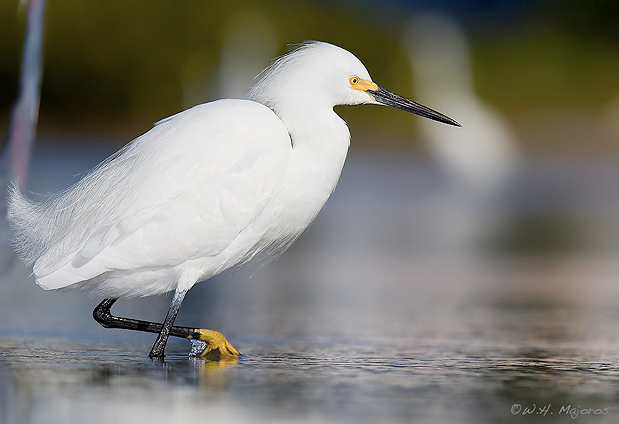
Fig. 6.1.4 :
Snowy egret in a shallow depth-of-field (DOF). Because I wanted
to isolate my
subject, I set my aperture very wide, and then calibrated my
exposure by adjusting the
shutter speed and ISO (but not the aperture). When one of the
exposure parameters is
constrained for artistic reasons, adjusting the brightness has to be
done using the other
parameters. (1/1250 sec, f/6.3, ISO 125, 600mm, manual
mode, TTL flash at +1
FEC).
Similarly, changing the ISO or shutter speed can
have other effects on the resulting image. Increasing the ISO can
increase the noise level (as explained in section 2.5),
while
decreasing the shutter speed can decrease the sharpness of the image,
due to motion blur. Thus, the challenge is in finding the
combination of these three parameters which gives you an acceptable
exposure, without producing too much noise (via high ISO) or motion
blur (via low shutter speeds); in addition, if you’re trying to achieve
a specific effect via DOF (such as isolating the bird via a shallow
DOF), then you’ll want to find a combination of parameters that doesn’t
violate your desired DOF.
To make matters worse, there are limits on how high
or low you can set each of these parameters, and it’s not uncommon to
run into some of those limits in the field. Native ISO values are
typically limited to a range of 100 to 1600; “expanded” ISO
ranges typically are only “simulated” and should generally be avoided
if possible. Apertures are likewise limited at both the high and
low ends of the range, though it’s the upper limit that is most often
encountered in the field, since the objective lens diameter limits how
wide the aperture can be made. Though shutter speeds are also
limited at the high end (typically 1/8000 sec for pro bodies) as well
as at the low end (typically 30 seconds), in practice you’ll want to
avoid going below 1/125 or 1/160 sec (plus or minus, depending on
whether you’re using a tripod and/or image stabilization) in order to
avoid image blur (or 1/640 to 1/1600 for birds in flight, or even just
small birds frantically foraging).
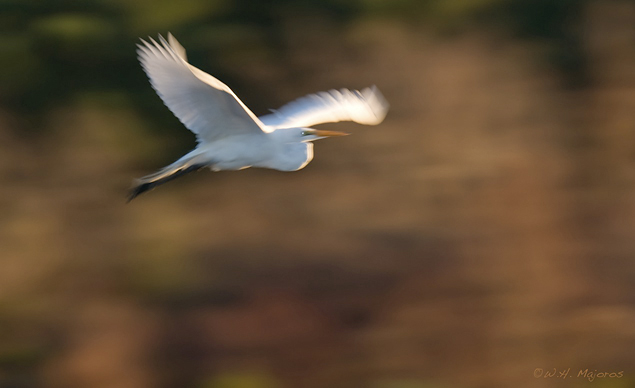
Fig. 6.1.5 : In
intense shooting situations, you need to be able to change exposure
parameters quickly, and correctly, without exceeding key limits.
For this shot,
I got a reasonable exposure (clipping some of the highlights on the
back of the
bird in order to make details visible on the underside), but I allowed
the shutter
speed to go too low, resulting in motion blur. Fortunately, the
image ended up
having a dreamy, artistic effect that I like. Notice the
eye-shine from my flash,
which normally I'd fix in Photoshop. (1/50 sec, f/10, ISO 125,
600mm, Av with
-1 EC, TTL flash)
Fortunately, as we’ll see in section 6.3, there are
several exposure modes that
you can use to make it easier to manage
the three parameters affecting exposure. What you’ll typically
find in the field, however, is that you only need to search for your
optimal parameters at the beginning of the day’s session, and then to
gradually adjust individual parameters a little bit throughout the
session, as the lighting changes (i.e., as cloud cover comes and
goes). Furthermore, if you do most of your birding at the same
place several days in a row, you’ll often find that establishing your
initial settings at the start of each session is easier, since they’ll
likely be the same settings you used at the start of yesterday’s
session, and may be just a few “clicks” (on the parameter dials on your
camera) away from whatever setting the camera was left in when you
turned it off at the end of the last session.
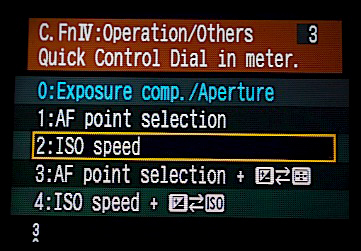
Fig. 6.1.6 :
Changing the behavior of the “thumb dial” on
the Canon 1D Mark III. For some situations I like to
set it to control ISO. Another menu option allows me
to swap it between shutter speed and aperture.
One trick that
can help you to become faster at adjusting exposure parameters is to
reassign the camera’s dials and buttons (if your camera allows you to
do that) to particular exposure parameters, depending on your shooting
style and exposure mode. For example, if you find that in a
particular birding situation you tend to adjust the ISO and aperture
more often than you adjust the shutter speed, then you could assign
those two parameters (ISO and aperture) to the two dials or joysticks
on your camera that are most easily within your reach. My current
camera has two dials, and I typically assign shutter speed and aperture
to these; adjusting the ISO can then be done by first pressing a button
and then turning the dial that normally changes the shutter
speed. However, if I’m birding in a dim environment, such that
I’m limited primarily by my shutter speed, then I may set the shutter
speed to its lowest practical value (say, 1/160 sec) and then assign
the two dials to ISO and aperture. Unfortunately, not all cameras
allow you to reassign their controls in this way.
Note that when trying to freeze birds, a faster
shutter speed isn’t always the ideal solution. As previously
mentioned, birds in flight often need a shutter speed of 1/640 to 1/800
sec for slow-flapping birds or 1/1600 to 1/2000 sec or faster for
fast-flapping birds. Even the fast head movements of foraging
birds (especially warblers and small shorebirds) can require speeds of
1/1600 or more to freeze. When these speeds aren’t feasible, due
to exposure constraints, flash can sometimes be used to freeze the bird
by keeping ambient light low and using a short flash duration (see section
7.7). In the case of foraging
birds (i.e., those not in flight),
if you’re already using flash for fill light then it’s often preferable
to keep your shutter speed below the sync
speed (to maximize effective flash output and minimize recycle
time), and just try to get the bird while it’s not moving. I’ve
found that for shooting frantically feeding warblers, 1/1600 sec
sometimes isn’t fast enough to eliminate motion blur, so I instead
shoot at 1/300 sec (the sync speed of my camera) and take lots and lots
of photos in hopes of getting the occasional lucky shot when the bird
is perfectly still. This is sometimes the only way to fully
dispel the shadows in the scene. Flash is dicussed in greater
detail in Chapter 7.
|
|
|


