|
Chapter
4
Accessories
While the choice of a good camera and a good
lens (or lenses) are paramount to beginning your career as a serious
bird photographer, there are a number of important accessories that you
should at least be aware of, even if you don’t need (or can’t afford)
all of them right away. Of these, the two most important are,
without a doubt, the tripod
and the external flash.
In this chapter we’ll consider both of these important accessories in
detail, with the emphasis on explaining their utility and offering
advice on purchasing the ideal model(s) for your situation. In
the case of external flash, instruction on the proper operation of the
unit will be deferred to chapter 7. The present chapter will
also briefly review a number of other, less sophisticated but
nonetheless
important accessories that you may at one point need to consider
purchasing or upgrading.
4.1
Tripods
For lenses that are either long,
or heavy, or both, the use of a tripod (or monopod) may be necessary,
or at least desirable. The use of a tripod can potentially
improve image sharpness (by reducing camera
shake), reduce muscular
fatigue during long sessions in the field, and potentially
reduce the chances of equipment damage due to accidents (i.e., dropping
the lens on a hard surface). These benefits depend, of course, on
the particular tripod selected, and on its proper use in the field.
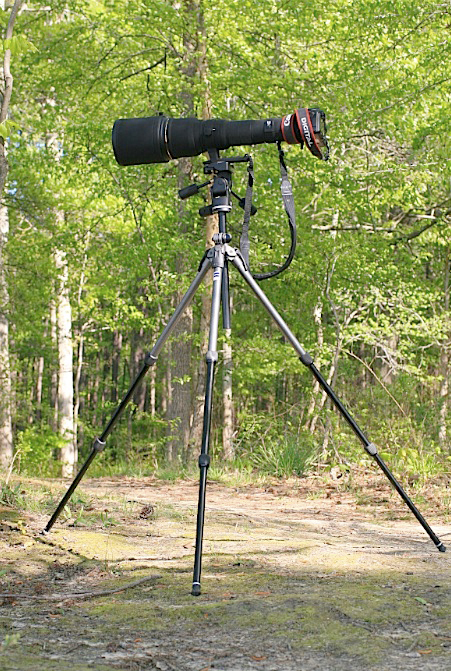
Fig. 4.1.1: A tripod supporting a large lens.
Tripod quality is affected by a number of factors,
including strength, ease of adjustability, maximum
height, and maximum leg angle.
An obvious first question is whether you need any tripod at all.
Though some authors would frame this question in terms of focal length (i.e., whether the
focal length of your lens is large enough to warrant using a tripod), I
feel that in practice it’s best considered simply in terms of weight. If your lens weighs
more than, say, about 4 lbs, and if your biceps are significantly
smaller than those of Conan the Barbarian, then you will almost
certainly want to keep your lens tripod-mounted, at least during
extended periods of heavy use in the field. Any 500mm f/4, 600mm f/4, or 800mm f/5.6 lens will need to be
tripod-mounted for extended
use, since these typically weigh over 8 lbs. In contrast,
400mm f/5.6 and some 500mm f/5.6 lenses are ideal for
hand-holding
(i.e., with no tripod or monopod), due
to their light weight (3 to 4 lbs) and small overall size. The
somewhat larger
400mm f/4 and 400mm f/2.8 lenses typically require a
tripod, with the
exception of the Canon 400mm f/4
DO (Diffractive Optics) lens, which
utilizes a special
optical design that renders the lens much lighter (~4 lbs) and less
bulky than what would otherwise be possible. Note that even
hand-holding a 4 lbs lens (plus camera and external flash) can be a bit
challenging for some individuals, depending on their overall physical
strength and stamina.
In practice, it’s a good idea to have a tripod (or
monopod) readily on hand, even if you don’t expect to use it
much. Most tripods can be collapsed so as to be very portable,
and even with small focal lengths (i.e., 400mm) it’s not uncommon at
some popular birding sites to encounter large birds that remain
stationary for long periods of time; for these it’s useful to be
able to mount the lens on a tripod while waiting for the bird to do
something interesting.
4.1.1
Tripods Versus Monopods
While tripods should be familiar
to most readers, monopods
might not. The difference is simple (if
not obvious from their respective names): a tripod has three legs,
while a monopod has only one. In practical terms, one consequence
of this differences is that a tripod-mounted lens can be considered “hands free”, while the monopod can’t: if for
some reason you need to
step away from your main lens (perhaps to use a second camera mounted
with a hand-held flight lens),
you’re free to do so when using a tripod, but not so with a
monopod. For this reason, I prefer to use a tripod rather than a
monopod for my big 600mm and 800mm birding lenses.
However, there are specific circumstances in which a
monopod can be a better choice than a tripod. The first is when
trying to get flight shots of birds that spend most of their time
perched and only occasionally take to flight. While the bird is
perched, you may want to keep your camera trained on the bird so that
you’re ready to begin shooting as soon as the bird jumps from the
perch. Without a tripod or monopod, the effort of holding up the
camera and lens (even a small lens) will start to strain your muscles,
eventually causing muscular tremors that can result in blurred images
when the bird does finally fly. Though a tripod would typically
provide a steadier support in these cases, a monopod may be preferable
for the increased freedom of movement when tracking the bird in
flight. Rotating your body around a tripod while tracking a bird
can be very difficult, due to the potential for tripping over the
tripod’s legs. And with a light enough monopod there may be the
option of just lifting the entire
camera/monopod assembly off the ground when the bird takes to flight,
effectively transitioning to a hand-held mode precisely when hand-held
work is called for.
There is another practical, if unconventional, use
of the monopod that is worth mentioning here. A number of bird
photographers have started to use the monopod in a novel way, which I
refer to as the “halfpod” technique. Rather than
extending the
monopod fully and setting its foot firmly on the ground, these
resourceful birders have found that by compacting the monopod down to a
single arm-length section, they are presented with a number of
additional options for supporting their lens in the field. One of
these options, illustrated in the photo below, involves planting the
foot of the shortened monopod (or “halfpod”) into the photographer’s
midsection, or supporting it via a belt worn at the waist.
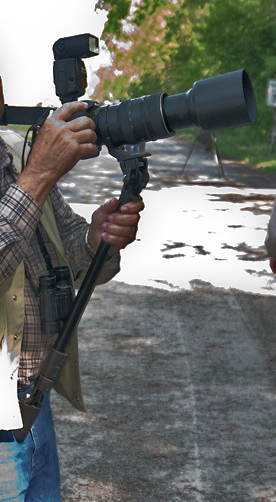
Fig. 4.1.2: The
“halfpod”
technique. A compacted
monopod is anchored in the photographer’s mid-
section, providing support for the lens while also
affording greater mobility to the photographer.
(Thanks to Ed Keenan for posing for this photo!)
In this particular case, the
photographer is using a belt-mounted flashlight
holster (manufacturer: BlackHawk),
as used by U.S. military and police personnel. The foot of the
monopod not only fits in the flashlight holster, but snaps into it and
stays put, simplifying the task of adjusting leg height
on-the-fly. Finding an appropriate receptacle with such a perfect
fit for your particular monopod, may, of course, require some effort.
The advantage of this setup is that the photographer
is highly mobile,
and can very rapidly move about in the field while following a bird,
without having to re-plant the foot of the monopod on the ground after
every step. Also, the photographer is better able to quickly
apply
large or small adjustments to the lens’ position and angle (both
horizontal and vertical) while
tracking a swiftly moving bird. Note in the illustration above
that the camera is also on a neck strap, providing an additional level
of support and safety. Obviously, since all of the support for
the camera is provided by the photographer’s body, some additional
muscle strain may occur (i.e., use at your own risk).
I’ve also seen the “halfpod” technique used with
big, 500mm f/4 lenses, with
the photographer either planting the
halfpod’s foot into his midsection or letting the foot float freely
while using the halfpod more as a handle for the lens. In the
latter use, the right hand would be grasping the camera while the left
hand would hold the halfpod about midway along its length. The
few people I’ve seen utilizing this technique swear by it, claiming
that their ability to quickly move about in the field and track flying
birds such as eagles is enormously enhanced. It goes without
saying that the use of this technique with large, heavy, and expensive
camera rigs involves a fair bit of muscular strength and coordination,
and that the risk of damage to the camera and lens (or possibly even
the photographer) may be considerable. I now use a similar
technique, based on the Black Rapid
strap system (see photo below). My 500mm f/4 lens (typically with 1.4× TC attached) dangles from my
sling strap at my hip and is always ready to be rapidly raised to my
eye for shooting. With the right coordination and balance, muscle
fatigue can be kept to a minimum when shooting; I balance the lens’ tripod foot on my left palm and
plant my left elbow against my ribs. I keep a monopod clipped to
my belt (not shown in the figure below) with a carabiner clip just in
case my arms do get tired and I need external support.
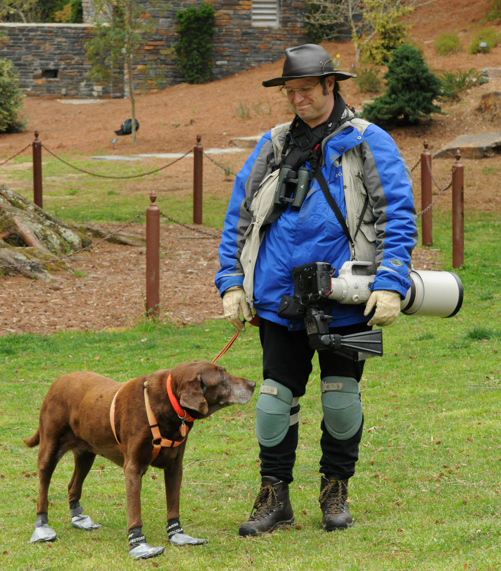
Fig. 4.1.4:
The author with his 500mm lens attached to the
Black
Rapid sling strap. This is for hand-held work. The
sling
strap allows the lens to be rapidly raised to eye-level.
Not
having to use a tripod results in greater mobility, while
a
monopod can still be carried along just in case it’s needed.
(Photo
by Caroline Gilmore, used with permission.)
In terms of individual models of monopods, many of
the choices mirror those available or tripods. One feature
specific to some monopods is the spring-loaded
leg extension
cabability, which allows you to raise the level of your monopod-mounted
camera using only one hand; without the spring, you’d have to grip both
parts of the monopod and pull them apart to extend the length of the
leg. The same (or similar) maneuver can be accomplished,
however, with a springless unit having well-lubricated joints and a
heavier foot unit, so that gravity mimics the effect of a spring.
The latter is the solution I’ve opted for with my monopod.
4.1.2
Carbon Fiber Versus
Aluminum
While most affordable tripods/monopods are made of aluminum, the more
expensive models are often made of a composite material known as carbon fiber. The two most
commonly cited reasons for preferring carbon fiber over aluminum are
the lower weight and the
greater absorption of vibrations.
In
terms of the weight, the difference between a carbon fiber tripod and a
comparable model made of aluminum is often relatively small (perhaps
one or two lbs), while the
cost difference can be in the hundreds of dollars. Keep in mind
also that while lighter tripods are easier to carry in the field, a
heavier unit may be preferable in terms of stability, once you’ve got a
long lens mounted on it.
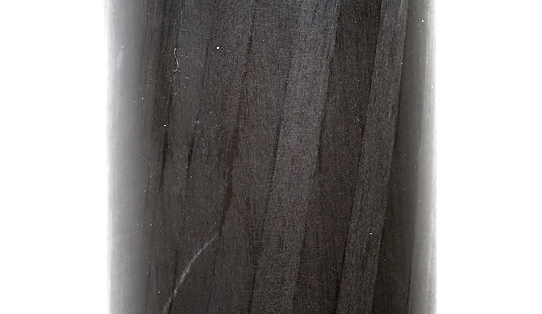
Fig. 4.1.3:
Close-up view of a carbon fiber tripod leg.
Note the composite nature of the material. Composites
can provide greater strength, lighter weight, and greater
absorption or dissipation of vibrations. When subjected
to extreme stress in very cold temperatures, however,
they have been known to shatter.
The other oft-cited advantage of
carbon fiber is its ability to absorb
or dissipate vibrations, due to the composite nature of its
construction. Since vibration can reduce image sharpness by
moving the camera during an exposure, dampening of vibrations is
obviously desirable. However, actually determining the extent to
which a particular carbon
fiber tripod dampens vibrations, relative to any particular aluminum
model, is difficult—especially if you don’t yet own either of the two
models. While composite materials may indeed dissipate vibrations
more effectively than solid metals (like aluminum), vibrations may also
dissipate to some extent via leg joints and through contact with the
ground. I’ve yet to see a thorough, scientific analysis of tripod
vibration with a breakdown of dampening sources (i.e., material of
construction, leg-joint design, etc.), so it’s difficult to say
anything
definite about the effect of carbon fiber on image quality at this time.
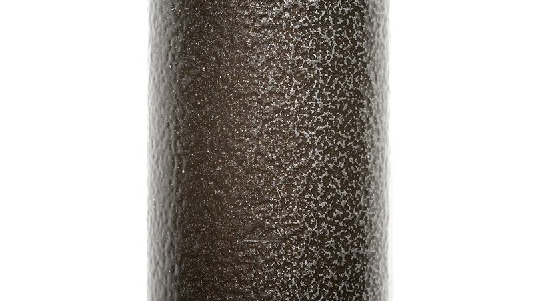
Fig. 4.1.4: An
aluminum tripod leg with an
artificial texture suggestive of a composite.
Don’t be fooled!
It’s easy to be misled by all the hype about the strength of carbon fiber.
Some manufacturers use a designation such as, e.g., “6×” to denote that
their composite material is formed of six layers, thereby providing
greater strength due to the oblique patterning of adjacent
layers. While it might (or might not) also follow that such a
material is in theory “6×” (six times) as strong as some
rival alloy
such as aluminum or steel, manufacturers typically trade off any
increased strength (per millimeter width) by thinning the walls of the
tubing so as to achieve a decrease in weight without reducing strength
below that of aluminum (for example). So in the end you get a
lighter tripod made of an expensive material that’s about the same
strength as aluminum, despite being thinner (and
lighter). Note that there have been anecdotal reports of carbon
fiber tripod legs shattering when subjected to extreme forces in
extremely cold temperatures (e.g., struck hard against a rock in
Antarctica).
Unfortunately, the weakest “link” in any tripod is
the folding leg joint—the place where the leg
joins the central piece of the tripod. In a number of carbon
fiber tripods, this
joint is not made of carbon
fiber, so any strength benefits of carbon fiber are meaningless in
terms of reliability for the overall structure. Obviously, the
last thing you want is for a leg to snap off while supporting your
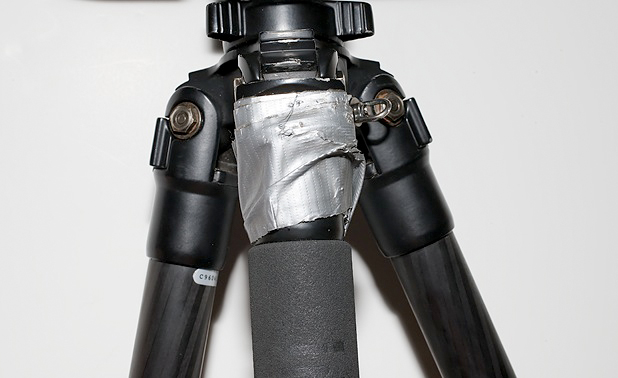
expensive camera and lens. This has happened to me twice now.
Fig. 4.1.5: An aluminum tripod leg that broke while supporting an $8000
lens.
The point of the break was at the leg joint—the weakest
part of any tripod.
Note how thin the metal is at the joint; also the screw hole in the
center.
The first time was when I was using a Gitzo aluminum “Explorer” tripod—a very popular model made
by a highly trusted
manufacturer. I accidentally bumped one of the legs with my foot
and the leg snapped completely off. I was fortunate enough to
catch my Sigma 800mm f/5.6 “Sigmonster” (an ~$8000 lens) before it
struck the paved walkway. The second time was at the legendary Venice Rookery in
Florida, when my Induro
carbon fiber tripod broke at
exactly the same place as my aluminum Gitzo had: at the joint
where the leg articulates with the central column ring. I had
again bumped the lower leg with my foot, and was lucky enough to catch
my 600mm f/4 lens before it
struck the ground.
Fig. 4.1.6: A “6×” carbon fiber
tripod held together by duct tape. The leg snapped off while
the author was traveling hundreds of miles from home. The use of
duct tape allowed the
author to continue use of the tripod till another could be procured
(which took over a year).
The moral of
the story: though carbon fiber may
be theoretically stronger than aluminum, if it’s thin enough (for the
purpose of reducing weight), or if it’s not used at all points in the
tripod’s construction, then the much-bandied strength benefits of
carbon fiber may do no more than lull you into a false sense of
security. Beware!
4.1.3
Number of Sections and Maximum Height
Tripod (and monopod) legs
typically have either three or four sections. Both varieties have
their advantages. Four-section “pods”
(tripods/monopods) often pack up smaller than three-section pods, which
can be an advantage when traveling (especially via airplane). On
the other hand, three-section pods have fewer leg joints that need to
be adjusted when setting up, possibly resulting in faster set-up times
during critical shoots. Also, fewer leg joints means fewer places
for potential failure (i.e., breakage), and possibly better overall
stability in terms of resistance to perturbations such as those induced
by wind or the occasional misplaced elbow. I personally use a
four-section tripod because the extra section allows me to extend the
legs to a ridiculous height (6.5 feet, not including the gimbal head),
which is useful when shooting birds high in a tree.
In terms of set-up time, there are models that use
so-called “flip-locks” rather than the twisting
kind—i.e., you simply
flip a lever when the leg section is in place, rather than having to
painstakingly rotate a screw-ring. I’ve found the
flip-type locks to be much, much faster than the twist-type, though in
all honesty, I rarely ever adjust the leg extensions on my
tripod. The birds I photograph are typically at or above eye
level, and
for these situations I want my tripod’s legs extended either fully or
nearly so; thus, I rarely adjust the leg lengths except when putting
the tripod back in my car. Also, some flip-lock designs loosen
over time, requiring regular adjustment to keep them tight. The
screw-type locks generally don’t suffer from this problem.
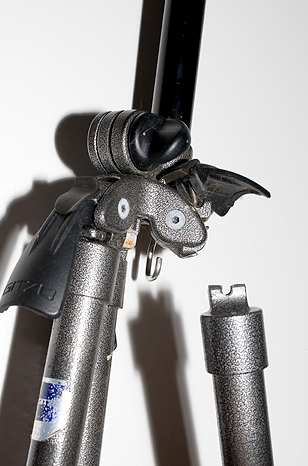
Fig. 4.1.7: Screw-in type leg lock. Notice the ridge on on the
lower leg segment (at right), which is intended to keep the leg
from rotating during setup. These rarely seem to work
as intended, even on expensive models.
When photographing a bird that suddenly drops below
eye level, there’s a useful trick that often reduces the need to
collapse your
tripod’s legs: by instead widening
one or two legs (rather than shortening
them), you can rapidly reduce the overall height of the tripod.
Many tripods permit
faster adjustment of the angle
of their legs than the legs’ lengths
(often
using flip-locks or a similar mechanism). I frequently adjust my
tripod’s height by unlocking a single leg and pulling it out to an
extreme
angle. Note, however, that while this can quickly reduce the
tripod’s overall height fairly dramatically, it also substantially
reduces the stability of your camera/lens rig; for that reason, I only
use this as a temporary solution, and am always
careful to keep both hands on the camera/lens when one of the legs is
askew. Note that this also complicates panning with the camera,
since you’ll generally need to rotate the lens in its collar while
panning, to keep the image level.
Fig. 4.1.8: A flip-type leg lock for adjusting leg
angle. This mechanism is very fast and convenient,
but is not as unyielding as other mechanisms, and
requires regular maintenance.
Another feature worth mentioning is the ability to
adjust the center column via a geared hand-crank. In all the
tripods I’ve used, adjusting the center column height requires some
fairly extreme strength and dexterity, at least with a large, heavy
lens mounted on it. For non-crank center columns, you have to
loosen the screw-in dial for the center column, then lift the entire
camera/lens rig with one hand while using the other hand to hold down
the tripod (since for lightweight tripods they tend to lift along with
the camera/lens, even with the dial loosened). For a big
500/600/800mm lens rig, this can require a fair amount of effort.
Some tripods make this task easier by providing a geared crank that you
can turn to raise or lower the center column. Although these
types of mechanisms may be slower in some cases than the dial-type
method, they do offer the additional advantage of precision, since they
allow you to carefully adjust the height with fine crank movements.
Regarding the center column itself, there are a few
things to consider. First, the center column tends to be the most
wobbly part of a tripod. I find that my tripod is the most stable
when the center column is adjusted all the way down, so that the
camera/lens is effectively resting directly on the lower leg assembly
rather than on the center column itself. The higher I raise the
center column, the wobblier the whole thing becomes. For this
reason, it’s a good idea when assessing the maximum hight of a
prospective model to consider the height with the center column not extended. A number of
manufacturers report the maximum height both with and without the
center column extended. The higher you can get without having to
use the center column, the better.
The figure below shows a rig with no center column
at all—the head simply attaches directly
to the plate where the legs articulate. This configuration
maximizes stability. I switched to using this rig after finding
that the lens mount of my Induro carbon-fiber tripod was attached to
the center column with no more than glue
(!). The problem with not using a center column is, of course,
that you can’t raise your lens by extending the center column.
The solution I’ve adopted is to use a four-section tripod with a very
large maximum height (78 inches, or 6.5 feet), and then to spread the
legs extra wide when shooting birds at eye level; when I need to switch
to shooting a bird higher up in a tree, I can simply pull one or more
of the legs in to increase the height of the lens. This system is
faster than using a center column and far more stable.
Fig. 4.1.9: A
tripod having no center column is more stable than
one with such a column. Without a center column, finding a way
to rapidly change the height of your lens while shooting requires
some creativity. If your tripod has extremely long legs, you can
open them extra wide when shooting at eye-level, and then pull
them in when you need to quickly raise the level of the lens.
There are a number of models (such as the
popular Gitzo “Explorer”) in which the “central” column is actually positioned off
to the side, and can be adjusted to different angles. I’ve never
found this feature to be useful for practical bird photography, and
suspect that it merely serves to reduce the stability of the tripod.
4.1.4
Support Ratings
It’s important to realize that both tripods and tripod heads are
engineered to support only a specified amount of weight. If you
exceed that weight limit by mounting a camera / lens / flash-unit rig
heavier than the recommended weight, you risk damaging both the tripod
and the supported camera rig. Unfortunately, just because you
don’t exceed the specified weight limit of a given support system
doesn’t mean that the support system can’t break. The above
examples of broken tripod joints provide proof of this, since in both
cases the supported rig was strictly within the weight limits of the
tripod.
Keep in mind that a particular model’s weight rating
may be determined by a complex formula involving the expected failure
rate of the tripod under a given load, together with various marketing
figures such as the projected profit margin on the model in question,
the expected time to first failure (relative to the length of the
warranty period), and the projected number of claimants for losses due
to damage to equipment (and any legal protections the company may enjoy
in relation to such claims, which may vary regionally). If the
projected profit exceeds the projected cost in warranty claims and the
like, then the proposed support rating may be adopted and advertised by
the manufacturer.
Obviously, that doesn’t mean the tripod won’t break
if you don’t exceed the weight limit. It just means the
manufacturer is willing to accept the losses stemming from such
failures. The real question is whether you’re willing to accept such
losses. If you happen to be traveling far from home and your
tripod breaks, resulting in serious damage to your camera system, the
cost to you, in terms of lost photographic opportunities, may be more
than you’d like. For that reason, I recommend being doubly
cautious in choosing a tripod and tripod head for your camera
rig. Extensively scour the internet for firsthand accounts of
users who’ve used that tripod model with a similar weight load.
Most importantly, never assume that your equipment
is safe. If you must walk away from your tripod while your big,
expensive camera/lens rig is attached, then keep a constant eye on
it. Keep a lookout for passers-by who may bump into it,
especially children. And try always to keep a hand on the lens
itself, so that if the head or lens detaches from the tripod, you can
catch the rig before it hits the ground.
4.1.5
Ground Pods and Beanbags
A serious impediment for a great many novice bird photographers is the
tendency to set the tripod-mounted rig in one place and then stand
behind it, hoping that the birds will accommodate them by perching
directly in front of the camera, at eye level. I prefer to think
of my tripod as a convenience that I am sometimes lucky enough to be able
to use. The problem is that many birds like to loiter at heights
other than exactly 5 feet 9 inches. Many, such as shorebirds and
waders, spend most of their time at ground level, and for these I
recommend abandoning the tripod altogether. Although some tripods
can be adjusted down to very low levels, I think this is one case where
the tripod is simply acting more as an impediment than as an aid.
When working at ground level, I very often use the
camera/lens rig without any support whatsoever, besides the rocks and
other natural support that I find on the ground. However, if I
know in advance that I’m likely to spend a significant amount of time
lurking on the ground, I’ll bring along a so-called ground pod. Ground pods
provide support at ground level, typically much better than even an
extremely versatile tripod can. A number of companies manufacture
ground pods and sell them for upwards of $200 US or more, though I
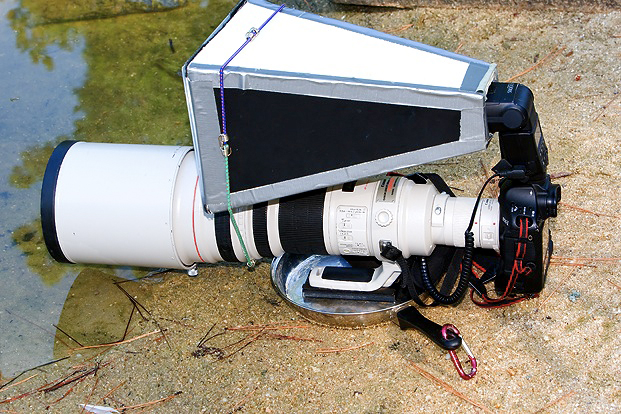
prefer a more low-tech solution: the common frying pan.
Fig. 4.1.10: A frying pan used as a ground pod. The lens’ foot, as well
as the flash’s external
battery pack, can be set in the pan while working in wet, sandy or
muddy environments, to
keep them clean and dry. The pan facilitates sliding of the
entire rig over rough ground. A
carabiner clip attached to the pan’s handle allows the pan to be
clipped to the photographer’s
belt while hiking in the field.
A cheap frying pan can be had for
about $10 or so at WalMart,
and provides features comparable with other “ground-pods”. The three features I
consider essential in a ground-pod are (1) the ability to slide the pod
over rough terrain while stealthily approaching a bird, (2) the ability
to swivel your lens easily without incurring too much wear on your lens
foot, and (3) the ability to keep the lens dry and clean. My $7
frying pan satisfies all these criteria. During a recent trip to
Florida, I used my $7 “ground pod” while photographing
shorebirds.
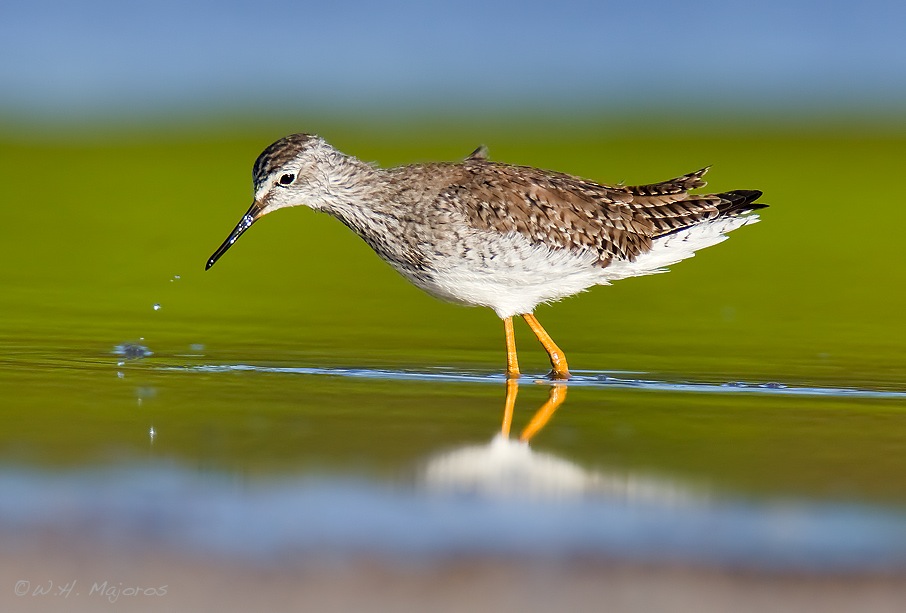
Fig. 4.1.11: Lesser Yellowlegs photographed at
eye level, using a frying pan as a ground pod.
Setting
the tripod foot inside the frying pan, I was able to slide
the entire rig smoothly over the terrain as I stealthily approached the
birds. As the birds wandered back and forth along the edge of the
pond, I was able to rotate the entire rig quite easily in order to
track the birds. And when I eventually reached the very edge of
the pond, the frying pan kept the water and sand away from the lens
foot, limiting any unnecessary exposure to abrasive or corrosive
elements. The pan also kept the water from my flash’s external
battery pack, which I placed in the pan beside the lens foot.
Finally, there are two other types of support that
should be mentioned. The first is the bean-bag, which should be
almost self-explanatory. These may be used on the ground or on,
say, the hood of an automobile. Use on the ground may be
complicated in wet environments, obviously, and for that reason I
prefer to stick with my trusty frying pan. The other notable
device is what I will call the window-pod,
which encompasses any manner of support used in a car window.
These are popular among the so-called “drive-by shooters” who prefer (or are forced, due to
medical reasons) to do the bulk of their bird photography from within
the confines of an automobile.
4.1.6
Tripod Comfort
Carrying a tripod in the field is always awkward, especially if you’ve
got a big telephoto lens attached to the tripod while you’re carrying
it. There are several features that can be useful in the
field. First, some tripods come with carrying bags that feature a
shoulder strap. This isn’t terribly useful in the field unless
you’re hiking to a very remote destination and don’t expect to need the
tripod until you get to the end of the hike. Tripod bags can,
however, be useful for air-travel.
Much more useful are pads that can be attached to
the legs to reduce discomfort when supporting the tripod on your
shoulder. You can buy pads specifically sized for individual
tripod models, or just go to your local hardware store and buy some
pipe insulation. Pipe insulation is cheap and can be attached to
your tripod using duct tape. I’ve done this and found the cheaper
route to be effective, with two caveats. First, some brands of
pipe insulation will become permanently compressed (i.e., lose their
sponginess) after only a few sessions in the field, reducing
comfort. Second, real tripod leg pads typically come with a
fabric cover sock that protects the padding and may lengthen the life
of the pads.
Though leg pads are a good idea in principle, in
practice I often find that the part of the tripod that rests on my
shoulder (for optimal balance) is not the leg but rather the joint
where the tripod head attaches. The standard leg pads don’t help
in this situation. However, it is possible to buy special,
triangular pads that cover one side of this joint. I’ve never
used one of these, but the ones I’ve seen looked thin and had
attachment points that could interfere with the operation of the
tripod. On the other hand, these triangular pads sometimes come
with small pockets which may be useful for storing things like memory
cards.
For tripods with center columns, a novel solution
(which I’ve seen used in the field) is to buy a standard toilet
plunger, remove the handle, enlarge the hole where the handle was
attached, and then slide the rubber piece up under the tripod around
the center column until it’s nestled just under the tripod’s top
support plate. For a large enough plunger head, the rubber will
protrude enough between the tripod legs to allow you to rest the rubber
part on your shoulders rather than the tripod itself.
Note that the standard tripod leg pads can be useful
if your tripod is very heavy in relation to your camera/lens rig.
The relative weights of the tripod legs versus the camera/lens dictate
the optimal balance point of the whole assembly. For extremely
light tripods (such as carbon fiber models), the balance point is
typically very high, often above where the leg pads are located
(rendering the leg pads less useful). But for very heavy tripods,
the balance point should be lower, and in these cases the leg pads can
be very useful indeed.
One solution is to simply sew some padding into the
shoulders of your camera vest. Then it doesn’t matter how you
balance the tripod on your shoulders, because your shoulders are always
padded. I’ve found this approach to be very effective.
|
|
|