4.2 Tripod Heads
Most tripods, when bought new,
don’t come with a tripod head.
The head is the part that your lens attaches to, and which allows you
to rapidly adjust the direction in which your lens is pointing.
Thus, the head sits between your lens and the tripod proper. Not
only is the head essential for practical use of a tripod, but getting
the right head can be of
enormous importance. With large, heavy lenses (i.e., those for
which you’d be most likely to require a tripod in the first place), the
wrong type of head can result in a rig that is so unwieldy that it may
significantly diminish your ability to get consistently sharp images of
active birds. And by “active” I don’t necessarily mean birds in
flight (for which a hand-held lens might be better anyway). Any
bird actively foraging in a tree or on the ground will require constant
tracking, and the particular head you choose for your tripod can make
that task of tracking the bird either manageable or onerous. In
this section we’ll consider the most popular types of tripod heads for
bird photography.
4.2.1
Gimbal Heads
The most popular type of tripod
head for large birding lenses is, by far, the gimbal head. A gimbal head
works like a see-saw: it
maintains a fine balance on the lens, so that very moderate forces
applied to one end (the camera
end) are able to precisely control movement of the other end (the objective lens end). An
example of a very popular model of gimbal head is shown below.
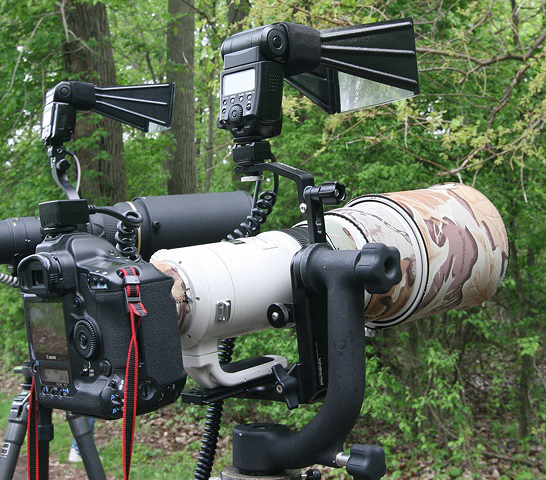
Fig.
4.2.1: A gimbal head. The tripod foot (thin white strip at
bottom of lens) attaches to the gimbal via a quick-release plate.
The inner gimbal arm swivels up-and-down to allow inclination
adjustments. The outer gimbal attaches to the tripod, allowing
left-to-right panning.
This is the Wimberly head,
which as of mid-2009 runs about $600 US for the “Version II” model. It’s by far the most
popular gimbal head among bird photographers. At the bottom of
the figure above you can see where the head attaches to the tripod collar (just barely visible in the
image). This joint allows the head to swivel side-to-side.
The lens foot (the
horizontal white piece at the very bottom of the lens) attaches to the lever arm of the gimbal (the inner
black piece of the head shown in the figure). The movement of
this lever arm is what allow the lens to tilt up and down. Thus,
these two joints in combination allow the direction of the lens to be
smoothly adjusted in any direction.
What’s most remarkable about a properly mounted
gimbal head is that it allows almost effortless adjustment of the lens
direction, using just one hand. You can, for example, grasp your
camera with your right hand, keeping your index finger on the
shutter-release button as usual, and with the same hand move the camera
in any direction (while looking through the viewfinder) in search of a
bird that you’ve yet to find or that you’re in the process of
tracking. This is possible because the gimbal head keeps the lens
perfectly balanced (or near-perfectly balanced, with friction helping
out in the case of slight imbalance), so that lever action (or leverage) renders angular
adjustment of the lens from the camera end far easier than you might
expect for such an enormous lens as that shown in the figure.
A nice feature of the Wimberly head is that it
offers attachments for flash brackets
such as the one shown in the figure above. The device at the top
of the figure is obviously the flash unit (with fresnel extender attached—see
section 4.3). The flash bracket is the
thin metallic arm
connecting the flash unit to the gimbal head. As will be
explained in section 4.3, using a flash bracket
(as opposed to mounting
the flash unit directly atop the camera) has distinct advantages when
photographing birds and other wildlife.
Although the Wimberley head enjoys enormous
popularity among birders with large lenses (i.e., the 500mm, 600mm, and
800mm crowd), those contemplating the purchase of such a head likely
don’t enjoy the prospect of such a large outlay of cash. A
handful of alternatives have thus become available at rather more
palatable prices. The most popular is the Bogen 3421 (listed as Manfrotto 393 in some catalogues),
which is illustrated in the figure below.
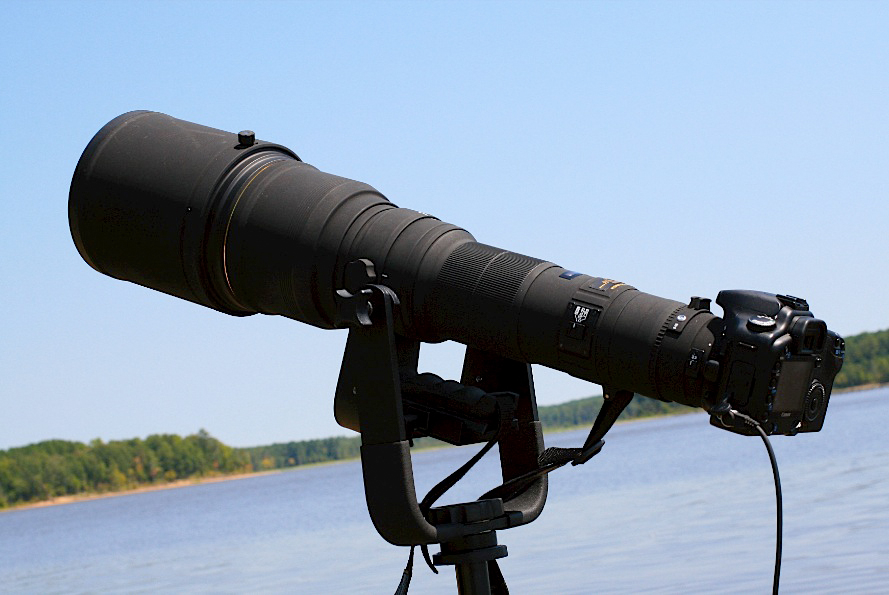
Fig. 4.2.2: A cheaper gimbal head model, supporting an
800mm f/5.6 lens. This gimbal head provides two inner
and outer arms, unlike the more popular Wimberley head,
perhaps making it slightly easier to grasp.
The lens shown in the figure above
is the Sigma 800mm f/5.6
lens. I’ve also used this very same gimbal head with the Canon
600mm f/4 lens, both with and
without teleconverters (including both 2× and 1.4× varieties). The best thing
about this head is the price: roughly $180 US as of mid-2009.
I used this unit for about two years before switching to the Wimberley
II head, and it never failed me during that time. It
works by essentially the same principle as the Wimberley, but with a
symmetric
design having a lever joint on both left and right sides (somewhat
difficult to see in the figure above). This symmetric design
allows easier grasping from either side when carrying the rig
over the shoulder in the field, or when trying to steady the rig with
your free hand while shooting.
One significant difference between the
Bogen/Manfrotto head and the Wimberley is that the Bogen wobbles, whereas the Wimberley
doesn’t. Both models have tightening dials that allow you to
adjust the tension in the left-right (panning) and up-down (tilt)
movements of the head. In most situations, these need to be kept
somewhat loose, to allow smooth movement of the head. On the
Bogen/Manfrotto (at least on some units), loosening the bottom dial not
only allows the head to swivel on the tripod collar (which is good),
but also allows it to wobble back and forth at that same joint (which
is not so good). That joint on the Wimberley has a much heavier
construction, which prevents wobbling. Indeed, the entire
Wimberley head is far sturdier than the much cheaper Manfrotto. I
feel much safer swinging my tripod over my shoulder when it’s mounted
in the Wimberley than when it’s in the Manfrotto, though I do find the
Manfrotto easier to quickly pick up when following a bird, and more
comfortable to carry. The lens mount on the Manfrotto appears to
be held in place by only two tiny screws, so it may present a greater
risk of breakage.
4.2.2
Ball Heads
A ball head is one which utilizes a
lubricated steel ball to allow unimpeded movement in any direction
within a spherical coordinate system—within certain constraints, of
course. The figure below shows a ball head with special grooves
allowing significantly greater freedom of movement in particular
directions.
Fig.
4.2.3: A ball head. (Photo by Wikimedia user
Nebrot; used by special permission).
Ball heads are not good for large lenses. A
ball head effectively allows the lens to tilt in any direction, and
this makes it very difficult to keep a large, heavy lens stable.
Even though a ball head might seem to be a far cheaper alternative to a
gimbal head, a much better compromise is to use a so-called pan head (described in the next
section). The pan head will allow the lens to rotate left and
right and to be tilted up and down; rotation about the lens axis is
typically provided by the lens itself, via its collar (see figure below).
Pan heads thus provide all the freedom needed for maneuvering a large
lens on a tripod. Ball heads provide more freedom of movement,
but with a heavy lens, this just makes the entire rig far too
unwieldy.
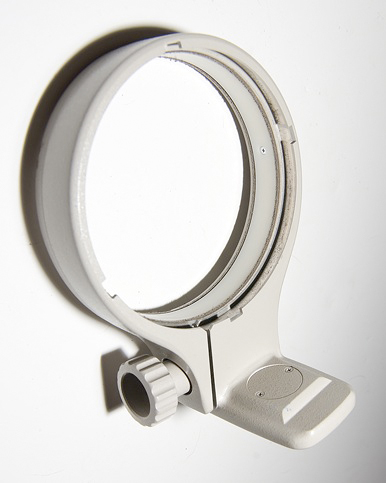
Fig. 4.2.4: A lens collar. By loosening the screw
shown at bottom-left, the collar allows easy
rotation of the lens about its central axis. Most
long-focal-length lenses have a built-in collar.
There’s a nifty
variant of the ball head which makes use of a mechanism with a trigger,
much like a handgun. The ball is loose only when you pull the
trigger; upon releasing the trigger, the ball is fixed in its current
position. This allows very quick adjustments to the head, and can
be extremely convenient, for small, lightweight camera rigs. For
large lenses, however, these clever devices generally fail to keep the
lens properly positioned, simply due to weight.
4.2.3
Pan Heads
Pan heads are the cheapest
practical alternative for long birding lenses. There are several
different varieties. The simplest allow movement around only two
axes: they can be panned left
and right, and tilted up and
down (which is why these types of heads are sometimes call pan-and-tilt heads). This is
all you need for bird photography (as long as your lens can rotate
inside its tripod-mounting collar).
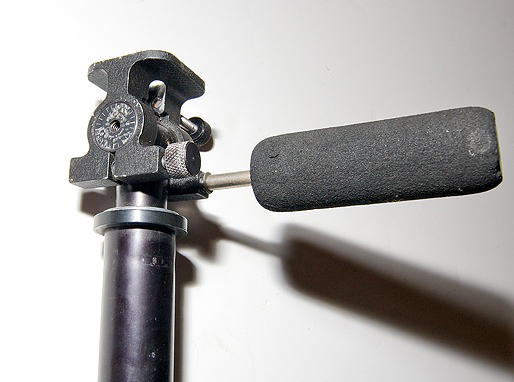
Fig.
4.2.5: A simple two-axis pan head (or “pan-and-tilt
head”),
allowing for panning (left-and-right) and tilting (up-and-down) of
the lens. This head came permanently attached to a Davis &
Sanford (now marketed as Tiffen) telescope tripod.
More complex pan heads have a
third adjustment that allows the lens to be effectively rotated
(resulting in a pan-tilt-rotate head),
but if your lens already provides this capability via its mounting
collar, then that feature is unnecessary in the pan head (and in fact
having that feature duplicated in the head can decrease stability,
while increasing weight and probably cost). A head with three
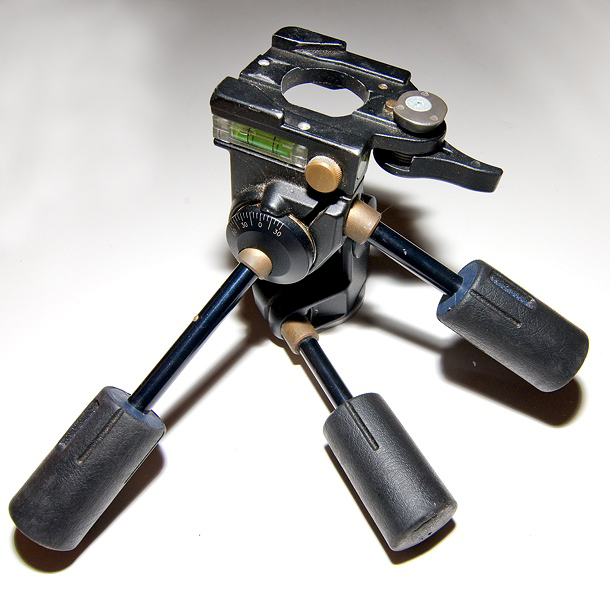
adjustable axes is illustrated below. This unit also features a bubble level (the green tube near
the top).
Fig. 4.2.6: A heavy-duty, three-way panning head.
This head provides extremely stable support,
but is also extremely heavy, and relatively expensive.
For general bird photography, a gimbal head would
be a better buy.
The unit shown
above is extremely heavy, and rather expensive (almost as much as a
cheaper gimbal head), but does provide rock-solid support. The
unit features precision-machined steel parts, so that when all of the
screws (i.e., the three handles, which screw in to fix one of three
axes) are securely tightened, the unit produces very little wobbling
even with a heavy lens mounted atop. Other pan heads with a
less-solid construction will typically allow a bit of “play” around each axis, resulting in a
tendency for a big, heavy lens to wobble whenever it’s bumped or blown
by the wind, thereby degrading image sharpness at low shutter
speeds.
For birds that are extremely stationary—for example,
an owl perched in a tree, after having eaten a large meal—such a sturdy
head can be ideal, especially on a windy day. However, for most
practical birding situations, the freedom offered by a gimbal head is
far preferable. Because changing tripod heads in the field is so
very inconvenient, it’s advisable to find a single head that suits your
needs most of the time, and keep that one fixed on your tripod. I
own three pan heads, and I’ve used none of them since acquiring my
gimbal head. I keep them only as backups, in case the gimbal head
breaks.
4.2.4
Quick-release Plates
No matter which type of tripod head you decide on, you’re definitely
going to want to choose a model that accommodates a quick-release plate. This is
a piece of metal which attaches, semi-permanently, to your lens’
foot. (When I say semi-permanently, I just mean that you’ll
attach it to your lens and then leave it attached for months on end; if
you ever need to take it off, you can do so very easily with a
screwdriver). The quick-release plate then slides in (or snaps
in) to a special mounting clamp attached to the tripod head. An
example of a quick-release plate is shown below.

Fig. 4.2.7: A quick-release plate. This attaches
semi-permanently to your lens’ mounting foot.
As already mentioned, the
quick-release plate stays attached to your lens’ foot. The mounting clamp, which is designed
to allow rapid attachment and detachment to/from the quick-release
plate, stays attached (semi-permanently) to your tripod head. The
plate and clamp thus act to provide a convenient interface between the
lens and tripod head, allowing for easy mounting and un-mounting of the
lens onto the tripod. A mounting clamp is illustrated in the
figure below.
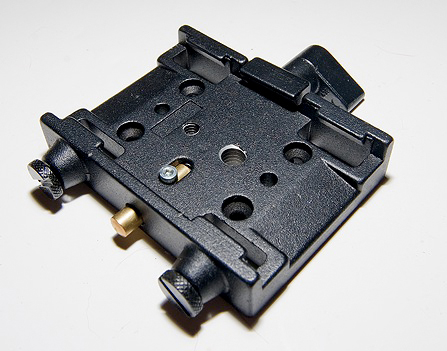
Fig. 4.2.8: The mounting clamp for the quick-
release plate shown in the previous figure.
This attaches to your tripod’s head.
In the case of the clamp shown above, the brass button along the
lower-left edge provides the quick-release mechanism. The plate
slides onto the clamp and is clamped tight by the lever shown at the
top-right. When you’re ready to detach the lens from the tripod,
you simply loosen the clamp lever and then press the brass button while
sliding the quick-release plate out of the clamp. Such a system
provides solid support with minimal risk of unintentional detachment of
the lens from the tripod during normal use in the field, while allowing
for easy detachment when packing up to go home at the end of a shoot.
Most quality tripod heads will provide a clamp and
plate to be used with that head, or prescribe a particular plate that
must be purchased separately. A popular system among professional
bird photographers is the Swiss-Arca
system. I use the Manfrotto
system illustrated above, and am completely satisfied with it.
Whichever model you choose, make sure it has a safety catch that keeps
your lens from sliding out of the clamp accidentally if you forget to
tighten the lever. Most units from reputable brands will have
this feature.
|