|
6.2 Exposing to the Right
As already mentioned in section
2.5, there’s an attractive method
for setting exposure levels which is
just now starting to gain popularity among large numbers of digital
photographers. The inventor of Photoshop has been credited with
first proposing the idea. It’s
called ETTR, or Exposing To The Right. The
idea is simple: when in the field, you try to achieve the brightest
possible exposure
without obliterating any details via clipping.
Clipping
results in regions of the image that are pure white—that is, all the
pixels in those regions have exactly the same pixel values, and
therefore encode no detail whatsoever. When that happens, we say
that we have blown the highlights.
The goal in ETTR is to maximize the exposure (i.e.,
image brightness) in the field without blowing any highlights.
There are
several reasons for maximizing the exposure, and it’s very important
for you to understand all of them. First and foremost, if you can
maximize the exposure without resorting to high ISO values (i.e., if
you can maximize brightness via aperture
and shutter speed alone),
then you’ll be reducing image noise, by maximizing the number of
photons collected by the sensor. Recall from section 2.5 that
underexposure in digital images results in small photon counts, which
in turn results in noise. And since noise becomes more apparent
the more you blow up your image (to larger sizes), more noise in effect
translates to less usable detail
when sizing an image.
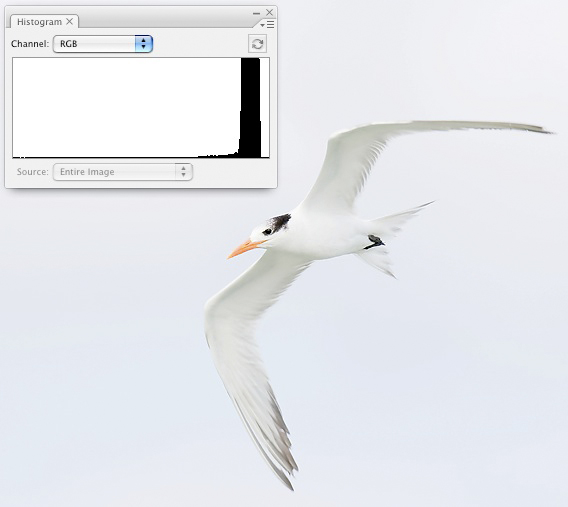 Fig.
6.2.1 : An extreme case of ETTR. Notice that all the data is
positioned
Fig.
6.2.1 : An extreme case of ETTR. Notice that all the data is
positioned
near the rightmost end of the histogram, with just a little space to
ensure that
highlights are not clipped. This photo also happens to be an
example of a “high
key” photo—i.e.,
overwhelmingly white. Don’t confuse ETTR with
high-key:
they’re not the same. (1/800 sec, f/7.1, ISO 500, 600mm, manual mode, no
flash)
A second benefit from increased brightness during
image capture is that the image will be encoded (in the RAW file) using
more bits per pixel, on
average (a bit is the
fundamental unit of information in computers). This is simply due
to the standard practice of encoding image data in such a way that
brighter pixels are allocated more bits than darker pixels, which means
that there are more shades (or hues) of each color that can be
accurately represented at the higher
end of the light spectrum than at the lower
end. Thus, by exposing to the right you should, in theory, be
better preserving any fine color gradients that may be present in the
scene you’re capturing. Some commentators have questioned whether
this benefit really has much effect in practice, but there at least
seems to be no harm in the
allocation of greater numbers of bits to images (other than slightly
larger image files), and if it does occasionally improve your images
then it’s worthwhile.
Finally, some have suggested that a further
reduction in image noise may be achieved by producing larger electrical
signals from the imaging sensor, in that the downstream electrical
circuitry (especially the analog-to-digital
converter, or ADC)
may—at least in some camera models—generate relatively less noise
(relative to the signal) for the higher pixel values. Note that
even if this turns out to be true, it may be very camera-specific, so
don’t assume that it necessarily applies to your particular
model. Also be aware that on some low-end camera models the the
full-stop ISO values (100, 200, 400, 800, and 1600) can be less noisy
than the between-full-stop values (125, 160, 250, 320, 500, 640, 1000,
1250), since on some models these latter ISO’s are achieved via digital
multiplication of the discretized bits, rather than via analog
amplification.
A slight
variant of the ETTR philosophy calls for maximizing the amount of
information in the subject,
rather than maximizing the overall
information in the image as a whole. In the case of bird
photography, I call this BETTR,
or Bird Exposed To The Right
(not to be
confused with Rush Limbaugh’s pet canary). The difference between
ETTR and BETTR is that in BETTR we allow the blowing of any highlights
that aren’t in the bird (or in the immediate foreground around the
bird—such as in the branch that the bird is perched on). That
is, we try to maximize the exposure of the bird without blowing any of
the bird’s highlights, but if we have to blow highlights in the
background, then so be it. Since the background is often rendered
out of focus anyway (by a shallow DOF), trying to retain details in the
background serves little purpose. There are, of course,
exceptions—such as when the background has rich color gradients that
you’d like to preserve. In those cases, BETTR might in fact not
be “better” than ETTR.
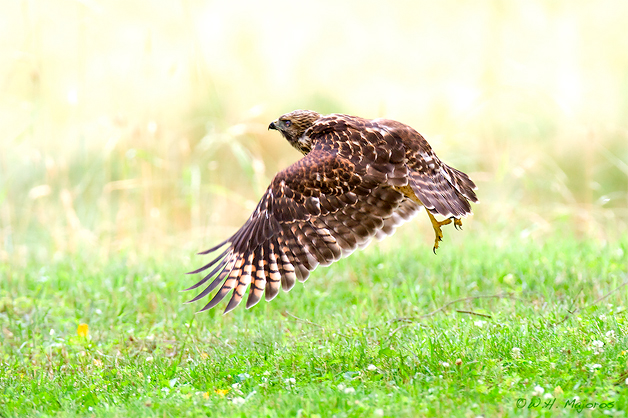
Fig.
6.2.2 : A bird exposed to the right (BETTR). In order to maximize
the information
in the bird, I had to blow the highlights in the background, which I
usually don’t mind doing
since I prefer blurry backgrounds anyway. That allowed me to
maximize the detail in the
bird, which is what I usually want. Just be careful not to clip
any highlights in the bird!
(1/640 sec, f/5.6, ISO 1600, 600mm, manual mode, manual flash at 1/4
power)
The crucial point of ETTR (and BETTR) is that you’re
not trying to make
the image look as nice as possible on your
camera’s LCD. When employing ETTR/BETTR, the images that appear
on your camera’s LCD might look downright unpleasant. When you
get the image onto your computer you can
then adjust the exposure digitally back to a more pleasing level
(during RAW conversion—see
Chapter 12), while retaining more details in the image (or at least
retaining a greater potential
for accentuating subtle details via further postprocessing). The
idea behind ETTR is to maximize exposure in the camera, even if you have to
turn down the brightness once you get the image onto the
computer. This will help you to avoid systematic underexposure of
your photos in the field. As long as you don’t blow the
highlights, darkening the image in postprocess is always better than
brightening it in postprocess, because artificial brightening of
underexposed images in postprocessing typically brings out more noise,
whereas darkening images that are overexposed (but not clipped) doesn’t.
In order to employ the ETTR/BETTR technique, your
camera needs to have one critical feature: a highlight alerts function.
This function causes blown highlights in the captured image to be
detected and displayed prominently on the back-panel LCD of the camera,
typically via bright flashing. Most of the newer DSLR’s on the
market today have some form of highlight alert. What’s important
is that the highlight alerts be available during the “image review” period—i.e., as the image is
automatically shown on the back LCD
panel just after capture (typically for 1 or 2 seconds). Having
the highlight alerts automatically show up immediately after each
capture allows you to rapidly assess your exposure during the heat of
intense shooting, so that you can make quick adjustments (if needed) to
the exposure in-between shots, without drawing your attention away from
the bird for too long.
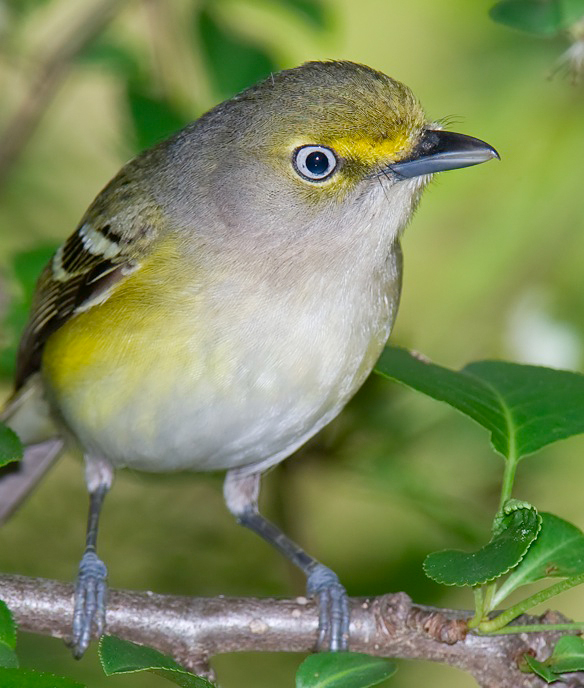
Fig. 6.2.3 :
ETTR helps retain subtle details in bright areas. Notice the many
subtle
details in the front/underside of this white-eyed vireo. Some of
these are due to the use
of flash (see Chapter 7), but much of this detail would likely not be
present if the photo
had instead been underexposed and then brightened in postprocess.
ETTR ensures
that you rarely have to brighten images in postprocess. Darkening
images in postprocess
is always better than brightening them in postprocess, for a variety of
reasons (see text).
(1/80 sec, f/11, ISO 250, 840mm, Av with -1 EC, evaluative metering,
TTL flash at -2/3)
As mentioned in Chapter 2, If you can perform ETTR by
adjusting only the shutter speed and/or aperture, while keeping ISO
very low, you’ll be both maximizing the number of bits allocated to
your image’s detail and at the same time minimizing photon noise (i.e.,
minimizing sampling error by not
underexposing the image). Exposing to the right via shutter speed
and aperture (but not by using higher ISO’s) reduces photon noise by
allowing the sensor to collect more photons, thereby reducing sampling
error and ensuring a more accurate measurement of color information
from the incoming light. Remember, collecting more light allows a
more accurate measurement of the individual colors making up that
light. If instead you expose to the right by increasing the ISO
setting, you’ll be getting the benefit of better bit utilization (since
you’ll have brighter pixels, which are generally allocated more bits in
the RAW file than darker pixels), but you won’t be reducing photon
noise at all, since you’re not collecting more light (you’re just
amplifying the signal after it’s already been measured by the
sensor). Depending on the noise characteristics of your camera’s
downstream electrical circuitry, turning up the ISO after you’ve already exhausted your
options for maximizing exposure via aperture and shutter speed might
result in additional benefits (besides better bit utilization).
Just remember that ISO doesn’t affect the
sensitivity of the silicon atoms in your sensor; it simply multiplies
the photon counts after the photons have already been counted.
When applying the ETTR technique, if you have to do it by increasing
the ISO, that’s OK: you’ll still get some benefit due to better bit
utilization. But if you can do it via shutter speed and/or
aperture instead of higher ISO, you’ll also be reaping the benefits of
lower photon noise. So, only turn up the ISO once you’re sure you
can’t increase the exposure level via aperture and/or shutter speed.
It’s important to note that achieving ETTR via the
use of flash is generally a very bad
idea, for several reasons. First, since the use of flash actually
introduces more light into the scene, the potential for feather glare (see section 7.11)
increases as you increase the flash output level. Although
extreme feather glare may show up on your highlight alerts, less
extreme glare that doesn’t cause clipping won’t show up in the highlight alerts
but may still degrade your image aesthetics and can be very difficult
to correct in post-process. Second, because flash illumination
falls off nonlinearly as distance increases (see section 7.2), reducing
exposure digitally in post-process can be very tricky, since most
exposure adjustment tools in software perform linear adjustments (and
they certainly can’t compensate directly for in-the-field
distances). A good rule of thumb is to keep the flash output
moderately low when finding your initial (non-flash) exposure
parameters, and then once you’ve found the parameters which give you an
ETTR exposure, increase the flash only as needed to illuminate shadow
regions on the bird. You may then need to adjust other exposure
parameters to mitigate clipping introduced by the fill flash.
They key here is to use flash for fill
only: don’t keep increasing the flash output to achieve ETTR, because
you’ll be inadvertently affecting flash ratio and possibly introducing
feather glare.
Postprocessing of images captured via ETTR/BETTR is
addressed in Part III of this book.
|
|
|