|
Chapter
3
Lenses
It could well be argued that for bird
photography, the choice of lens may be far more important than the
choice of camera. This is especially true for those who are
willing to spend time at the computer postprocessing their
images. Whereas a cheaper camera may introduce some noise into
the image, which can be reduced or perhaps even removed entirely via
semi-automated software filters, a lens producing too little
magnification or too little light transmission may result in images
that are simply unusable for most practical purposes. For small
birds at a distance, a lens with insufficient magnification will result
in images in which the bird appears as little more than a tiny, colored
spot in the image. On the other hand, a lens with high
magnification that lets in too little light, or that introduces
optical aberrations, is likely to produce images in which the bird
appears large in the image but is also fuzzy and indistinct, or has
an unpleasant purple “halo” or shadow around it.
In this chapter we’ll cover many topics concerning
lens design that will help you to choose an appropriate lens (or set of
lenses) for your particular birding goals. We will also introduce
some basic
concepts that will be essential when you read later
chapters of this book, such as f-numbers
and the notion of stopping down
a lens; these latter concepts are extremely important even if you’ve already purchased a lens, since
they’ll enable to you better operate
your equipment in the field.
3.1
Focal
Length and Aperture
The two most important concepts
regarding birding lenses are the focal
length and the aperture.
You can think of the focal length
as being a measure of the amount of magnification that the lens
provides (i.e., to what degree it makes a small bird appear larger),
whereas the aperture
influences (among other things) how bright the resulting image will
be. (We’ll be refining and augmenting these basic definitions as
we progress through this chapter, but for now these will serve as a
good starting point for our discussion of these most fundamental
concepts about telephoto lenses).
Unlike with binoculars and spotting scopes, where the
magnification is specified explicitly as, e.g., 8× or 10× (in the case of binoculars) or
perhaps 30× to 60× (in the case of spotting scopes),
in photography the issue of magnification is confounded by several
factors, including the focal length of the lens, the degree of cropping performed either by the
camera’s imaging sensor or by software in postprocess, and any
enlargement done by the photo lab when making prints. For this
reason, magnification ratings for lenses are rarely given (and are
typically wrong when they are given—so beware!).
One thing you can firmly rely on is that longer
focal lengths enlarge the bird more than smaller focal lengths.
Thus, for birds that are either small, or distant, or both, you’ll want
to use a lens with a longer focal length (i.e., a “longer lens”) than
one better suited for large birds close-up. For warblers and
other tiny birds in the wild, a good focal length in practice is around
800mm
(give or take a hundred mm), whereas for herons and egrets at a
distance of perhaps 15 feet or so, a much smaller focal length in the
50-200mm range may be more useful.
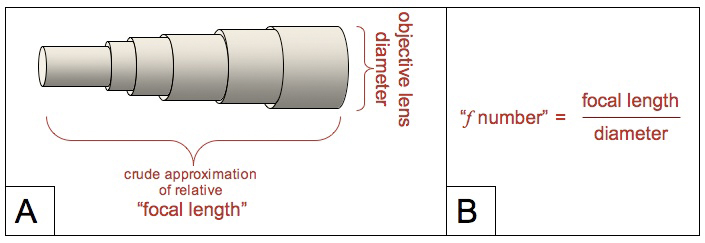
Fig. 3.1.1: Focal length and aperture.
(A) The length of a camera lens is often a crude indication of the
relative focal length, as compared to other lenses of the same
type. The width of the wide end of the lens is the objective lens
diameter. (B) The f-number is the focal length divided by the
objective lens diameter.
As suggested by part
A of Figure 3.1.1 (above), the overall length of a telephoto lens is
typically indicative of the relative focal length of the lens: longer
lenses most often have longer focal lengths and therefore higher
magnification factors than shorter lenses. This is only a very
general rule of thumb, however, since there are a number of special
optical designs that can result in large focal lengths in a relatively
small package (such as catadioptrics
or diffractive optics), and
also because the issue of zoom
lenses complicates the issue as well. We’ll address these
latter exceptions in due course.
The important point to be conveyed by part A of the
above figure is that it is both the length and the width of the lens that
(very broadly speaking) largely determine the brightness of the
image. A long lens that is very narrow will thus tend to produce
high magnification but dark images. Conversely, a short lens with
a very wide objective diameter
(i.e., the wide end of the lens) will tend to produce only modest
magnification, but should be very bright. Later we’ll consider
a number of caveats to this general rule.
First, let’s dispense with a common (though rather
mundane) source of confusion regarding terminology. To an
optician or physicist, a “lens” is a single piece of thin glass
with
(typically) two convex surfaces. To a photographer, a “lens” is a
complete package consisting of a plastic or metal outer casing
enclosing perhaps 10 or 20 glass elements (each of which a physicist
would call a “lens”). Unfortunately, we’ll have
to use both of
these definitions of “lens” at various points in this
discussion,
though we’ll try to use the term “lens” only for the complete package,
with the individual (physicist’s) “lenses” inside that package being
referred to as “glass elements” or “optical elements”.
One exception to this rule is the term “objective
lens” or “objective lens element”, which refers to the big piece of
glass at the widest end of the lens package. It’s the diameter of
the objective lens element that largely determines the light-gathering
capacity of a camera lens. However, this effect (of
large-diameter objective lenses to let in more light) is highly
dependent on the focal length of the complete lens package. In
fact, it’s the ratio of the
focal length to the objective lens diameter which effectively dictates
the overall
brightness of the image that is projected onto the camera’s imaging
sensor. It’s for this reason that photographers define a special
term for this ratio—a term which you’ll see again and
again throughout this book: the aperture. As we’ll
soon see, this term is an unfortunate carryover of ancient
photographic tradition which has resulted in no small amount of
confusion by newcomers. Hopefully, we can mitigate the amount of
confusion with a simple mnemonic, which we’ll come to very shortly.
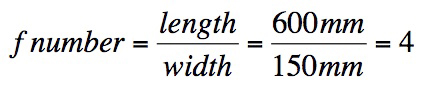
But first, just to keep things concrete, let’s
consider a quick example. One of the most popular lenses among
professional bird photographers is the 600mm f/4 lens. This lens has a
focal length of 600mm and an objective lens diameter of about 6
inches. Since one inch is equal to approximately 25 millimeters,
the diameter is roughly 150mm. Applying the formula from part B
of the figure above, we get:
Thus, for a lens with a 600mm
focal length and a 150mm objective lens
diameter, we say that the aperture
of this lens is f/4.
One way to think of this f-notation
is to think of the “f” in f/4 as standing for “focal
length”. In that case, f/4
would mean “focal length divided by 4”, which in the example above
would give us 600/4 = 150, or the objective lens diameter. Thus,
the “aperture” is what we would intuitively
expect it to be: the size
of the opening through which light is collected.
Notationally, the aperture of the lens in the
preceding example is emphatically not
4—rather, it’s f/4.
That is, the f-number is “4” but the aperture is “f/4”.
That’s important, because while you’d expect a larger “aperture” (hole
that lets in light) to result in brighter images, larger f-numbers (such as 8 instead of 4) actually let in less light than smaller f-numbers. That’s because the
f-number occurs in
the denominator of the f-notation.
Given two apertures, f/a and f/b,
if a>b, then f/a
will be smaller than f/b,
since a and b are in the denominator, and thus f/a
will be a darker aperture than f/b, since it denotes a smaller
objective lens diameter, which would let in less light.
Let’s consider a few more concrete examples.
In Figure 3.1.2, below, we show four super-telephoto lenses: two 400mm
lenses (f/4 and f/5.6), a 600mm lens (f/4) and an 800mm lens
(f/5.6). These are all
common birding lenses. Considering
first the two 400mm lenses (both at left), we can see from the figure
that the f/4
lens is wider than the f/5.6
lens. The f/4 lens will
thus let in
more light, allowing faster shutter speeds that will be better able to
freeze the action of the bird and thereby produce sharper images of
non-static subjects. The f/4
lens will also be more desirable in
early morning or late evening, or in cloudy conditions, when the faster
shutter speeds allowed by f/4
will help to overcome any hand-shake that
you experience when taking the shot (if you’re not using a
tripod). Of course, the wider lens will also be heavier and may
therefore cause more hand-shake, but as we’ll discuss in section 3.5, image
stabilization can to some
degree compensate for these issues.
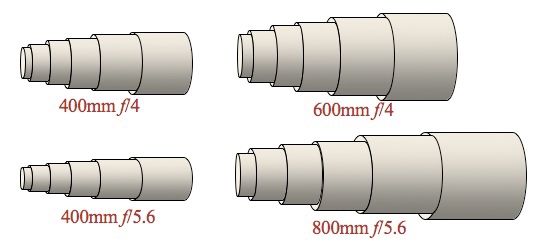
Fig. 3.1.2:
Typical focal lengths and apertures of
birding lenses. Because aperture is a function of
both the focal length and the objective lens diameter,
a wider lens doesn’t always have a larger aperture.
Compared to the 400mm lenses
depicted in the figure, the 600mm and 800mm lenses are obviously
longer. To compare widths, let’s first consider lenses of the
same aperture (f-number).
Comparing the 400mm f/4 lens
to the
600mm f/4 lens, we can see
that the 600mm lens is definitely wider than
the 400mm lens. But because 600mm is longer than 400mm, the
increased width of the 600mm lens still only results in an aperture of f/4, so that both
lenses will produce roughly the same brightness in
the resulting images, despite the 600’s wider opening. Similarly,
while the 800mm lens shown above
is much wider than the 400mm f/5.6
lens, the fact that they both result in a
length/width ratio of 5.6 means that they have the same f-number, and
should therefore produce images of roughly the same brightness (all
other things being equal).
Keep in mind that the issue of brightness typically
translates to shutter speed or other camera settings. In the figure above, you can see
that the 800mm and 600mm lenses have the same objective lens
diameter (6 inches), but since they have different focal lengths, the
apertures end up being different (f/4
versus f/5.6), so the
brightness
will be different: the 800mm lens will require slower shutter speeds or
higher ISO settings than the 600mm, because it lets in less light per
unit time than
the 600mm, despite having the same objective lens diameter. In
other words, your photos will be darker when taken through the f/5.6 lens than when taken through
the f/4 lens, unless you
compensate via camera settings (such as shutter speed or ISO).
But the act of compensating via camera settings can sometimes have
unfortunate consequences: for poorly lit scenes, you may be forced to
use a shutter speed that is so slow that the bird looks indistinct, due
to motion blur (motion blur
is discussed in Chapter 6), or if you instead
just increase the ISO you
may end up with an image that is very noisy. In this way, the
aperture of a lens can seriously affect the quality of your images, and
this is why professionals generally prefer lenses with the largest
apertures.
Up to this point, we’ve been talking about the aperture of a lens—as if lenses have only a single,
fixed f-number. In
truth, what we’ve really been talking about is the maximum aperture of a lens.
Most camera lenses have a built-in iris,
or diaphram, which can open
or close to various sizes to restrict the amount of light entering the
lens, as illustrated in Figure 3.1.3 below. In this way, the
aperture of a lens can be reduced, when needed.
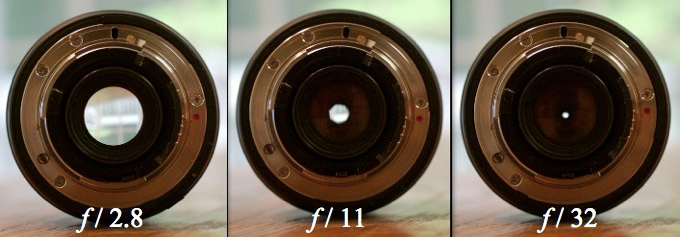
Fig. 3.1.3:
Reducing the effective aperture via an adjustable iris.
Left: wide open at f/2.8. Middle: stopped down to f/11.
Right: stopped down to f/32.
In the figure above, we’re looking
through an f/2.8 lens with
the iris set to different settings. In the leftmost image, the
iris is wide open, giving us
an effect aperture (f/2.8)
that is the same as the
maximum aperture of the lens. In the middle image, we’ve closed
the iris (or stopped down)
quite a bit, resulting in an effective aperture of f/11. In this middle image
you can see that the iris is not perfectly circular: in this case it’s
a heptagon (i.e., like a
hexagon or octagon, but with 7 sides); we’ll comment on this later, in
section 3.7. In the rightmost image,
we’ve stopped down even
further, to f/32, and now you
can see that the opening is very small indeed. For practical bird
photography, apertures smaller than f/11
are rarely used. A common range of apertures used in the field
would be f/5.6 to f/8.
In addition to letting in more light, a lens with a
large maximum aperture (i.e., a smaller f-number) also permits the use of
shallower depth-of-field
(DOF), which can be useful in isolating your subject from the
background and/or foreground. This can make a big difference in
the aesthetics of your photos, since the bird will stand out more, and
the background will be less likely to distract the viewer from the
beauty of the bird. The photo below shows five female Boat-tailed
Grackles (Quiscalus major)
perched on a wooden railing at a park; because I was using an f/4 lens at close range and was
shooting wide open (i.e., at
maximum
aperture), I was able to isolate one bird from the group, despite the
other birds being mere inches away from the subject in focus.
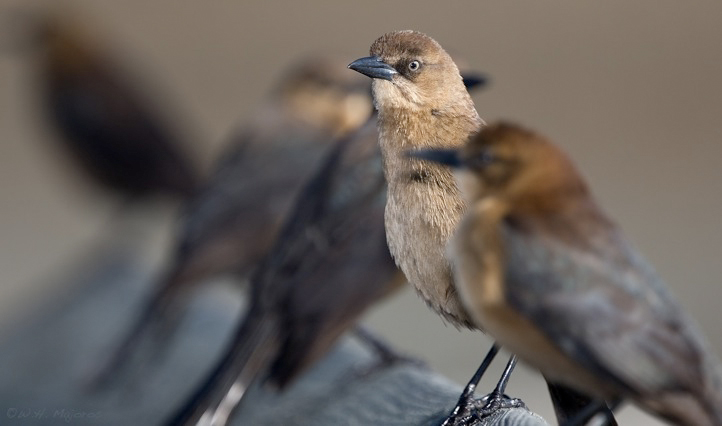
Fig. 3.1.4:
Isolating a subject via wide aperture.
At a close distance (~12 feet) and wide aperture
(f/4), I was able to isolate this grackle from its
flock-mates who were only inches away from it.
In practice, effects like that
shown above can be achieved in software if you don’t have a
wide-aperture lens. If I had instead shot this image at f/11, the other birds would
probably have been at least partially in focus, distracting the
viewer’s attention away from my intended subject (the single bird I was
focusing on). To get the effect illustrated above, but at f/11, I could have opened the image
in Photoshop, traced the outline of the second bird from
the right, and then applied a lens-blur
filter to the rest of the image. This isn’t always easy though, so it’s
preferable to achieve this kind of effect with a
wide-aperture lens (if you have one).
To briefly summarize, the maximum aperture of a lens
can affect the depth of field
of your images, as well as the maximum brightness, which in turn affects
the shutter speeds and/or ISO settings you’ll end up using
with that lens, and these latter settings can affect the image quality
due to motion blur or pixel noise. For these reasons,
lenses with wider maximum apertures (smaller f-numbers) such as f/4 or f/5.6 are preferable over those
with smaller maximum apertures.
For real-life birding situations, however, the focal
length typically trumps lens aperture in overall
importance, simply because focal length translates into magnification.
When chasing wild birds in the field—especially small, wary birds that
won’t let you get close—you’ll more often find that you
need more magnification
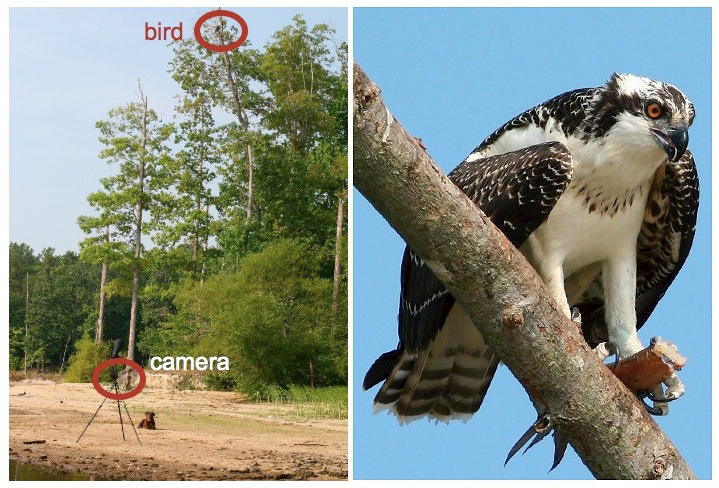
rather than less. Figure 3.1.5, below, should give
you some intuition
for how focal lengths translate to magnification and “reach”. On the left you can see a
tripod-mounted camera (a Sigma 800mm f/5.6
lens with a 1.4× teleconverter attached) and a
bird (an osprey) perched high above in a tree. The image on the
right was taken after the bird had moved to a more open branch at more
or less
the same distance from the camera. This image was taken at an
effective focal length of 1120mm.
Fig. 3.1.5:
Osprey at 1120mm.
Left: prior to photographing this bird, it was perched
as shown in the tallest tree. Right: after moving to a
nearby branch with fewer leaves, I photographed this
bird at a focal length of 1120mm (800mm + 1.4× TC).
This is an enormous focal length,
but given the distance and size of the bird, it was just right for
getting the amount of detail I wanted in my subject. Keep in mind
that magnification is important for achieving two things: making the
bird big enough to fill an appreciable portion of the frame, and
magnifying details such as feathers so that they’re large enough to be
individually resolved in the final image. Thus, while you can
always digitally zoom in on the bird later in Photoshop to make it fill
more of the frame, doing so won’t recreate details that were lost
during image capture (due to either lack of magnification or poor
optical quality). For my 10 megapixel professional camera body (a
2007 model with a 1.3× crop factor), which produces
exceptional image quality, I find that I can sometimes apply an extra
50% digital zoom, but most of the time I’m not satisfied with the
resulting image quality and will revert to full frame (no zoom).
Thus, if you want very high image quality, I recommend getting all of
your magnification from a combination of prime focal length (possibly
with a high-quality 1.4× teleconverter) and the so-called “foot zoom” (using your feet to get you
closer to the bird).
It should be obvious that the ideal magnification
for any shooting situation depends on the size of the bird and how
close you can get to it. It’s worthwhile to go through a few
examples with birds of different sizes to get a feel for how much focal
length you’ll want to have for shooting those birds at typical
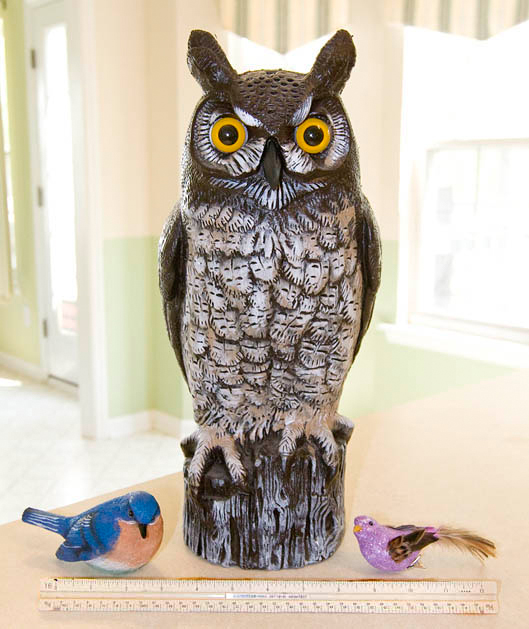
distances in the field. The image below shows the sizes of the
models we’ll be using in the ensuing examples. The owl is about the same
size as a great horned owl (Bubo
virginianus), the blue bird is about the size of an eastern
bluebird (Sialia sialis, a
typical American passerine), and the small purple bird is about the
size of a typical New World wood warbler (Parulidae).
Fig.
3.1.6: Models used in the ensuing examples. The owl is about the
size of a great horned owl (Bubo virginianus), the blue bird is about
the
size of an eastern bluebird (Sialia sialis), and the purple bird is
about
the size of a New World warbler (Parulidae). The size of the bird
and its
distance from the camera determine the ideal focal length for shooting
it.
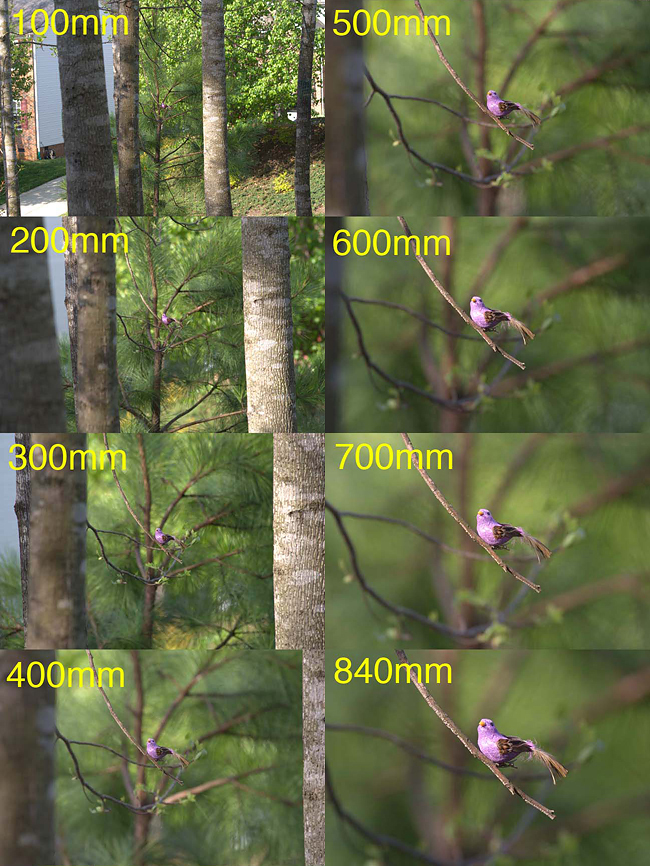
The first example is for the
warbler. You can see in the figure below that anything less than
840mm (600mm with a 1.4× teleconverter) leaves the bird
noticeably small in the frame, and even at 840mm you’d want to crop the
image so that the bird fills a larger proportion of the frame.
These photos were taken at a distance of 35 feet, using a 1.3× crop camera (section 2.3). That’s two and a half car lengths,
which is not a terribly large distance when you’re out in the field—and keep in mind that while the
model was at eye level, warblers are often found higher in the trees,
which increases the effective shooting distance. In order to get
really great warbler photos with my 840mm rig, I find that I need to be
closer than this.
Fig. 3.1.7: A
model warbler shot at different focal lengths.
The bird was 35 feet away, or about two and a half car lengths.
A 1.3× crop camera
was used. Note that even 840mm does not
result in a frame-filling shot, though it’s probably
large enough for
an acceptable crop.
Thus,
for warbler photography in a place like the North Carolina piedmont you
really need either a 600mm lens with a 1.4× teleconverter or an 800mm
lens, or you need to find a way to get closer to the bird. (One
way to
get closer is to travel to a migration hotspot where you can get within
15 feet of the birds and shoot them with a 400mm lens—see sections 8.4
and 8.7.1).
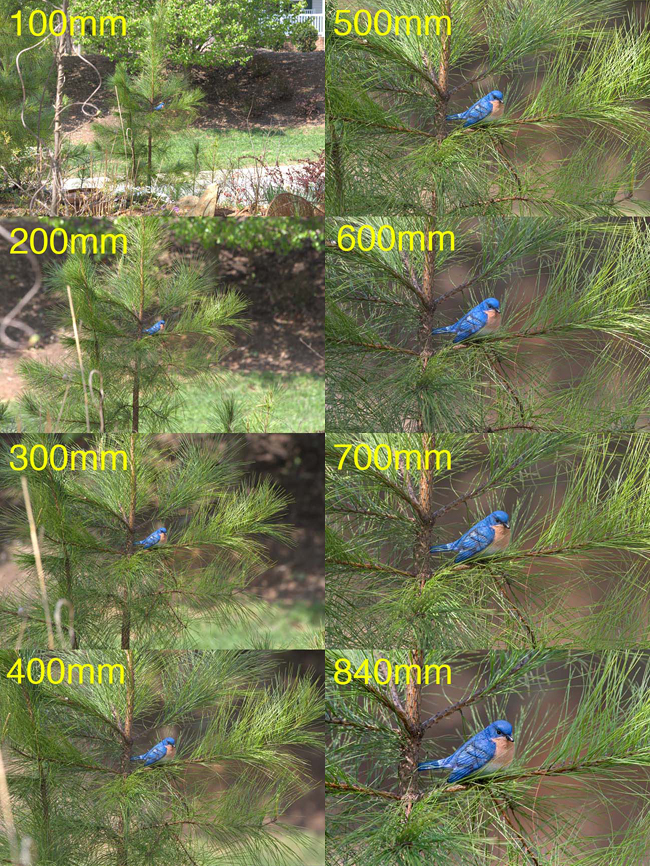
The next example is for the
bluebird, which was shot at 40 feet (direct line-of-sight distance)
with the same 1.3× crop camera. The size of
this bird is very typical for passerines, so for general-purpose
birding this example may be more relevant than the others.
Fig.
3.1.8: Model bluebird at 40 feet, or about two and a half car lengths,
which isn’t very
far. The 840mm shot renders the bird nice and large, though
the 600mm shot may support a reasonable crop. Passerines do
require large
focal lengths, unless you have some way of getting extremely close to
them.
In
this case 840mm enlarges the bird enough to fill a nice portion of the
frame. I could also have taken the 600mm shot and digitally
cropped it to make the bird appear 40% larger—that would have resulted in a
framing identical to the 840mm shot. As long as the 600mm shot is
a sharp
capture this might produce an acceptable full-screen image for posting
on the internet. But as mentioned earlier, for my 2007-model pro
camera body I typically don’t like to apply any digital zooming,
because doing so often sacrifices detail (I resize most of my images to
33%, which roughly fills my laptop’s 15-inch screen). Of course,
your images don’t need to fill the full
screen. Many people post images online that fill only a quarter
of the screen. For the example above, even the 500mm shot would
probably suffice to produce a high-quality image of that size.
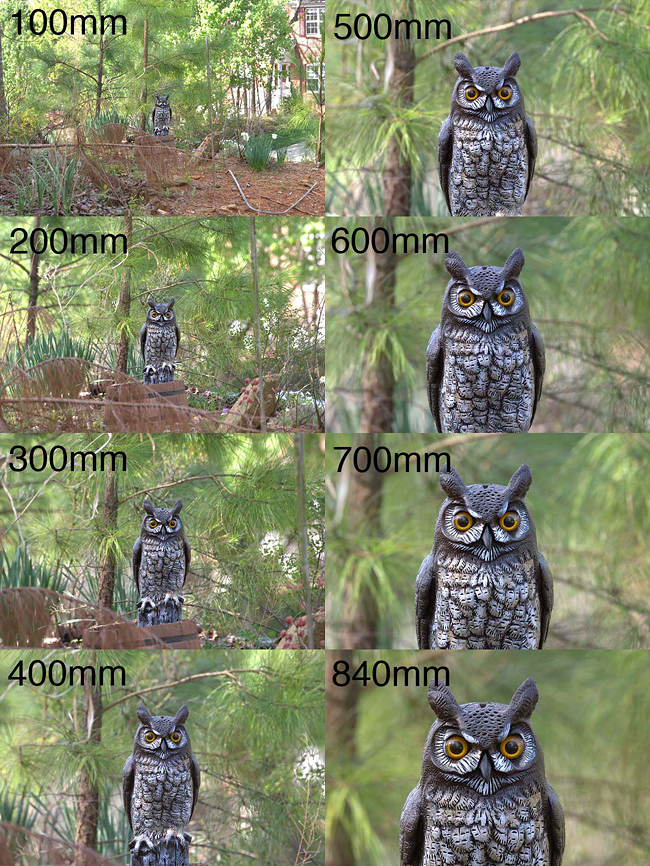
The final example is of a much larger bird—a great horned owl at 35
feet. As you can see below, you need a lot less magnification
when shooting a large bird like this. Acceptable framing can be
accomplished (for this bird, at this distance) at 300mm or 400mm, and
above 400mm we’re losing part of the bird. Nevertheless, 840mm is
still useful for this subject because it can be used to get incredibly
detailed head shots.
Fig. 3.1.9:
Great horned owl at 35 feet. For large birds like raptors,
waterfowl, pelicans, and others, 400mm is a very good focal length
at close distances, though 700-800mm is still useful for getting
ridiculously detailed head shots. Note that a bird in flight at
this
distance would fill more of the frame, due to its wing span.
Note that for birds in flight the
subject can appear substantially larger, due to the wing span.
For that reason, 400mm lenses are very popular for shooting birds in
flight (BIF—section 8.10)
at short distances. For wary passerines such as warblers and
thrushes in the wild, when it’s difficult to get closer than a couple
car lengths, the need for much larger focal lengths is unavoidable,
unless you can find some way to get closer to the bird than would
normally be possible—such as via the use of a blind (see section 8.4). My personal preference is to use a
500mm lens with a 1.4× teleconverter, resulting in an
effective focal length of 700mm. I can carry this rig on a sling strap (section 4.1) and shoot hand-held, so I get the benefit of
a relatively large focal length while still retaining mobility and
flexibility by not having to mess around with a tripod. That
mobility in turn allows me to get closer to the bird in many cases.
Unfortunately, large-focal-length lenses tend to be very,
very expensive. Canon’s and Nikon’s 500mm and 600mm f/4 lenses run between US $6000
and $9000 new. Even Sigma’s “third party” 800mm f/5.6 lens runs about $7000
(new). There are, however, several options available to the
budget-minded birder. First, there’s the possibility of using a
400mm f/5.6 lens with a
teleconverter to achieve 560mm (with 1.4× TC) or 800mm (with 2.0× TC) fairly cheaply: a new 400mm f/5.6 lens runs around $1000 to
$1500 for brand-name, or less for third-party, and name-brand
teleconverters range
from $200 to $500 US. The quality of such a setup will, of
course,
be no match for a $6000+ name-brand lens, especially when using a 2× TC. Furthermore, this setup
will typically require you to focus manually,
which can be very difficult if you have less-than-perfect eyesight, or
if you’re trying to capture birds in flight. (Note that with a
pro body you’d typically be able to use autofocus with an f/5.6 lens attached to a 1.4× TC, but not with an f/5.6 lens attached to a 2× TC; also, pro bodies run $4000+
new).
Two other options, both of which require manual
focusing, make use of cheap optics, but can sometimes produce fairly
good images with some effort. The first we’ve already discussed:
attaching your camera to an astronomical telescope such as the 1800mm
focal-length Maksutov telescope described in section 2.2.
Large-focal-length mirror telescopes such as Maksutovs and
Schmidt-Cassegrains can be had, new, for US $600 or so, and can be
extremely sharp. Unfortunately, they require manual focusing,
provide no image stabilization
(which becomes more essential at the high focal lengths these lenses
provide), and typically have a maximum aperture of around f/12 (and that aperture is often
fixed, so you can’t modify it in order to adjust your exposure).
They can also produce distracting background patterns, such as
doughnuts (see section 3.7). Smaller
versions of
these mirror telescopes have been developed and marketed specifically
as camera lenses, though these have a reputation for producing
low-quality images. Such a mirror lens is shown below; these
lenses often cost as little as $200 and provide 500mm to 800mm of focal
length. Just keep in mind that with photographic equipment you
generally get what you pay for.
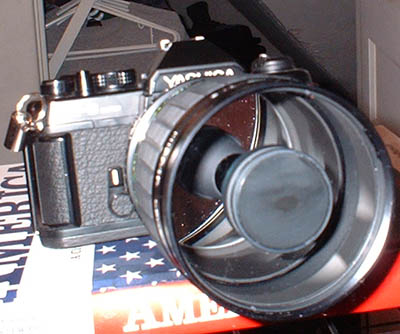
Fig. 3.1.10: A
cheap mirror lens.
(Public Domain image by Rama; reproduced from Wikipedia).
One final alternative for budget-constrained birders requiring large
focal lengths is the use of lenses from such manufacturers as Opteka, who offer long lenses with
very small apertures at very low prices. One such model is a zoom
lens that can go from 650mm to 1300mm, with apertures also zooming from
f/8 down to f/16. This model is available
for under $300.
If you’re tempted to follow one of these cheaper
routes, just be sure to find out about any and all shortcomings of the
lens/telescope before buying (or keep your receipt so you can return it
for a refund). In addition to the smaller apertures, many of
these lenses have fairly large minimum
focus distances (or MFD—see section 3.13.6); which means
that if the bird is closer than this distance you won’t be able to
focus on it (even manually). Reasonable MFD’s for bird photography are in the
range of 10 to 20 feet.
|
|
|