8.5 Steadying the Camera
Nothing is more frustrating than
photographing a beautiful bird in a beautiful setting, only to discover
after the bird has flown away that every single image is blurry. The two most common causes of
blurry images are (1) focusing errors,
and (2) motion blur (not
necessarily in that order). In the case of focusing errors, the
problem may be a faulty autofocus system (in which case you should send
the camera back to the manufacturer for repairs or re-calibration—see section 3.11),
or
may simply result from a difficult focusing situation (such as
insufficient lighting, or an out-of-focus object such as a twig
partially occluding the subject—see section 2.6).
In the case of
motion blur, there are two possible problems: either you’re using a
shutter speed which is too slow to freeze the subject (see sections 6.1
and 7.7), or the motion blur is due to camera shake. This section
addresses the latter problem.
For stationary subjects, you obviously want to keep
the camera and lens as perfectly still as you can. Image stabilization (IS—section 3.5)
can help with this to
some degree, though there are limits to what it can do. Even with IS enabled, I
find that I still have to exert considerable effort when using my
tripod-mounted rig to avoid noticeable camera shake at ~800mm; this is
especially true on windy days. Image stabilization (what Nikon
calls vibration reduction, or
VR) is intended to
compensate for hand tremors and slight disturbance due to air
movement. Expecting IS to completely eliminate camera shake due
to sloppy handling is in most cases asking too much.
Fig. 8.5.1 :
Image stabilization can help enormously in
keeping the image steady, though it’s no silver bullet.
Note that some lenses/cameras have a special IS mode
for panning—i.e., for following a bird in motion.
When using a tripod, there are a number of things
you can do to reduce camera shake. First, for stationary subjects
you can tighten all of the knobs on the tripod head to prevent the head
from inadvertently shifting during exposure. For birds that are
only momentarily stationary, however, this can be very inconvenient,
since you may need to loosen and re-tighten multiple knobs every few
seconds, likely resulting in lost shots. Another thing you can do
is to avoid using the center column of your tripod, whenever possible;
on many tripods the use of the center column decreases stability
(especially in windy conditions), resulting in increased camera
shake. Also, be sure to use the correct IS mode; on Canon
systems, mode 2 is intended for panning
(i.e., for following a moving subject), while mode 1 is more effective
for stationary subjects (other manufacturers likely have similar modes,
though they may be known by different names).
There are a number of things you can do with your
own body (i.e., your arms and legs) to improve stability. First,
try anchoring your head (either at the brow-ridge or cheekbone) firmly
against the camera; I find this technique to have a significant impact
on stability when shooting with a loose tripod head. Another very
effective technique is to use your free hand to steady the far end of
the lens (the end furthest from the camera); on large lenses you can
sometimes do this by grasping the screw that holds the lens hood in
place. With one hand firmly grasping the camera and the other
keeping the far end of the lens stationary, you should have maximum
control over the lens axis. This is true whether you’re using a
tripod or shooting hand-held.
When off the tripod, stability for shooting
stationary subjects can often be improved through the creative use of
body limbs and other props. Obviously, anchoring your lens firmly
against the side of a tree trunk can help. When in a standing
position, planting your elbow against your own trunk (i.e., your upper
torso) can help improve stability and reduce muscle fatigue. When
in a kneeling or sitting position, planting your elbow on your knee or
on the ground or a large rock will usually improve stability.
When lying on the ground, propping the far end of the lens up on a rock
or on your external flash battery pack can sometimes help. The
use of image stabilization, if it’s available, can of course further
help (though it’s important to use the correct “mode” of IS, depending
on whether the subject is stationary or moving).
Shooting birds in flight requires rather more effort
than shooting stationary subjects. For tripod-mounted rigs, a
good option is to use a gimbal
head (see section 4.2). Regardless what
type of tripod head you
use, for flight shots you’ll want all of the knobs kept loose to allow
the smoothest motion when tracking the bird in flight. Keeping
one hand at either end of the lens (one on the camera and one on the
lens hood) yields maximal control and makes smooth tracking easier—or
rather, makes smooth tracking more feasible,
even if it requires greater effort in terms of physical exertion.
Intense flight photography can be a good workout, especially without a
tripod.
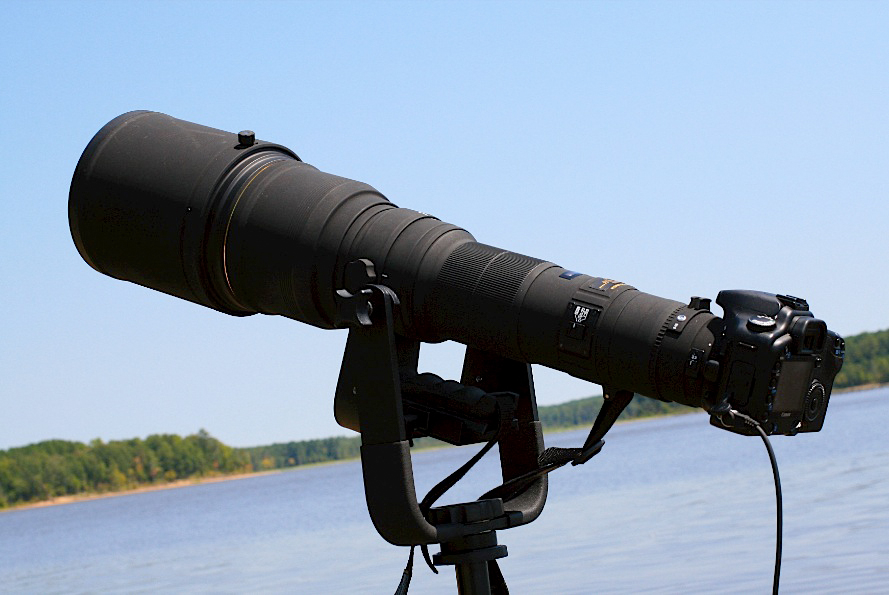
Fig. 8.5.2 :
For tripod-mounted rigs, a gimbal head can be very useful
when following birds in flight. With all the tension controls
loosened,
the lens rotates smoothly in all directions, almost as if you were hand-
holding it, but without all the strain on your arms. You do still
have
to step around the tripod while following birds, though, since the
lens is still coupled to a fixed rotational axis (i.e., the tripod).
For hand-held flight shots, you’ll again want to
keep your free hand as far out on the lens barrel as possible. I
like to anchor the camera firmly against my head (using my brow-ridge
and my cheekbone) and then swivel my whole upper torso—using my knees—when tracking the bird, rather
than moving my arms, if possible. For really intense flight
action, try keeping your knees slightly bent, and then do all the
tracking motion using your legs. When you first catch sight of
the bird, quickly find good positions for your feet, and then try to
track the bird along its trajectory without repositioning your feet
unless absolutely necessary; swiveling on the ball of your foot is
usually better than taking an actual step, in terms of maintaining
balance and focus.
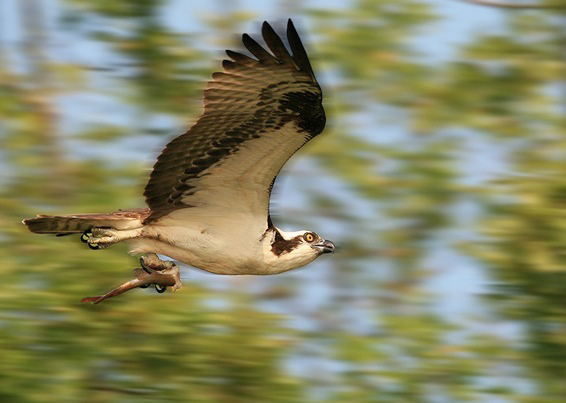
Fig. 8.5.3 :
When tracking birds in flight, try to confine all of your bodily
movements
to your legs and your lower torso, keeping your arms and head fixed
relative to your
trunk. Hold the lens at both ends (the camera end and the lens
hood, if any). Turn
IS off, or make sure it’s in panning mode. And don’t forget to
follow through: when
you press the shutter release, keep the camera smoothly panning along
its trajectory.
(Note: a motion-blur effect was added to the background of this image
in Photoshop).
A common
pitfall when shooting birds in flight is a failure to follow through. Following
through means continuing to track the bird’s trajectory even after you
press the shutter release. Many people make the mistake of
freezing the camera when they press the button; the problem with doing
this is that the bird doesn’t also freeze, so by freezing the camera
you increase the potential for motion blur via movement of the
bird. By keeping the camera in motion while the shutter is open,
you’ll hopefully keep the bird more-or-less aligned with the same
pixels on the imaging sensor the whole time the sensor is exposed; if
you instead freeze the camera during exposure, then the projected image
of the bird is likely to be “smeared” across the sensor during the
imaging interval, resulting in image blur.
Diving birds present an especially difficult
challenge, since they can accelerate rather rapidly during their
descent. Recalling from elementary physics that objects in
freefall near the surface of the Earth accelerate at approximately 9.8
m/s2, it’s not terribly difficult to imagine that a
horizontally flying bird that suddenly turns into a dive can present a
challenge for the enterprising photographer hoping to capture a sharp
image of the descent. For the pelican photo below, the solution
to this problem involved a healthy dose of luck in combination with an
intentional effort to remain mindful of the rapidity with which gravity
can accelerate a sizeable mass. (In
other words, just do your
damnedest to keep the camera on the bird and fire off as many shots as
you can—and maybe you’ll eventually get lucky.)
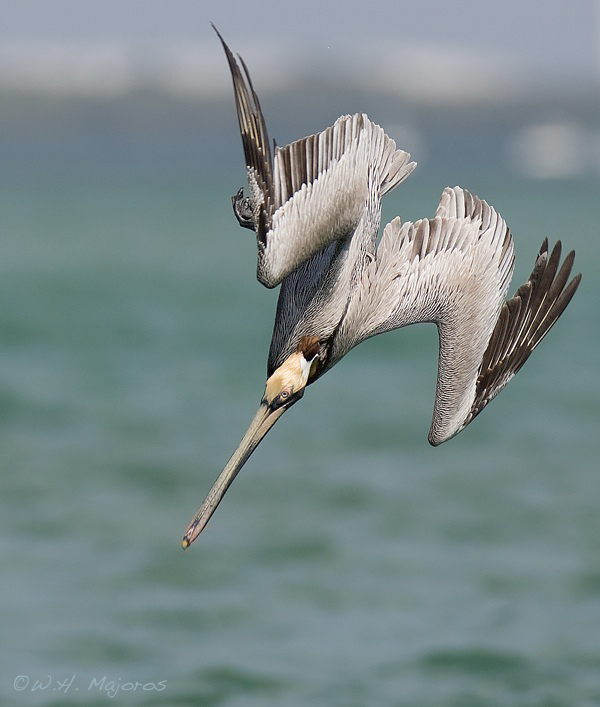
Fig. 8.5.4 :
Tracking diving birds is extremely difficult—much more so that I ever
expected before I tried it. The problem is that as the bird turns
into its dive it
accelerates very rapidly, due to gravity. To get this pelican
shot I had to take
several hundred shots of birds diving from a foraging flock. Only
a handful
of shots turned out well.
Note that for
birds in motion it’s typically best to keep image stabilization turned
off. If your lens (or camera) has an IS mode specifically
designated for panning (“mode
2” on Canon lenses), then you at
least have the option of using IS for
flight shots; stationary-mode IS (“mode 1” for Canonites) should
definitely not be used for
tracking subjects in motion, since it will try to keep the image
stationary, whereas what you want to do is to keep the image moving
smoothly as it tracks the subject. Keep in mind that when IS is
enabled (regardless of mode) your autofocus system may take noticeably
longer to initially acquire the subject; for warblers and other
restless birds, this can result in more frustration than anything else,
and in these cases I simply turn IS off altogether.
Finally, it goes without saying that accurate
operation of your camera’s autofocus system depends on your ability to
keep the AF sensor(s) positioned on the bird in the viewfinder.
Thus, for birds in flight it becomes even more critical to smoothly
track the bird. If your panning is jumpy, the AF point that is
tracking the bird may pick up the background and focus on that
instead. Some camera settings (such as re-acquisition speed and the
enabling of helper points—see
section 2.6) may help to some degree, but it’s
still very important
when taking flight shots to keep the bird as perfectly stationary
within the viewfinder as possible.

Fig. 8.5.5 :
Keeping the AF point on the bird is critical for flight shots.
For the bird on the
left, I was sloppy and let the AF point drift to the background; once
the camera picked up
the background, it was reluctant to re-acquire the bird even after I
pointed the AF point at
it again. Before taking the shot on the right, I had turned on
the camera’s point-expansion
option, which allows the camera to switch AF points automatically in
order to keep the
subject in focus. Note that this feature doesn’t work the same on
all camera models!
If you do lose the subject by having the AF focus on
the background (as in the photo above), getting the bird back into
focus can sometimes be very difficult. If you can at least see
the bird as a blob in the viewfinder, it sometimes helps to tap the
shutter release button one or more times to re-initialize the AF
tracking algorithms once you’ve got the active AF point positioned on
the bird again. If your lens has a range limiter switch (see section
3.8.2), setting this to an
appropriate value for the bird(s) you’re
working with can place some bounds on how far out of focus the lens can
go, and can therefore make re-acquisition of the bird somewhat
faster. Just remember to reset the focus limiter when you switch
to shooting subjects at other distances; otherwise, the lens will
refuse to focus at that distance.
|

