8.2 Angles and Light
Now that we’ve spent some time
considering the importance of subject placement in the frame, let’s
change gears for a bit and think instead about the placement of the camera. Far too many
photographers stand complacently behind their tripod-mounted cameras
and wait for the perfect image to spontaneously form directly in front
of them. Sometimes they get lucky. But most often, the
ideal image for a given situation is either at an odd angle (i.e., not
visible from a point 5 feet 6 inches above the ground on an officially
designated park trail) or is a moving target, in the sense that the
ideal angle changes over time. If you too often find yourself
standing quiescent behind your tripod in the field, it may be good to
meditate on the following “rule”:
| Kelsey’s Rule of Ideal Angles |
“If you’ve been standing comfortably
behind your tripod for more than ten minutes, then you’re probably not
getting the ideal angle.”
Kelsey
the Dog.
|
I am firmly convinced that the
best way to inject novelty and perspective into one’s bird photography
is to always be ready to try a new angle (literally). Birds, as
flying creatures, live in a somewhat more three-dimensional world than
we do, and capturing them in their element sometimes requires
deviations from normal human thinking.
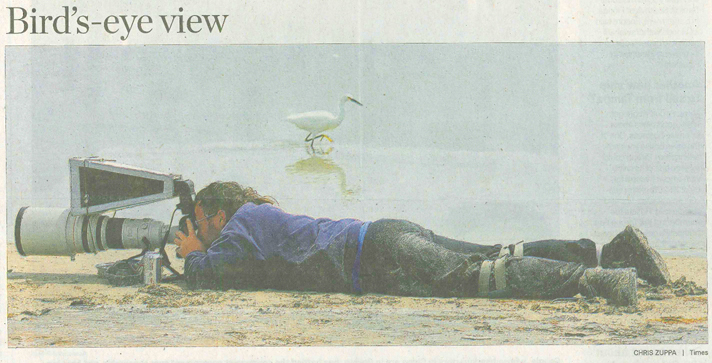
The author
photographing shorebirds on his belly. A newspaper
reporter found this scene strange enough to be newsworthy.
In the case of
waterbirds (such as ducks and
herons), an especially productive exercise is to get down on your
belly—even when that means lying in mud or shallow water (or even in
mounds of smelly goose droppings)—and expore your options for getting
images of the bird at or near eye-level. By placing the camera on
the ground, at the bird’s level, you effectively take the viewer of
your images into the bird’s world, so that your photos look less like
amateur snapshots and more like professionally crafted, artistic
depictions of the lives of birds.
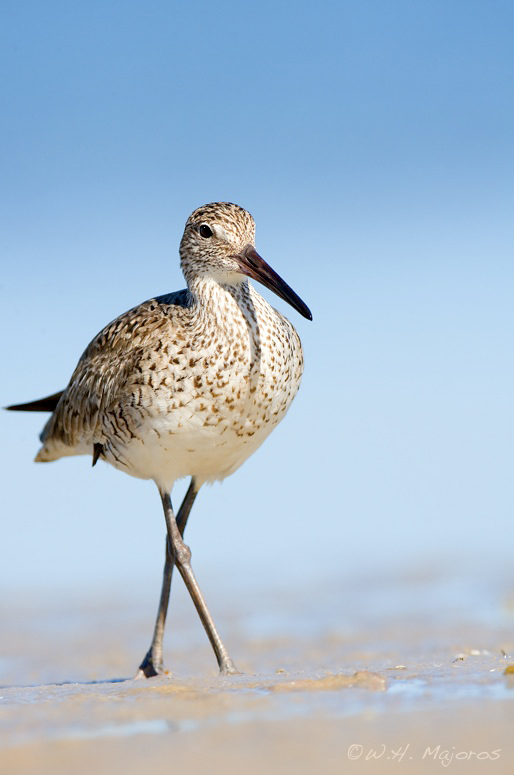
Fig. 8.2.1 :
Willet from a very low angle. The use of a low angle
for birds on the ground or in the water helps to take the viewer
into the bird’s world, providing a more intimate visual encounter.
Note that crossed legs often mar an otherwise good photo. The
slight tilt to this photo can be seen as another defect, but I think
it improves the novelty of the perspective.
The willet (Tringa semipalmata)
shown above is less than a foot tall, but by getting low and pointing
the camera up at the bird, it’s made to look much larger. Note
that the use of a shallow depth-of-field (DOF) here makes the beach
look like it extends indefinitely into the distance, and also blurs the
distinction between the sand and the sky.
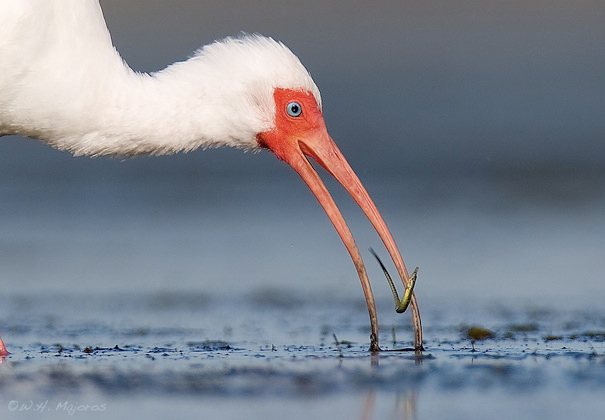
Shooting birds in the water at eye level can produce
rather striking effects due to the compression of the water into a
narrow band. For the white ibis (Eudocimus
albus) photo below, I was actually kneeling in the water with
the bottom of my lens barely touching the surface. A shallow DOF
again helped to compress the in-focus portion of the scene. If
you look critically at some of the works by great photographers such as
Art Wolfe, you’ll see that they often employ angle tricks like this to
produce the novel effects that make their photographs so memorable.

Fig. 8.2.2 :
Low angles do amazing things to water. The use of a shallow depth-
of-field helps to accentuate this effect. For this shot my lens
was as low over the
water as it could get without submerging.
A low angle coupled with a large focal length can be
especially useful in capturing intimate images of hunting behavior by
waterbirds. The large focal length allows you to get closer to
wary birds than you otherwise could, and provides magnification for the
small prey items captured by the bird, as demonstrated by the ibis
image below.
Fig. 8.2.3 :
Another example of low-angle waterbird photography.
Shooting from low angles doesn’t have to mean getting wet and
dirty. When I know I’m going to be lying in mud or wet sand, I’ll
take along something to lie on: either two large trash bags (which fold
up nicely into a vest pocket), or a large sheet of painter’s
plastic. The latter can be purchased in rolls from the hardware
store and then cut to your size. I fold mine up and keep it in a
trash bag that I then clip to my belt with a carabiner clip, for easy
carrying in the field.
In order to keep your lens and camera clean and dry,
you can use a frying pan (or similar device), as illustrated below.
Fig. 8.2.4 :
Keeping your lens dry and clean when crawling on your belly
can be difficult. Expensive “ground pods” are available
that can
help with
this, but I prefer my $7 frying pan from WalMart. Note the
carabiner clip
on the handle, which allows me to clip the pan onto my belt when
walking.
The frying pan is easy to carry around if you use a carabiner clip to
attach it to your belt, and is easy to slide around on smooth surfaces
such as sand or mud. By placing the lens foot in the pan, you
keep sand and dirt off of the tripod mounting plate (if you’re using
one); you can also place the external battery pack for your flash in
the pan, to keep it dry (which is obviously very important). Note
that you do still need to keep hold of the lens and camera while using
the frying pan, in order to keep the rig from tipping over and falling
into the shallow water (this happened to me once, but fortunately
nothing was damaged). There are professional ground pods you can
buy which allow you to attach the lens to the pod, reducing the chance
of your rig tipping over; these typically cost over $100 (US), and for
that reason I prefer my $7 frying pan from WalMart.
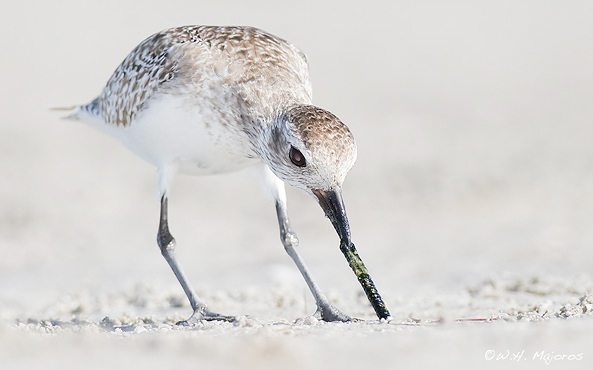
Fig. 8.2.5 :
Yet another on-my-belly shot. This shorebird is
extremely small, but by using an eye-level perspective the bird
is made to appear much larger.
Note that while
a frying pan can be used at the edge of a body of water to keep the
lens foot (and battery pack, if you use one) dry, waves or changes in
water level can cause water to splash into the pan, possibly damaging
your equipment (this is especially true for battery packs). Also,
when shooting birds from a prone position at the edge of any body of
water subject to tide changes, be sure to keep all water-sensitive
equipment well away from the water. I once had a cell phone
destroyed when the tide slowly crept up to me and imperceptibly soaked
my pants’ pocket where the cell phone was. On the same trip I
encountered a fellow who had just destroyed his teleconverter in the
same way. I now keep my phone, memory cards, and other important
items in sealed ziplock bags at all times when in the field.
While shooting from ground level can be very useful,
it’s not always the ideal angle—even for waterbirds. Sometimes
you can get better background colors, or even a reflection of the bird,
by changing your angle. Although reflections of the subject in
water are considered by many to be cliché, many others find them
to be quite pleasing.
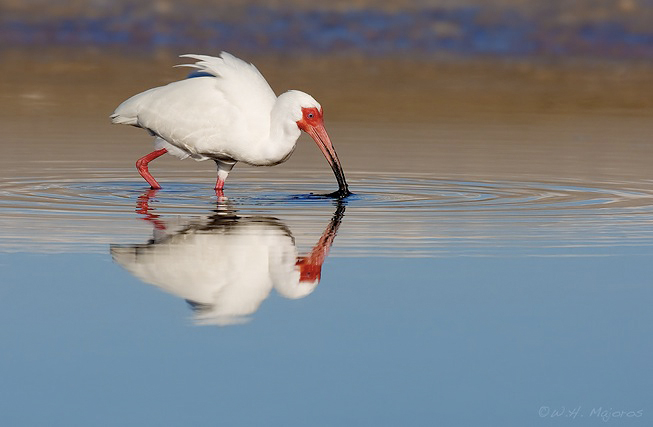
Fig. 8.2.6 :
Reflections may be considered cliché according to some
standards, but
many people still like them. To capture a coherent reflection of
the bird the camera
typically has to be at least a few feet above the ground. Note
that distance to the
subject has a significant effect on the resulting angle. This
shot was taken from
a considerable distance while the camera was tripod-mounted (about 5
feet high).
In the field it can be difficult to pay attention to both the subject
and the background—particularly when both are in motion—but it’s often
worthwhile to try to do so. Birds swimming in water provide a
particular challenge, because as the bird moves across the surface of
the water, the background reflections can change drastically from one
instant to the next. And though we as birders tend to concentrate
inordinately on the bird, to a wider audience the background is quite
often what makes or breaks an image, in terms of its artistic impact.
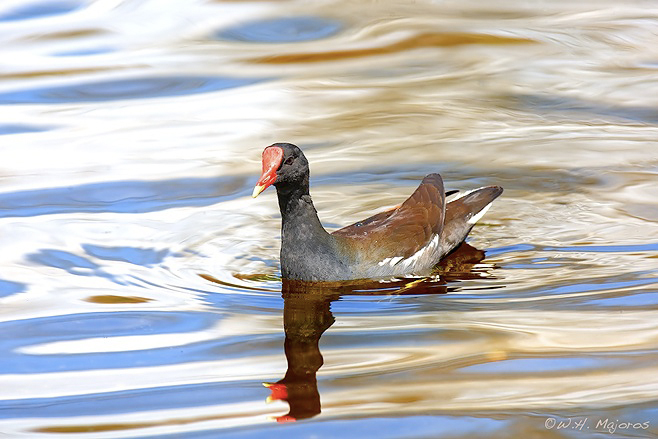 Fig.
8.2.7 :
Non-birder viewers of your images may care more about the
Fig.
8.2.7 :
Non-birder viewers of your images may care more about the
background than about the bird itself. Water can provide wonderful
opportunities for capturing interesting backgrounds, via reflection of
colors from the far shore. In this case I specifically waited
until the bird
passed through a prominent patch of brown (matching the bird’s dorsal
wing plumage) to create some visual interaction between foreground
and background. This bird’s head angle does mar the image
somewhat.
One strategy is to take a shot
every time the bird’s head is oriented properly (showing the face and
at least one eye), and to later sort through the images and pick out
those that happened to have nice background reflections. This
strategy can result in large numbers of images that later take a lot of
time to sort through, but the effort is often worthwhile.
One thing that I like to do at my local duck pond is
to find a part of the pond that has good reflections at that time of
day, and then photograph any ducks that wander into that area.
Even when working the same tiny patch of water for an hour or more, the
photos all turn out different, due to the neverending variety of wave
patterns on the surface. Autumn is an especially good time of
year for getting waterbird photos with interesting backgrounds, due to
the reflections from changing leaf colors (in those locations where
deciduous trees shed their leaves in the fall).
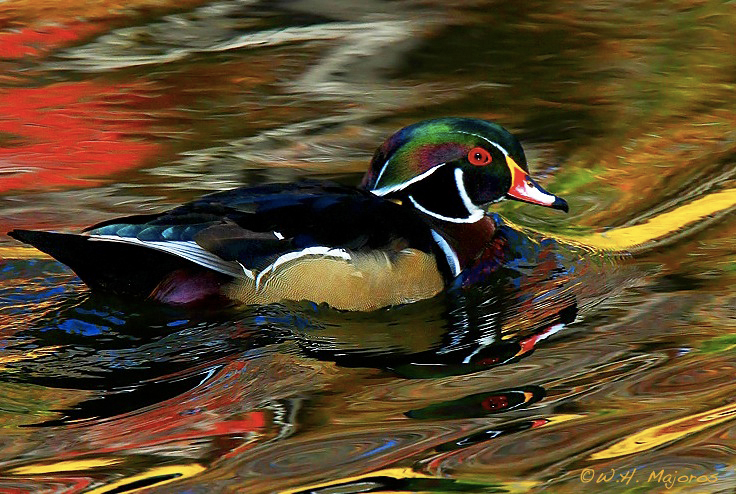
Fig. 8.2.8 :
Reflections of autumn leaves in water can provide for an amazing
background palette. The constant movement of waves results in a
neverending
variety of color patterns. In this type of setting I typically
take lots of photos
and sort through them later to find the ones with the best backgrounds.
Angle tricks aren’t only useful around water. In addition to
getting different views of the bird, changing your angle can let you
take advantage of certain lighting phenomena. The great egrets (Casmerodius alba) below illustrate
what’s known as rim lighting—what
happens when a light source behind the subject provides bright
illumination around the edges of the bird while leaving the rest of the
bird somewhat darker. As you can see, this creates an interesting
mood for the scene.
Fig. 8.2.9 :
Rim-lighting. Though back-lit subjects are usually avoided by
bird photographers due to the poor illumination of the bird’s front
side,
in some cases back-lighting can create interesting effects.
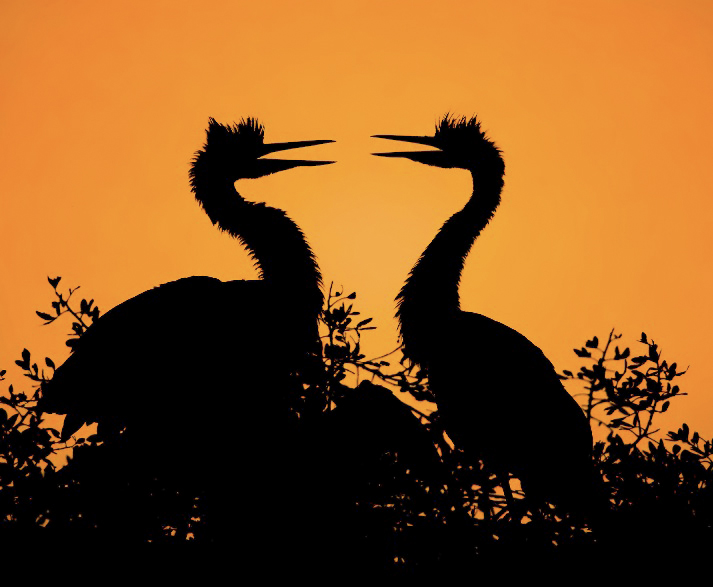
A more extreme (and probably more
familiar) effect is that of silhouette
lighting. Silhouette shots are a good reason to stay in
the field right up through sunset. If you do try to capture some
silhouette shots of birds, don’t be disappointed if yours don’t seem to
be as bright or contrasty as the one shown below: for this shot I had
to significantly increase the brightness, contrast, and saturation in
Photoshop to get the final image shown here. I also had to rotate
it just a few degrees to restore the horizontal symmetry (my camera
might not have been perfectly level when I took the shot—a common
problem in the field).
Fig. 8.2.10 :
Silhouettes are among the easiest and most rewarding scenes
to capture in the field. Don’t worry if the color of the sky
isn’t intense enough
when you take the shot: that can easily be fixed in Photoshop.
One nice thing about shooting
silhouettes is that they’re usually fairly easy to postprocess: in many
cases, all you have to do in the field is get a sharp image of the
bird’s outline, without worrying about depth of field or color or
brightness. As long as you get a good, sharp silhouette shape,
the foreground can be made black and the background some appropriate,
bright color, with very little effort (in Photoshop). Noise is
typically very easy to fix in silhouette shots too, because you can
easily select the foreground or background and apply strong noise
reduction to just the selected area, since there’s typically no
fine-scale detail within regions of the image (away from the edge of
the silhouette).
If you’re shooting without flash (or are forced to
use a low flash ratio), one thing that you need to be constantly aware
of is the distribution of shadows in the scene. The ovenbird
photo below illustrates some of the relevant issues related to shadows.
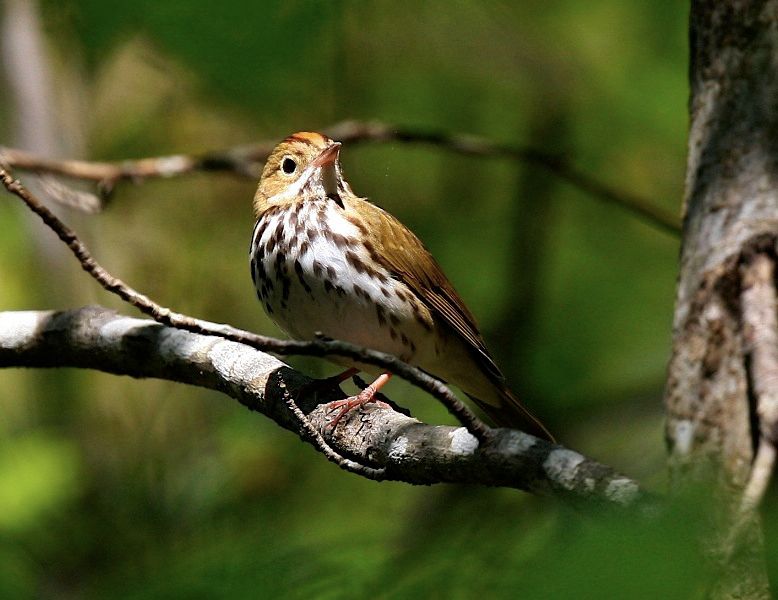
Fig. 8.2.11 :
Shadows can both enhance and mar an image. Direct
sunlight is a special problem for today’s digital imaging sensors, due
to
their limited dynamic range; capturing detail in highlights and in
shadows
typically isn’t possible without exposure bracketing. Note also
that the bird’s
eye in this image looks dead, due to the lack of any catchlight.
First, shadows affecting the bird
are typically the ones you most want to avoid (unless you’re using them
to achieve some sort of artistic effect—see below).
In the image above, the underside of the bird is heavily affected by
shadow since the sun is shining from directly overhead (though parts of
the shadow are lightened by light reflected upward from the
branch). Note also that the bird’s beak casts a fairly prominent
shadow, which some viewers may find distracting.
The main problem with shadows is that the dynamic range of today’s digital
imaging sensors is often too limited to capture detail in both the
highlights and the shadows of a scene—especially one lit by direct
sunlight. To avoid blowing the highlights you’ll generally have
to underexpose the shadows, so that any detail you would have seen with
the naked eye is likely to be lost in the digital image. Shadow
areas also tend to harbor noise, due to their lower photon counts and
the resulting sampling error
(see section 2.5). Note also that, in the
image above, the eye is
shaded from the sun and therefore lacks any catchlight that would have given it
some dimensionality. The use of flash can often fix (or at least
mitigate) many of the foregoing problems (see Chapter 7).
Shadows aren’t always bad, however. Shadows
can help to improve the dimensionality of the scene, and can also give
the viewer a sense of time-of-day (via the implied position of the
sun). In the bald eagle photo below,
extensive shadowing of the bird’s body greatly affects the mood of the
resulting image, and the pure black background (entirely due to shadow)
forces all attention onto the subject. Tiny shadows cast by
individual feather barbs (possibly accentuated by the side-lighting) result in a natural
form of the micro-contrast
phenomenon discussed in Chapter 7 in relation to flash; micro-contrast
can help reveal an enormous amount of fine detail in a bird’s plumage.
Fig. 8.2.12 :
Shadows aren’t always bad. Here, the dark background and shadowing
of one side of the bird has imposed a certain mood on the image.
Direct sunlight on
the bird’s head has also resulted in more fine detail, due to the
effect of micro-contrast.
Note that this image was produced by merging three different exposures
using the HDR
feature in Photoshop to overcome a lack of adequate dynamic range in
the camera.
For the above image, however, additional effort was required to bring
out the bird’s body, since a single exposure would have resulted in
either blown highlights in the white head or far less body detail than
shown here. To make this image I had to take three different
exposures in rapid succession (via exposure
bracketing—see section 6.9) and then
merge the exposures via HDR
(high dynamic range) in
Photoshop. HDR and the related concept of tone mapping are discussed in
section 6.9 and in Chapter 13. Note that
while the black
background in the above image occurred quite fortuitously, due to the
deep shadowing of the background, a similar effect can sometimes be
achieved, when using flash, by employing a high flash ratio so as to
expose the subject more than the background (see section 7.6); the use
of flash wasn’t feasible for this particular
image, because the (captive) bird was behind a wire mesh.
In terms of the strong side-lighting evidenced in
the above eagle photo, it’s worth noting that direct side-lighting is
most often not desirable in
the field, since in many cases you’ll end up with a half-illuminated
bird that many people would find unpleasant. When the sun is low
you can eliminate side-lighting by repositioning to either the sunny
side of the bird (to obtain direct front-lighting)
or the dark side of the bird (to obtain rim-lighting or a silhouette shot).
Alternatively, you can wait until the bird moves out of the direct
sunlight, and then either employ flash (to make your own frontal
lighting) or rely on ambient light.
|