8.9
Photographing Warblers
A
number of bird
families deserve special consideration as to
the mechanics of their
effective capture (photographically) in the
field. One of these
is the warblers.
Though
the taxonomists will rightfully distinguish
between the old-world
warblers (the Sylviidae) and the new-world
warblers (the Parulidae), for our purposes
it
serves just as well to consider any small,
fast-moving bird as an “honorary
warbler”—just for
the present
discussion. These
subjects can be exceedingly difficult to
capture in an aesthetic pose,
for a number of reasons which we’ll consider
in due course. In
this section we’ll focus on techniques for
effectively photographing
small, active songbirds such as warblers,
vireos, wrens, chickadees,
nuthatches, and similar species.
For many birders, the
biggest problem with warblers
is finding them and getting close enough to
get a good view (and/or a
good photograph). In the suburbs of
Washington D.C., where I
first took up birding many years ago, there
are a number of excellent
places to go to see warbers during the spring
migration.
Unfortunately, these tend to be better places
to see
warblers (i.e., with
binoculars) than to photograph
them. In many forest settings, warblers
like to forage high in
the trees, and since the birds are themselves
quite small, an enormous
amount of magnification may be required to
make the bird fill enough of
the frame.
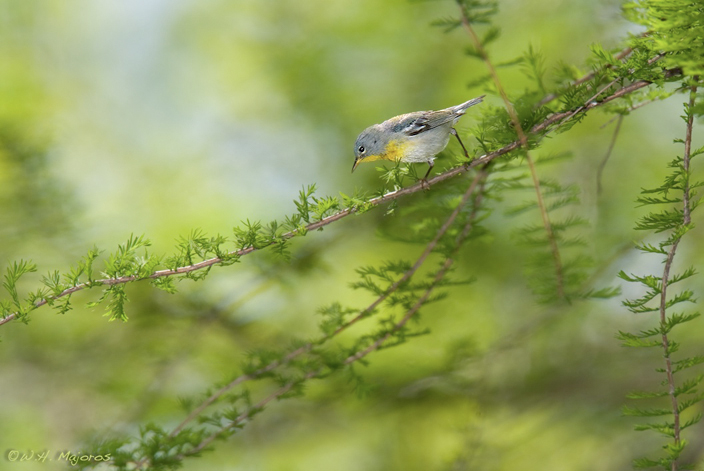
Fig. 8.9.1: One of the biggest problems in
warbler photography is
getting the bird
to be large enough in the frame. Though
longer focal-length
lenses can help, a
better option is to get closer to the bird, if
you can. Note that
not all warbler
photos have to have a bird large in the
frame. If the background
is nice enough,
the bird can be quite small and still result in
an interesting
image. My personal
preference, though, is for the bird to be bigger
in frame than shown
here.
My first
serious attempt at photographing warblers was
along the Eno River in
North
Carolina, using an 800mm f/5.6
tripod-mounted lens.
After upgrading from a consumer-grade 400mm
zoom lens, I felt sure this
would provide enough firepower to capture any
bird I wanted. My
preferred prey at that time was the
Yellow-throated Warbler (Dendroica
dominica), which in this
area likes to forage at the tops of very tall
sycamore trees.
Discovering that my tripod head wouldn’t tilt
back far enough to point
straight up, I took to lying on my back on the
forest floor with the
lens—still attached to the tripod—balancing
uncomfortably on top of my
face.
While the birds frolicked high above, I did my
best to track them with
my monstrous lens positioned vertically from
the forest floor
below. The top image in the figure below
shows a typical result
of these early attempts. As you can see,
it’s not very good.
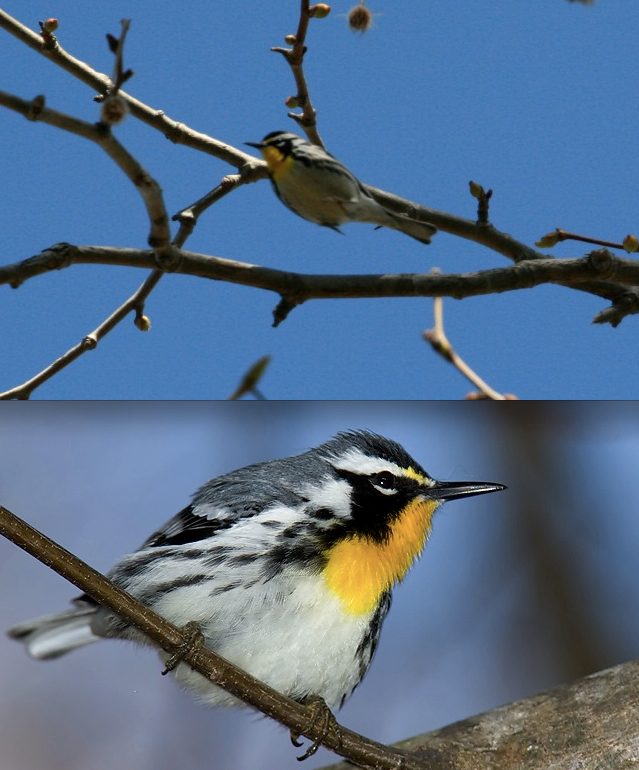
Fig. 8.9.2:
Magnification versus closeness. Top: even
using an 800mm lens, I
was
unable to get decent images of yellow-throated
warblers (Dendroica
dominica)
foraging high in the trees above me.
Bottom: when the bird came
down to my
level, I was able to get a much better shot
using a lightweight 400mm
lens.
The problem is
that for birds high in the trees, even with an
800mm lens you’ll
typically need to crop the image very, very
aggressively in order to
enlarge the bird. Even after aggressive
cropping, the top image
in the above photo still features a small bird
in the frame, and the
sharpness is obviously quite awful.
After several days of
strenuous effort at photographing these birds
with
the monstrous 800mm lens, I got lucky.
While walking back to my
car one morning an individual came down to
perch briefly at my
level. I quickly
set down my tripod-mounted rig and switched to
my shoulder camera, on
which I keep a 400mm lens mounted. I
then shot the bottom image
shown in the figure above.
The moral of this story is
that you can spend
inordinate amounts of time, money, and effort
trying to achieve the
impossible—in this case, obtaining tack-sharp
images of tiny birds
flitting energetically through the treetops
high above—or you can
instead opt for patience and adopt an
opportunistic strategy, capturing
birds at close range when they
decide to come into close range.
For birders just starting
out with photography, it can be difficult to
have this kind of
patience, but doing so can help to save wasted
time and effort
obtaining poor-quality photos that later will
be supplanted with much
higher quality images obtained—in time—through
opportunism,
continual readiness, and good old-fashioned
luck.
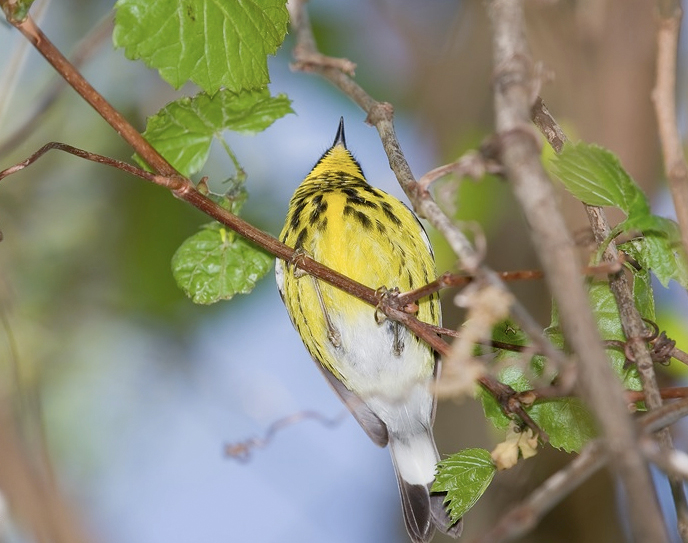
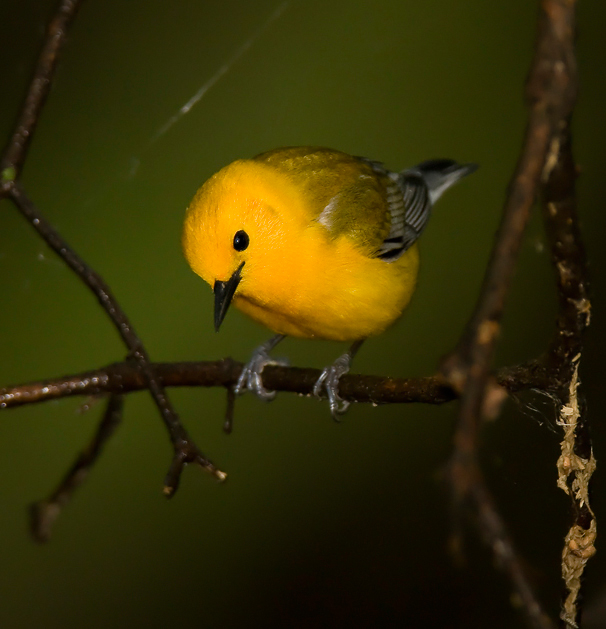
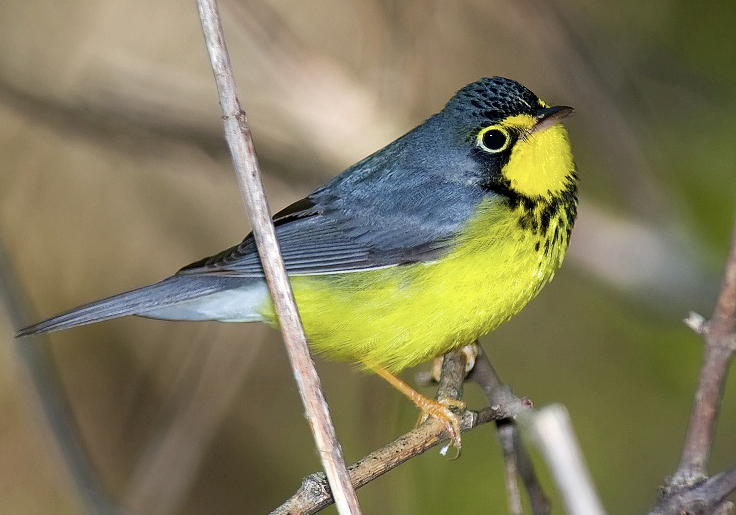
Fig. 8.9.3:
When shooting warblers foraging in the branches
above you, what you’re
most likely to get are belly shots.
Although belly shots can
occasionally be interesting,
they lose their novelty after you’ve taken
several million of
them. Not all shots of
warblers overhead need be belly shots, however,
since the birds tend to
be quite
acrobatic.
It turns out
that luck can often be manipulated through
intelligent planning.
In the case of warbler photography, there are
a number of hotspots
that, if you’re there at the right time of
year, can yield photographic
opportunities that are simply impossible in
most photographers’ home
towns. In 2008 I spent a solid month
(late April and early May)
pursuing warblers at my local state park,
acquiring in the process a
handful of moderately acceptable images,
though nothing
exceptional. In mid-May of the same year
I spent ten days at a
warbler hotspot in Ohio, where I effortlessly
shot thousands of photos
of warblers at virtually point-blank range as
they foraged mere feet
from where I was standing.
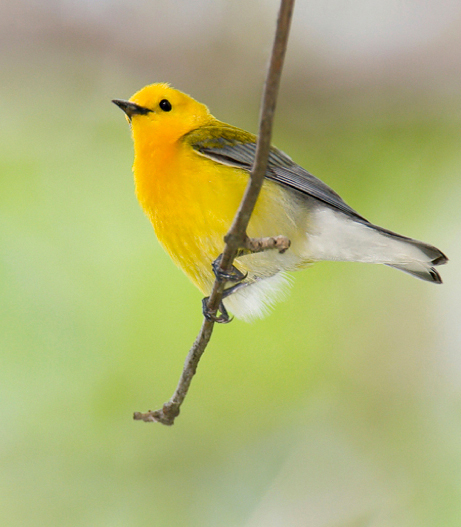
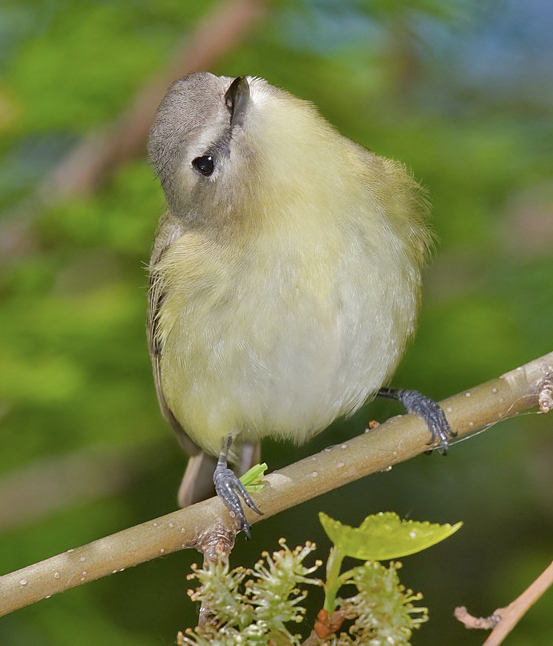
Fig. 8.9.4: A
belly shot that I like. Though the image
lacks
sharpness, I like the dreamy quality of the
background. As
far as belly shots go, this one at least gives
you a glimpse
of the bird’s face, though most photographers
would discard
this image because of the angle (i.e., shot from
below).
I now make it a
yearly ritual to travel to the same warbler
hotspot for 10 days of
intense shooting, which allows me to
prioritize my efforts at home,
during the remainder of spring, toward those
few species that are
easier to shoot locally where I live (such as
the Prairie Warbler, Dendroica
discolor). Traveling to a
remote location to shoot birds
can
indeed be costly and inconvenient (and even
dangerous), but can be
extremely efficient in terms of expenditure of
time. Knowing that
you can easily capture species X, Y, and Z
during a remote vacation
will free
you to concentrate on other species that are
easier to capture in your
own locale during the rest of the year.
In terms of warbler
photography in the United
States, there are several sites that stand out
head-and-shoulders above
the rest. These are Magee Marsh
in Ohio, Point
Pelee in
Ontario, Dauphin
Island in
Alabama, High
Island in
Texas, and the Dry Tortugas
off the southern tip of
Florida. I have experience only with
two: Magee Marsh in Ohio,
which is pictured below, and Dauphin Island,
which I've visited only
once (in early April) and where I
unfortunately saw very few birds.
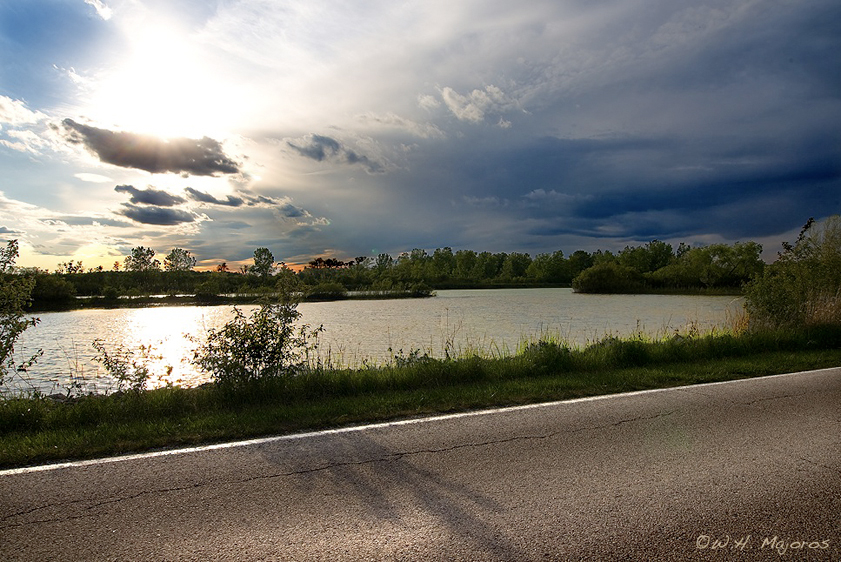
Fig. 8.9.5: The
warbler mecca known as Magee Marsh. On a
good day at Magee
in mid-May you can see hundreds of warblers at
close range. I
don’t even bother
trying to shoot certain warbler species in my
home town anymore, since
I go to Magee
every spring. Other warbler meccas include
Point Pelee, Dauphin
Island, and the Dry Tortugas.
Magee
Marsh
(formerly known as Crane Creek State Park) is
without a doubt my
all-time favorite birding location.
Though it has its
slow days even during mid-May (traditionally
the peak time for warbler fallouts
at this site), the good
days at Magee more than make up for the bad
days. As with any
migrant trap, it’s highly recommended that you
plan to spend
more than just a couple of days there, to
improve your chances of being
present when a big wave hits. Prominent
birders who are local to
these sites will often provide educated
guesses and predictions as to
when a big wave of migrant birds will likely
arrive, and these can be
useful in planning a trip to these locations,
though much depends
on the weather and is therefore subject to
change at the last
minute. A week to ten days is a good
amount of time to budget for
a trip to a warbler migration hotspot such as
Magee
Marsh in Ohio or
Point
Pelee in Ontario.
If you do visit a major
migrant trap in spring,
there
are a number of things you can do to improve
your productivity.
First, it can be extremely useful to be able
to recognize individual
bird species by their songs—i.e., to “bird by
ear”.
Being able
to recognize bird species by their songs
allows you to do several
things. First, when you hear a bird
singing that you can’t yet
see (because it’s behind too many leaves), you
can decide whether this
is a species of special interest to you, or if
instead it’s one that
you’ve already got too many images of.
The other thing that
birding by ear does is to widen your field of
attention. When you
don’t know your bird songs, any individual
song you hear just sounds
like background chatter in the forest.
But when you know your
songs, hearing a familiar song can force you,
subconsciously, to become
more aware of the birds that are in your
immediate vicinity. In
other words, just knowing the songs can help
you to be more attentive,
which can in turn help you to find the birds
more easily.
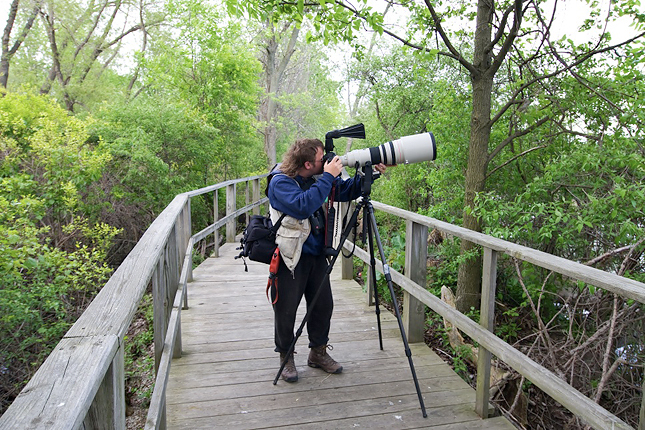
Fig. 8.9.6: The
author enjoying himself on the boardwalk at
Magee.
There is something truly special about
photographing warblers here.
Visiting a
warbler hotspot during the peak migration
period is an exciting
experience. At Magee Marsh
in mid-May, there are often hundreds
of birders present on the boardwalk at any
given time. Those
hundreds of eyes all simultaneously searching
for birds in the
surrounding foliage are, in aggregate, far
more efficient at finding
good photographic opportunities than you alone
will ever be. This
is something that you should be prepared to
exploit to the greatest
possible extent. Remember that these
birds are tiny, and even at
a warbler hotspot there will be many
individual birds that you’ll miss,
even when they’re only thirty feet from where
you’re standing. If
you factor in weather conditions such as wind,
it’s clear that any help
you can get from other birders in just finding
the birds can be
extremely valuable.
Not all information from
other birders is of equal
value, however. For example, many
birders will become excited
about a rare species that they can just barely
make out through their
10×
binoculars at a large distance,
in the deep shade of a bush blowing
in high wind. These are generally very
poor photographic
opportunities, unless you’re specifically
trying to get photos of these
rare species for documentation purposes.
Whenever I come upon a
congregation of birders
all looking through their binoculars, I take
note of several
things. First, if all the binoculars are
pointed up at an extreme
angle, that means the bird is probably high in
a tree and will present
only a belly shot. In those cases I just
keep walking until I
come to the next group of birders.
Alternatively, if I hear one
birder explaining to another in very detailed
terms how to find the
bird in his or her binoculars (e.g., “follow the
main branch up until
it forks, and then look under the seventh twig
for where the vine leads
off into the distance, where the bird is
partially visible...”), then I
keep walking right on by that group without
even slowing down.
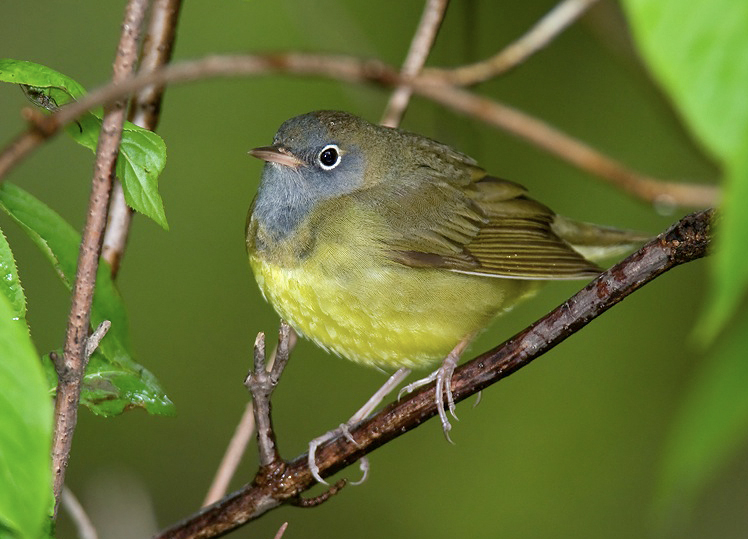
Fig. 8.9.7:
Connecticut warbler (Oporornis agilis). I
generally avoid
chasing rarities like this, since the time spent
chasing one elusive
bird
could be spent photographing ten less elusive
birds. But to each
his own.
It’s an
interesting and often useful fact that at some
migrant traps where
individual birds may stop over for several
days to refuel for their
journey, you can end up seeing the same
individual foraging in the same
general vicinity—sometimes even in the same
tree—day after day, or at
least sporadically throughout a single
day. Another thing to keep
in mind is that an inordinate amount of
attention is typically
dedicated by birders to the rarest species
sighted at these
locations. The mourning warblers at Magee Marsh
are a case in
point. Every year the boardwalk gets
choked by crowds of birders
eagerly trying to see a mourning warbler that
was sighted off in the
distance an hour ago. If this species
happens to be high on your
priority list, then spending several hours
waiting for the bird to make
a brief appearance may be worthwhile for
you.
Personally, I prefer to spend that time taking
more photos of common
species, so that I’ll have a wider variety of
images to choose from
later when I separate out the best photos from
my trip.
Similarly, every year
a report is made of a Kirtland’s warbler that
has been spotted
somewhere at Magee within the park or on the
beach nearby, and many
people flock
to these sites to try to catch a glimpse of
the bird. I’ve found
that chasing rarities like this is typically
unproductive—for me,
personally—given that my own personal goals
are to simply obtain
aesthetically pleasing images of birds of any
species. In the time that
I might spend chasing a single rare bird, and
getting either no photos
of it or a few mediocre ones, I might instead
be able to get a good
number of very decent shots of some slightly
less rare species.
These types of decisions depend of course on
your personal goals, and
on how extensive your portfolio has already
become.
Note that the ideal focal
length—i.e.,
magnification—can be highly dependent on
location, and this is a very
important fact when considering a trip to a
warbler hotspot.
While 800mm is barely enough (or more often not
enough) at my local state park
in North Carolina, at Magee Marsh
in Ohio I find that the ideal focal
length is between 400mm and 560mm (i.e., 400mm
with a 1.4×
teleconverter attached) when
shooting on the boardwalk, where the warblers
will often come to within
ten feet of you while frantically chasing
insects. Indeed, many
photographers have found that using a 500mm or
600mm tripod-mounted
lens on the boardwalk at Magee can be
counterproductive, both due to
the crowds of people that the heavy equipment
has to be carted through,
and the fact that the birds often get so close
that these bigger lenses
can’t even focus on them. At Magee Marsh
the most popular lens is
the Canon 100-400mm f/5.6
zoom. Many birders have captured
exquisite images at these modest focal lengths
at this site, making the
trip from their home states overwhelmingly
worthwhile for them.
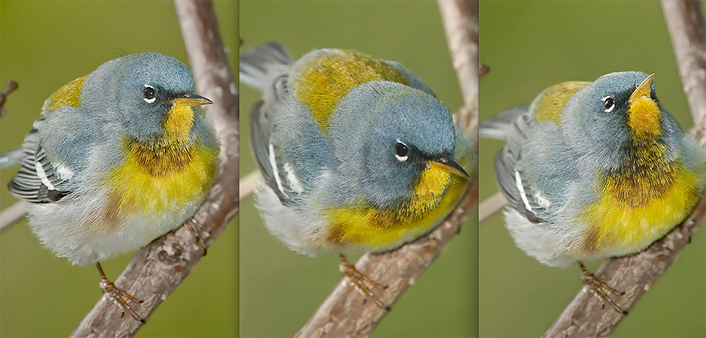
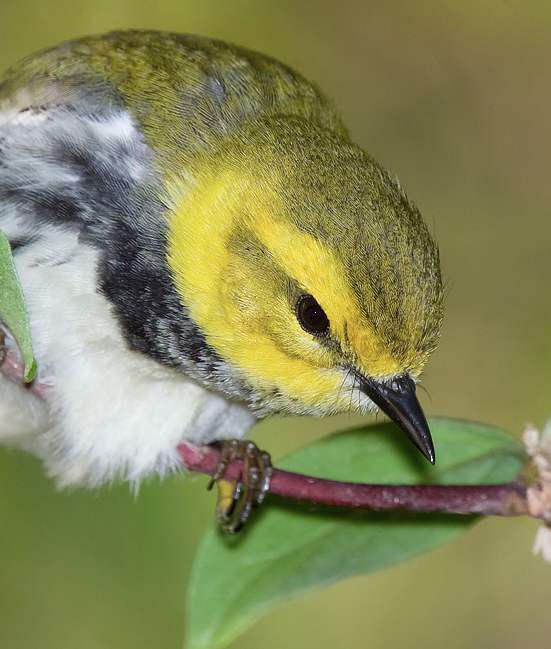 Fig.
8.9.8: Focal length can be your friend or your
enemy. Though
Fig.
8.9.8: Focal length can be your friend or your
enemy. Though
excessive magnification can produce truly
stunning “macro” views that
you might not be able to otherwise get in the
real world, it also
reduces
your options for framing the bird. Also,
larger focal-length
lenses tend
to have larger close-focus distances, which can
prevent you from taking
the shot when the bird gets too close (as is
common at some warbler
hotspots).
For those
with
high-powered optics in prime warbler
photography locations, it’s
definitely worth considering smaller focal
lengths. A smaller
focal length will necessarily trade off bird
detail for perspective and
background inclusion. A nice, colorful
background is often what
is most needed to turn a good warbler photo
into a great
warbler photo. Remember
that the bird lives in a particular
environment, and your viewer
doesn’t necessarily know much about that
environment.
Furthermore, these are
extremely small birds living at relatively
small scales (when they’re
not migrating across thousands of
miles). The world of the bird becomes
particularly relevant when the scales of the
subject and its
ecologically immediate environment are
substantially different from the
fundamental scale of the human viewer.
To the extent that you can
effectively capture that scale difference
while retaining a
compositionally coherent image, you’ve
satisfactorily exploited the
imaging potential of that scene.

Fig. 8.9.9:
Getting a good background in a warbler photo can
be difficult.
Most warblers bathe regularly, typically around
late morning or mid-day.
Staking out a clean pool of water at a warbler
hotspot can be good way
to widen the range of backgrounds in your
photos.
Good
backgrounds in warbler photos can be very
difficult to obtain. In
practice, because the birds tend to move so
quickly, often the best you
can do is to take at least one shot of the
bird every time it moves to
a new perch, and to hope that at least one of
the shots features a
decent background. Remember that many
backgrounds can be improved
in Photoshop with fairly minimal effort, such
as through artificial
blurring
(section 12.6).
The prime issue then
becomes the proportion and
arrangement of space around the bird, and this
is something you need
to be cognizant of while shooting in the
field. Whenever the bird
becomes so big that it’s difficult to place a
comfortable margin around
the subject in the viewfinder, I generally try
to move back, away from
the subject, to widen the field and increase
the amount of background
space I’ll have to work with later during
post-processing. A good
rule of thumb is to try to ensure that the
bird takes up no more than
half of the space in the horizontal or
vertical directions, when
shooting in the field; while this may seem a
rather useless rule in
many locations where the birds never get very
close, in birding
hotspots it can indeed become relevant on a
daily basis. At these
sites you may indeed find more utility in a
100-400mm zoom lens than in
a 500mm or 600mm prime, since you can easily
zoom out as
needed to give the bird some space in the
frame.
In terms of which types of
backgrounds are more
aesthetic than others, this is something that
can be difficult to
assess in the field. I personally try to
avoid
excessively dark backgrounds, because they
often appear black in the
captured image, and too many of these low-key
images
gets to be either cliché or simply
monotonous. In the
field
you’ll often find that taking just one step to
the left or the right
can dramatically alter the background as seen
through the
viewfinder. It always surprises me how a
tiny change to the angle
of the lens can result in such a significant
change in the overall
background composition. Things like tree
trunks, vines, and
leaves dangling behind the bird will start to
catch your attention more
as you gain experience with photographing
small birds. For
example, when using flash, a tree trunk
immediately behind the bird is
usually (though not always) a Bad Thing,
because it’ll often show up in
the final image as a bright gray band
enclosing the bird. With
experience you’ll develop
your own intuition for what types of
background elements—and at what
distances behind the bird—can potentially
enhance or mar a warbler
photo.
Fig. 8.9.10:
Dark backgrounds sometimes help to make the bird
look more
prominent in the scene, though too many dark
backgrounds in a single
gallery
gets to be monotonous. In this photo I
liked the way the diagonal
band of green
breaks up the darkness behind the bird, while
natural sunlight falling
exactly
on the bird helped to make the subject stand out
even more.
Warbler photos
like this are rarely planned—you just have to
take whatever you can get
in the field and then sort through your images
later for the lucky
shots.
Camera settings
can of course modulate the effect of the
background in significant
ways. If the aperture is too small, for
example, foliage too
close behind the bird can form distracting
patterns that you’ll later
want to fix in Photoshop (see section 12.6).
If you know á
priori
that you won’t have
time to perform such detailed manipulation in
post-process, then you
might decide to forego taking such photos in
the first place.
Keep in mind also that your flash ratio
(section 7.6)
can
strongly affect the prominence of the
background in the final
image.
Fig. 8.9.11:
Small apertures can result in distracting
backgrounds,
due to a wide depth of field (DOF), though at
any DOF you can still
end up with too much background detail if the
bird is flanked closely
by foliage. These issues can be corrected
later in Photoshop by
separating the bird from the background and
applying a blur
filter to the background to reduce detail (not
shown here).
Flash ratio can indeed be a very useful
parameter to adjust in the
field, since it can sometimes help to improve
color in the background
when desired. When the backdrop of the
bird is some distance
behind the subject, increasing the ratio of
ambient light to flash can
help to bring out more background color,
whereas for backdrops close to
the bird, a stronger flash may instead be
indicated so as to better
illuminate the background via flash light
rather than ambient.
Just remember that the
effect of the flash output on
the subject is typically your primary
concern. In the case of
warblers, the use of flash to induce micro-contrast
(section 4.3) can
be a highly effective technique for bringing
out more detail in these
tiny birds, especially when magnification is
not on your side. As
we’ll discuss shortly, the ability of short
flash durations—and high
flash ratios—to freeze action can also be
useful in the field, and
needs to be considered when choosing a flash
setting. Many of
these
tradeoffs can be efficiently explored in the
field by taking several
rapid shots of the bird at different settings
and assessing the results
on your camera’s LCD, so don’t feel that the
situation is hopelessly
complicated by all of these varied
considerations.
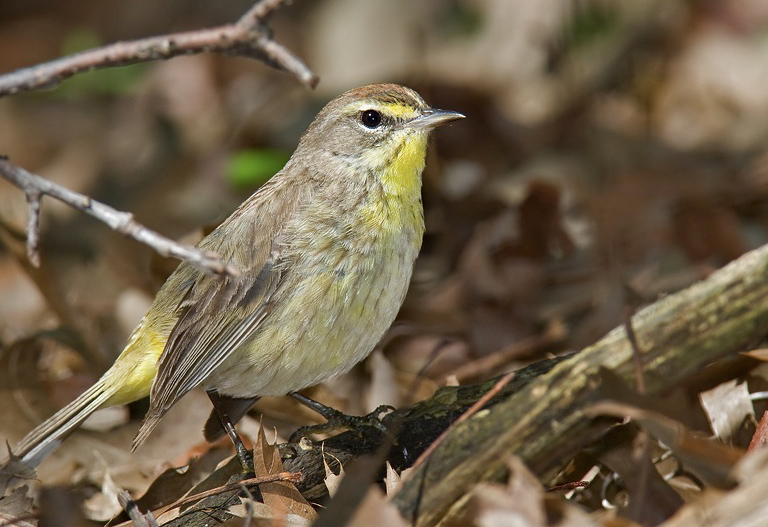
Fig. 8.9.12: A
detailed foreground and a blurred background can
help to make your
subject stand out. Though sharpening was
applied to this bird in
Photoshop, much of
the apparent detail comes from micro-contrast,
which results from
strong directional
light. The background was slightly blurred
in Photoshop using the
Reduce Noise filter.
Since warblers are so small and spend so much
time in thick foliage and
other dense
micro-environments, any trick you can use to
make them stand out from
their background
can be highly useful in producing a memorable
image.
More generally, the task of
choosing appropriate exposure
parameters when shooting warblers can be a bit
of a challenge in some
situations. It’s therefore worth
revisiting some of the material
from Chapters 6 and 7 and refining things a
bit to make them more
applicable to the case of small, fast-moving
subjects at intermediate
distances. We’ll do that next.
Much of what we’ll discuss
assumes you’re shooting in manual
exposure mode, which I highly
recommend.
First, let’s consider the
aperture. Not only
does the aperture affect depth of field, but
the effect of aperture on
depth of field is distance-dependent: subjects
that are further from
the camera will enjoy a correspondingly
greater depth of field (see
sections 3.1 and 6.1).
When shooting warblers at a major migrant
trap,
the distances are often quite small, so that
depth of field ends up
suffering. The figure below shows a
Prothonotary warbler shot at
840mm with an aperture of f/5.6,
with the subject being rougly 15 feet
from the objective lens. At this
distance and aperture, the depth
of field for this camera’s pixel pitch is
literally on the scale of
mere inches. As a result, you can see in
the figure below that
only the bird’s head is in focus, while the
rest of the body blurs into
the distance.
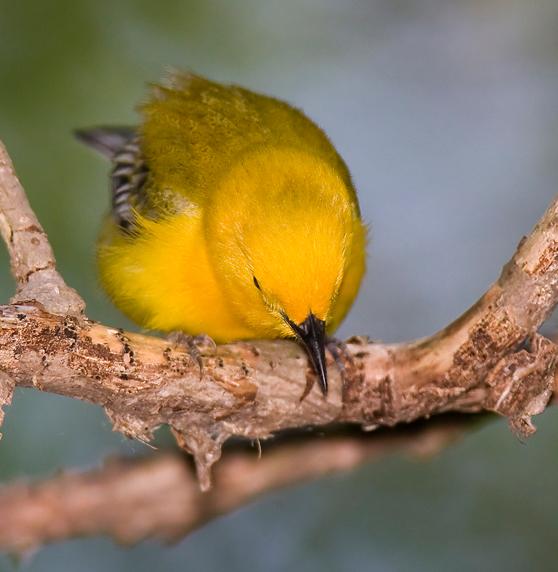
Fig. 8.9.13:
Depth of field can be your friend or your
enemy. Though a
shallow DOF can help to isolate the bird from
its background, at close
range the razor-thin depth of field can result
in only part of the bird
being
in focus. In this example the head was
perfectly in focus, so the
shallow
DOF was acceptable, but if your camera decides
to focus instead on
the bird’s wing or tail, a shallow DOF can ruin
the image.
For warbler photography, a
shallow
depth of field (DOF) may indeed be what is
desired for particular
subjects in particular scenes. When the
bird is large in the
frame, a shallow DOF helps to isolate the
bird’s head, eyes, and beak,
which are typically the prime focal regions
for human observers.
Artistically, shallow DOF’s are often a
strength rather than a
liability. It’s still useful to keep in
mind how DOF changes with
aperture and distance-to-subject,
however. In the figure above
only part of the bird was in focus, because
the DOF was shallow and the
bird was oriented along the lens axis.
For the figure below, the
subject was instead oriented along an axis
almost perpendicular to the
lens, so that more of the bird remains in
sharp focus, while the
background is fairly blurry. Whenever
you’re shooting small birds
at close range,
keep in mind that perpendicular birds will
separate much more readily
from the background than birds oriented
axially with the lens, and
this can both affect the photo’s raw
aesthetics and potentially
simplify the task of post-processing the
image.
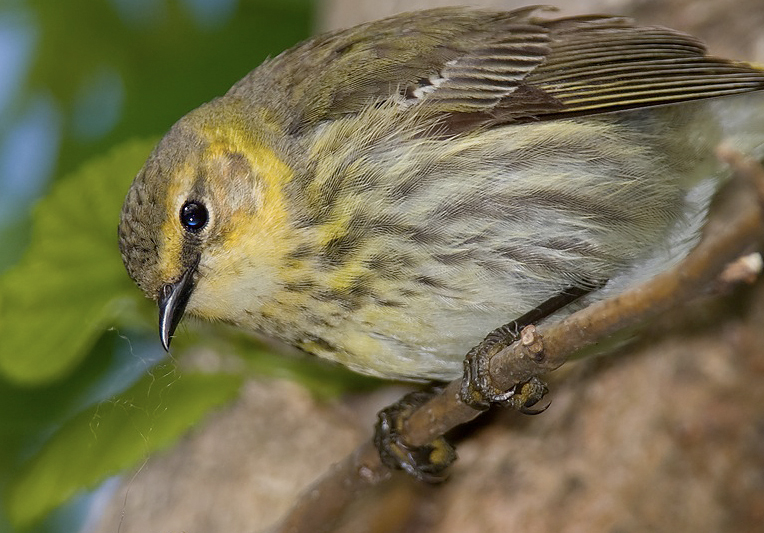
Fig. 8.9.14:
Subjects that are perpendicular to the line of
sight (i.e., are in
profile)
are easier to isolate via a shallow
depth-of-field. Such poses
also simplify focusing;
with a warbler in strict profile, focusing on
any part of the bird
should cause the
eye to be in focus as well (assuming a perfectly
flat bird...).
Shutter speed is
another important exposure parameter that
needs to be considered
carefully when shooting warblers. These
tiny birds can move very
fast
indeed, even when they’re not flying.
I’ve found that shutter
speeds of 1/1600 sec can be too slow to freeze
the head movements of a
warbler frantically foraging at a migration
stopover. Using
shutter speeds in excess of this tends to be
problematic, however,
because
exposures tend to get rapidly darker, and the
tendency to rely on
higher (and “noisier”—see
sections 2.5
and 11.1) ISO
values becomes ever greater.
I therefore tend to stick
to the relatively slow “sync speed” of my
camera—i.e., 1/300 sec for
the Canon 1D Mark
III—since it maximizes effective flash output
while still allowing
sharp images to be captured in high ambient
light when the bird is
relatively still. Since the shutter
speed is then fixed, I only
have to worry about the ISO setting, the
aperture, and the flash “power”.
The aperture I typically
leave fixed at 2/3 of a stop to
2 stops below maximum aperture, to maximize
the sharpness of my lens
without sacrificing too much light. That
leaves the ISO and flash
power, and these are generally all that I
modify when shooting
warblers.
Balancing these two
parameters allows me to adjust
the flash
ratio (section 7.6),
which is of prime importance
in getting a good
exposure of both the bird and the
background. When the background
is far behind the bird, some ambient light is
needed to illuminate it,
so that you don’t end up with a solid black
background (figure 8.9.10
above shows a bird with a poorly lit
background, due to a high flash
ratio). When the background is close
behind the bird, strong
flash can illuminate the background instead;
this allows a high flash
ratio to be used, which can be helpful in
freezing the bird’s
movements. Getting the right flash ratio
is tricky, however, and
there are a few things worth repeating from
previous chapters in this
regard.
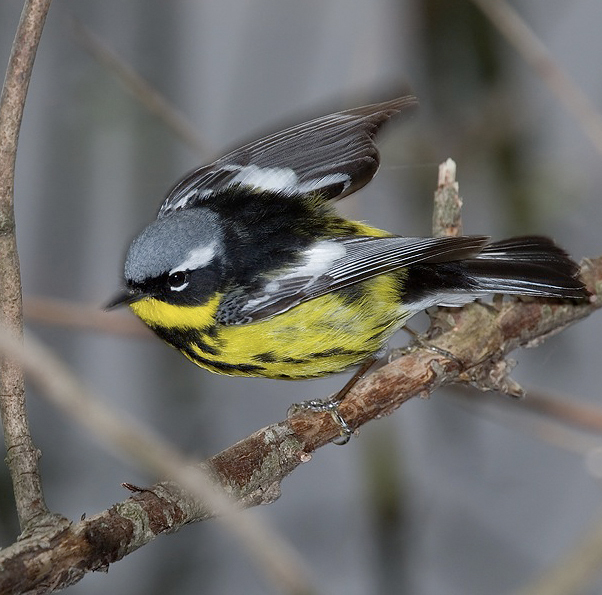
Fig. 8.9.15: A
high flash ratio can help to freeze any motion
that occurs
when the shutter is open. In this case,
the motion was mostly
frozen, though
the shadows/ghosts surmounting the wings, beak,
and cap attest to a non-
negligible amount of ambient in the mix.
Action shots of warbler
are of course
fortuitous; rarely can a photographer take
credit for having planned
such a capture.
First, recall
that flash illumination is, unlike ambient
light,
distance-dependent. That means that
every time the bird moves
closer to you, you need to consider reducing
your flash power
(assuming that you’re using manual flash
rather than TTL
flash).
When working at short distances, I set my
flash power at 1/32
initially, and adjust upward or downward from
there, whereas at longer
distances I start at 1/4 and try not to go
higher than 1/2 (to avoid
short recycle
times—see
section 4.3 and
Chapter 7). At longer
distances, a flash extender (section 7.9) is
essential; at shorter
distances, you may want to remove the extender
to avoid
disproportionately lighting up part of the
bird or scene.
In addition to checking
your LCD’s highlight alerts
for overexposure (section 6.2),
you also need
to be careful not to
induce feather
glare due to
overstrong flash. Unfortunately,
feather glare isn’t always obvious on the LCD,
so it’s sometimes good
to be conservative in the use of flash,
especially at close
distances. Although microscopic amounts
of feather glare can
sometimes enhance an image via the phenomenon
of micro-contrast
(section 4.3), larger
amounts of glare are to
be avoided whenever
possible, because it can be very difficult to
fix in post-process (see
sections 11.2 and 11.3).
Glare can do two things: it can bleach
the colors
out of your subject by overloading it with too
many photons (so the
feather surface can’t absorb the photons of
the wrong color and reflect
only those of the right color), and it can
also potentially cause
clipping in specific color channels in your
sensor, which may not
trigger your camera’s highlight alerts
(unfortunately). The
figure
below illustrates both of these
problems. The bird’s shoulder
exhibits some feather glare that bleaches out
some of the blue color,
while the yellow regions lack detail in some
areas due to clipping in
the yellow “channel”.
Fig. 8.9.16:
Flash is invaluable for warbler photography, but
must be used with
caution. This figure illustrates two
dangers of flash: feather
glare, and clipping
of individual color channels. Both are
difficult to diagnose in
the field, so it’s
best to be conservative in your use of flash for
close-quarters warbler
encounters,
at least until you’ve become experienced enough
to quickly identify
subtle
problems like these in the field.
Fixing
glare in post-process can be very difficult
(see section 11.2
and 11.3), so
it’s best to prevent it from happening in the
first place. Just
keep in mind that your
camera’s highlight alerts may not be showing
you any clipping that
occurs in individual channels. On my
camera, I find that
birds with bright red or yellow plumages often
suffer clipping in the
red channel, even
when the overall histogram
shows no clipping (i.e., the
highlight alerts don’t blink). For that
reason, whenever I’m
photographing a bright red bird I always turn
down the exposure a
few clicks more than I normally would.
And for any bird that I’m
photographing at close distance with a 400mm
lens, I generally turn
down the flash a few “clicks” (thirds
of a stop of light) below
what
appears to be ideal based on the camera’s
LCD. These types of ad hoc
adjustments tend to be
camera-model dependent, so what works best for
me might not work best
for you.
Another consideration with
flash is that it can
occasionally scare off the bird. I’ve
found that this occurs much
less often than I originally expected it
might, and far less often than
some non-photographers have rudely insisted it
would. What I
typically find with warblers is that a bird
may be visibly startled by
the first one,
two, or three flashes, but that after that it
will usually ignore the
flash henceforth. If the bird doesn’t
fly away immediately after
the first flash (which does happen in a small
fraction of cases), it’s
unlikely to do so after a few more. At
warbler hotspots where
many photographers gather in spring, the birds
tend to become
insensitive to flash very, very quickly.
As a case in point, the
Prothonotary Warbler shown
in Figure 8.9.13 (four figures prior) was
photographed at Magee Marsh
during the second week of
May, 2010. This bird had a nest cavity
next to the boardwalk
where hundreds of people passed by each
day. At the time that
particular photo was taken, the bird had just
finished preening for a
full five minutes in front of a group of about
twelve photographers,
all shooting through enormous lenses with
powerful flash units
attached. The bird was about fifteen
feet from the edge of the
boardwalk, and was illuminated almost
continuously by the flash
pulses from the ecstatic photographers, never
once batting an eye in
our direction. The bird
simply did
not care about flash, and
the vast majority of birds I’ve photographed
appeared to have the same
attitude.
Fig. 8.9.17:
Another action shot enabled by the use of a
short
flash duration and moderately high flash
ratio. The wing
blur is again due to ambient ghosting.
This shot was not planned.
When shooting with flash
there are a few mundane but
still important things you might want to keep
in mind. First,
because flash units eat batteries faster than
Homer Simpson can eat
doughnuts, it’s a good idea to enable the “auto-off” feature
of your
flash unit, so that it turns itself off
automatically after some period
of disuse (say, two minutes, or five
minutes). If you do use this
feature, you’ll likely find that when you
suddenly try to take a photo
of a bird that has appeared out of nowhere,
the first shot ends up
being underexposed because the flash unit’s
capacitors didn’t have time
to fully charge before you took the
shot. For most cameras and
flash units, if you press any button on the
camera while the flash is
asleep, the unit will immediately wake up and
begin to charge its
capacitors in preparation for an impending
discharge. I take
advantage of this by pressing the ISO button
on my camera whenever a
bird suddenly appears on the scene. This
wakes my flash unit,
which should then have enough time to charge
for the next shot before I
myself am actually ready to press the shutter
release. Although I
choose to use the ISO button for this purpose,
just about any button on
my camera will do. Note, however, that
waking your flash unit by
lightly touching your shutter release is not
the best solution, because
doing so will activate your autofocus (unless
you’ve reprogrammed your
camera to use a separate “AF on” button),
and if your camera isn’t
yet pointing at the subject, this may result
in slower acquisition of
the focus later when you’re finally ready to
acquire the subject and
begin shooting.
Another thing to keep in
mind is that if you use the spray-and-pray
technique (section 6.6) of holding
down the shutter
release and taking
a series of rapid-fire shots, the first photo
may be differently
exposed from subsequent photos, since the
flash’s capacitors may not
have time to recharge fully between
shots. Your camera or flash
unit may have a special setting that you can
use that deals with
rapid-fire flash shots, but in general you’ll
still be faced with lower
flash output for fast-paced shooting.
One thing you can do to
mitigate this effect is to turn down the flash
power right from the
outset, so that the first burst doesn’t fully
empty the
capacitors. In many circumstances this
isn’t ideal either,
because the resulting flash output ends up
being less than you’d
like. This is why for warbler
photography I generally don’t use
spray-and-pray. One exception is if I
decide to turn on the
high-speed drive mode in order to take two
shots per press of the
shutter release. Some photographers use
this technique
extensively, with the rationale that if the
first photo of the pair is
blurry due to subject movement, the second
might not be. I rarely
use this technique, but it is worth
considering if you’re getting lots
of blurry shots of a restless subject.
Fig. 8.9.18:
Intentionally capturing a warbler in flight is a
skill reserved for
true masters
of bird photography. Until I become one of
those, I’ll instead
rely on dumb luck, as in this case.
Note that for
warbler photography you’ll often want to keep
IS (image
stabilization—section 3.5) turned
off. These birds simply
move
too fast for IS to be useful. For
in-the-lens IS (still the most
popular and most effective form of IS), the
gyroscope used to achieve
stabilization takes some time to start
spinning and then to reach its
terminal
velocity, and meanwhile the autofocus system
is either waiting for the
signal from the IS system that stabilization
has been achieved, or
(conceivably in some systems) has already
started trying to autofocus
before the image is stabilized. In
either case, autofocus
acquisition speed is very likely to suffer as
a result of the IS being
enabled (as I’ve discovered is certainly the
case with my camera and
lens). Because warblers tend to move
around so much, IS makes
little sense anyway, since it can work against
you as you try to pan
the lens to follow the bird (unless you’re
using IS in panning
mode—see section 3.5).
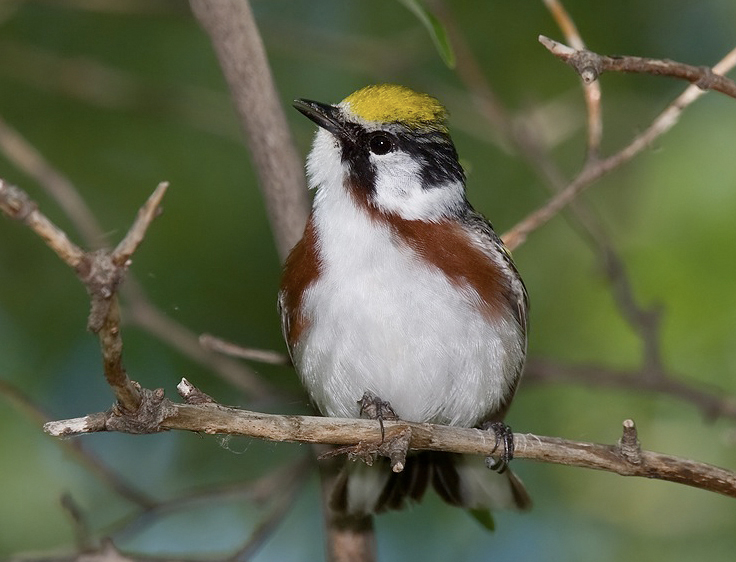
Now let’s
consider in greater detail the challenges of
properly exposing a
typical warbler. The attraction of
shooting warblers is, for
many, the birds’ varied
color. As illustrated by the
chestnut-sided warbler shown below,
they often contain both white and black
plumage elements, and can also
sport yellows, reds, and other hues. For
birds having both
whites and blacks (or, more generally, very
light and very dark
colors), properly exposing both extremes is
rarely easy.
Fig. 8.9.19:
Exposing whites in warblers can be
difficult. I recommend using
the ETTR
philosophy, by exposing as bright as possible
without clipping the
highlights. The use of
flash can also help tremendously, due to the
phenomenon of
micro-contrast. Without
this effect of strong directional light, many
white areas of birds’
plumages would appear
as a solid white blob. Slightly
over-sharpening the white areas
in post-process can help too.
One
solution is to expose for the highlights
(the
whites, or the brightest colors), and hope
that any
clipping in the blacks will go unnoticed by
viewers of the resulting
image. Research has shown that people do
tend to pay more
attention to the brighter parts of images than
the darker parts, so
this strategy does at least have some
scientific support. Note
that clipping of the black regions can be
corrected in Photoshop (see
section 11.2) with a
bit of work. But
the main advantage of
exposing for the highlights is that doing so
is consistent with the ETTR
philosphy (Exposing
To The Right—section 6.2),
which has several
important benefits, as we’ve already
discussed.
For warblers with more
uniformly dark plumages,
there may actually be some hope of exposing
the blacks well, though
doing so can still be very difficult.
One thing that can
sometimes help is the use of strong
flash.
Although feather glare is something that
should normally be avoided
whenever possible, for a bird with lots of
black plumage, a bit of
feather glare in black regions can actually
enhance the perception of
detail in those regions. This is
illustrated by the American
redstart shown below.
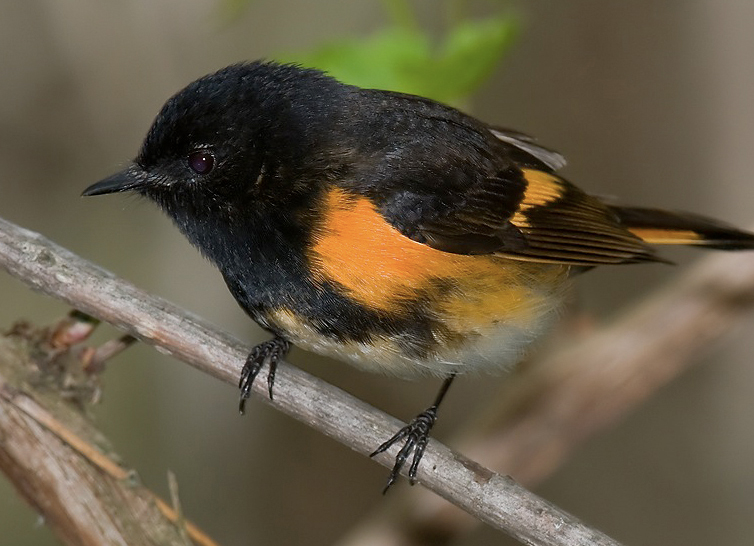
Fig. 8.9.20:
Extracting detail from black parts of a
warbler’s plumage can be
just as challenging as for the white
parts. Strong flash can help
by inducing
feather glare; though glare is something that
should normally be
avoided, in
black regions it can help to bring out details
that would otherwise be
impossible
to capture. For the black regions that
still show no detail,
artificial detail can be
added in Photoshop (not shown here—see section 11.2).
In this case, though much of the head still
lacks detail, the back and
chest show detail in areas that without flash
would very likely show up
as pure black blobs in the resulting
image. Remember what glare
is: it’s too many photons striking a surface
for that surface to
effectively absorb light of the “wrong”
color. For black
surfaces, photons of all
colors are normally absorbed, so in an “ideal”
setting a black surface would have no
discernible detail
whatsoever. Through the use of feather
glare, we can force the
black surfaces to reveal some of their
detail. This in fact
happens naturally in the real world when a
black subject is seen in
extremely bright sunlight. So the use of
flash in this way need
not be seen as being terribly perverse.
Though I’ve advocated the
use of flash “power” and
ISO for
adjusting exposure parameters when shooting
warblers, the use of higher
ISO values should still be avoided, as
explained in section 2.5.
Though
noise resulting from higher ISO settings can
be reduced in
Photoshop during post-processing (section 11.1),
it’s worth keeping in
mind that high ISO settings can also result in
loss of subtle color
gradations. The safe range of ISO
settings
is different for every camera model. For
my Canon EOS 1D Mark
III, I don’t hesitate to use ISO values
between 100 and 1600, though I
prefer not to exceed 800, or better yet
400. Just remember that
using higher ISO values results in the
collection of fewer photons
(than if you achieved the same brightness via
aperture or shutter
speed), which can mean poorer image
quality. (These issues are
discussed in greater detail in section 2.5).
When shooting any bird in
the field, there is always
the possibility that the bird will move from a
sunlit perch to a shady
spot, or vice versa. For this reason, I
keep two exposure “profiles” in my
mind at all times when
working a bird: the sunny
profile and the shady profile. The sunny
profile is simply the
set of exposure settings to use when the bird
is out in the open,
illuminated by sunlight. The shady
profile is for use when the
bird moves into the shade. In practice,
this typically translates
to two ISO settings that I have to keep track
of when working the
bird. For example, the warbler shown
below, when out in the
sunlight, exposed well at ISO 200 on my
camera, while an ISO setting of
500 was better whenever it moved into the
shade. So all I needed
to do when working this bird was to keep track
of which ISO setting I
was currently using (200 or 500), and switch
to the other setting
whenever the bird moved from the sun to the
shade (or vice
versa). When the bird was half-shaded,
as shown below, neither
setting worked ideally, and in these cases
even the best compromise can
be unacceptable. I generally don’t take
any shots of the bird
when it’s lit by dappled sunlight, knowing
that my camera simply
doesn’t have the dynamic range to properly
capture both highlights and
shadows on the bird.
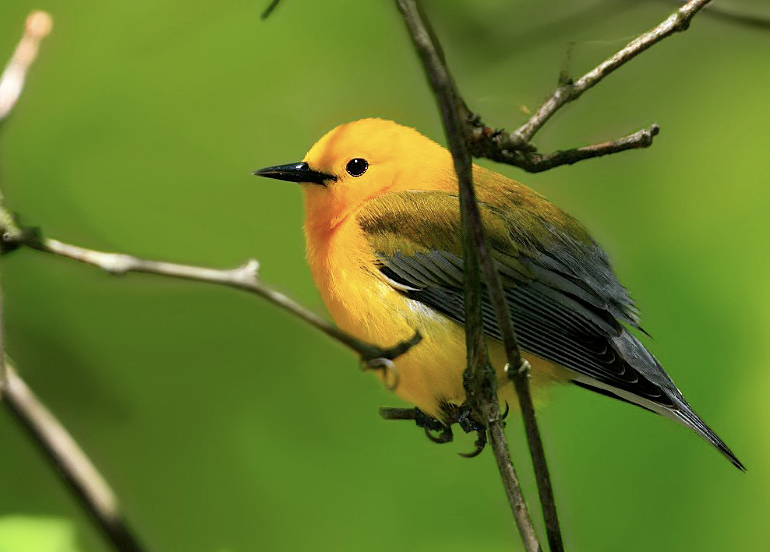
Fig. 8.9.21:
Properly exposing a bird that is partly in the
sun and partly in shadow
can be an exercise in frustration. I
usually don’t bother even
taking such shots in the
field, because with today’s cameras it’s often
not possible to retain
maximum detail in
both the bright areas and the dark areas with a
single exposure.
Now let’s concentrate on
the effective use of
autofocus when shooting active warblers.
This is one of the most
challenging aspects of warbler photography, as
has already been alluded
to in our discussion of depth-of-field.
There are a number of
other important aspects besides depth of
field, which we’ll consider in
turn.
First, I recommend using
single-shot AF
rather than servo (continuous AF), despite the
fact that some warblers
seem to be in constant motion. The
problem is that the birds
often pass
behind a leaf or vine, which will confuse the
autofocus system on many
cameras. Instead, I recommend tracking
the bird by following it
in the viewfinder while keeping your finger on
the shutter release,
without pressing it (not even halfway) until
you’re ready to take a
photo. When you’re ready to take a shot,
press the shutter
release fully, so that the autofocus is
engaged and the shot is
immediately taken as soon as focus is
achieved. Then fully
disengage
your finger from the button and wait for the
bird to either change its
posture, turn its head, or move to a new
perch. When it does so,
repeat the process by “pushing
through”—i.e.,
pressing the shutter
release fully to both engage the AF and then
immediately snap the photo
when focus is achieved.
Fig. 8.9.22:
Since warblers tend to be fidgety, and because
it’s difficult to get
them in
an ideal pose, it’s useful to take a shot of the
bird every time it
changes its perch, its
body attitude, or the angle of its head.
Don’t even think about
whether the pose looks
good before pressing the button; you can sort
through the images later
on your computer
and pick out just the good ones. That way
you’ll be able to spend
more time (later)
comparing poses and thinking carefully about
which one you like
most. There simply isn’t
enough time in the field to make these decisions
when shooting an
active warbler.
This strategy
has served me well, for several reasons.
First, whenever the bird
changes its pose, it is a good idea to snap a
shot quickly to capture
that pose, before the bird moves again.
As we’ll discuss more
fully below, capturing warblers in interesting
poses is a real
challenge, and the technique outlined above
can be useful to the extent
that it allows you to capture the bird in many
different poses.
Of course, you’ll have to spend potentially
many hours later sifting
through all the thousands of images you will
have taken, to pull out
the best
poses of each bird. In my opinion, this
is better than having too
few images of the bird, with none of them
showing the bird in an
aesthetic pose. The use of “two-fer”
shooting—i.e., engaging
high-speed drive mode and shooting two frames
every time you press the
shutter release—is another option that might
be useful to you,
especially for a bird that is foraging so
frantically that it never
actually stays still for even a fraction of a
second. For
these birds, it can also be useful, when
tracking the bird in the
viewfinder without the AF engaged, to lead the
bird a bit, by keeping
the AF sensor positioned just barely ahead of
the bird. This
strategy is tricky, however, so it should be
explored with
caution. Note in passing that you’ll
generally want to use only a
single AF point when shooting warblers; I
always use the center point,
and turn off any point-expansion features in
my camera.
One thing that many
photographers seem to be
oblivious to is the fact that the autofocus
module in their camera can
get confused by objects that aren’t even
visible in the
viewfinder. If you recall section 2.6,
the AF sensors in your
camera can sometimes “see” parts of
the scene that you
can’t, because
out-of-focus objects can still leave an
imprint on the phase profile
registered by the AF sensor (recall that the
AF point itself
effectively imposes its own aperture for the
AF system, which can
increase the depth-of-field as seen by the
focusing system, relative to
what you see through the viewfinder). A
very common case is when
there is
a thin twig passing in front of the bird,
which is almost invisible
through the viewfinder because it’s so out of
focus, but which the AF
sensor sees. The AF system then racks
the lens in and out in an
apparent
attempt to decide which object to focus on:
the bird or the
twig. Remember that cameras know nothing
about birds, so to the
camera, the twig is just as valid a subject as
the bird. What you
can do in these situations is to be cognizant
of any discoloration you
see in front of the bird, which may indicate
an out of focus twig or
leaf that is confusing the AF system. In
these cases I typically
wait for the bird to move to a different
perch. Although it might be feasible to
disable autofocus and
take the shot after focusing manually, the
blur induced by the
occluding object typically
results in a less-than-ideal image anyway.
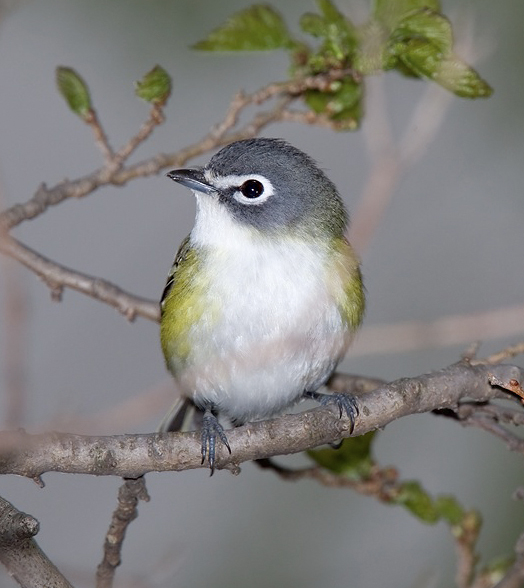
Fig. 8.9.23:
Keep in mind that out-of-focus branches and
leaves can
confuse the autofocus system in your
camera. Even if you can’t
see an
obstruction through the viewfinder, the AF
system might see it and get
confused by it. Also, OOF obstructions can
decrease sharpness of
occluded regions in the image, even if the
object itself is not
discernible.
Another thing you should do
periodically is to check
the AF micro-adjustment
setting on your camera (if you have one)
on actual birds in the field. In section
3.11
we showed how to
set
the AF microadjust using a focus chart in your
home. I now set my
microadjust exclusively in the field, using
birds as my test
subjects. Since your goal is to get the
bird in focus—most
especially the bird’s eye—a good way to set
microadjust is to find a
cooperative bird (i.e., a relatively
stationary one) and to tweak the
AF microadjust setting over several
consecutive shots until the eye is
maximally in focus. Since different
birds are of different sizes,
I find that different microadjust settings can
be useful when shooting
warblers as opposed to shooting hawks.
For hawks, I often end up
focusing on the bird’s shoulder, whereas I
want the bird’s eye to be
maximally in focus, and the microadjust can be
used to account for the
shoulder-to-eye distance on this
subject. For warblers, the
shoulder-to-eye distance is far less useful,
so I set the microadjust
setting accordingly when I’m in warbler mode.
Note that as you assess the
sharpness of your images
in the field (by looking at the images on the
camera’s rear LCD),
you’ll undoubtedly review a number of images
that, for one reason or
another, are clearly useless and which you’d
like to delete.
Deleting images from your memory card in the
field can be a distraction
when there’s more action to be captured,
though during lulls in the
activity there’s probably no great loss in
spending a few minutes
deleting photos that are clearly
useless. When pursuing warblers,
many photographers find that their “keeper
rate” tends to
be quite low,
so that the number of useless images captured
in the field can be quite
large. I personally opt to
simply keep excessive amounts of memory with
me in the field and to
resist the
urge to delete images until I get home—and
even then I sometimes
don’t even bother deleting bad images.
As flash card and hard
drive capacities increase and/or prices drop,
this strategy seems less
wasteful, and has the advantage of saving a
potentially more valuable
resource: my time.
As was mentioned earlier,
it can be useful when
shooting active warblers to take a new photo
each time the bird
moves. This not only helps to capture a
more representative
sample of the bird’s poses, but also helps to
battle the problem of
motion blur, because the more photos you take
of the bird, the greater
the chance that you’ll happen to snap a shot
when the bird was
perfectly still. It can also be a good
strategy, when the bird
moves behind a branch or tree trunk, to wait
for the bird to emerge,
rather than walking around the tree to try to
get a clear angle.
For highly active birds, it can sometimes take
less time for the bird
to come back out in the open than for you to
move around and find a
clear shot while the bird is behind a
branch—especially when shooting
with a tripod-mounted rig. This isn’t
always
the case, but as a general strategy it can be
useful.
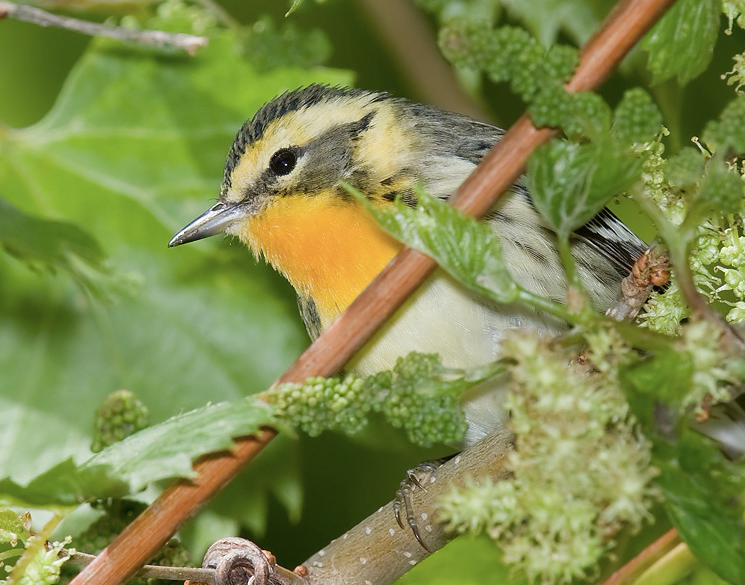
Fig. 8.9.24:
Focusing on a warbler in dense foliage is very
tricky. If the bird
is close enough and the AF sensors on your
camera are small enough, you
may
be able to point the active AF sensor point at
the bird and make the
camera
focus on the bird, but often it’ll instead
choose to focus on a leaf or
twig
that’s close to where the AF sensor is
pointing. For this photo I
moved the AF
sensor point slightly off the bird in the
northwest direction, in hopes
of forcing
the camera to focus on the bird’s head rather
than the foreground
foliage. I
could easily tell that it hadn’t focused on the
background foliage in
this case.
Leaves can be a
special problem for focusing. In many
cases the bird will be
partially exposed while the rest of the bird
remains behind
foliage. For some cameras, at some focal
lengths and effective
magnifications, you may still be able to get a
reliable focus via AF,
while for other cameras or shooting situations
you’ll find that the AF
system wants to focus
on a leaf or twig just in front of the
bird. It’s often not
obvious, when viewed through the viewfinder of
the camera, whether the
AF system has chosen to focus on the bird or
on an intruding
twig. Keep in mind that the AF sensor
indicators that you
can see in your viewfinder (the small red or
black squares that denote
AF
points) may be larger or smaller than the
actual AF sensors in your
camera, so just because the red square doesn’t
seem to overlap any
intruding objects doesn’t mean that the AF
sensor represented by that
square doesn’t do so. With
experience you should develop a feeling for
how your camera behaves
when trying to focus on precise spots in the
scene, and will then be
able to make more informed decisions when the
scene does include
intruding elements (as in the scene depicted
in the figure above).
Remember that leaves and
twigs in front of the bird,
while possibly rendered almost completely out
of focus, still occlude
any light that your flash may be
emitting. This can result in
unsightly shadows on your subject. These
problems should become
apparent quickly as you check your images on
the camera’s LCD in the
field. As a general rule, I check the
LCD at least once whenever
I start working a new subject, and then
periodically while shooting the
same subject. I’ll typically zoom in all
the way
to 100% to check for critical sharpness (lack
of sharpness can indicate
motion blur, an out-of-focus occluding element
such as a leaf or twig,
or possibly some equipment issue such as dirt
on the drop-in filter or
a systematic focusing error that might be
correctible via AF
microadjust). Note that when leaves
begin to occlude too much of
the bird it’s advisable to track the bird
using manual focus instead of
AF. This is, unfortunately, difficult
with warblers, due to their
size. For that reason, when a warbler is
at all occluded by
foliage I usually cease shooting until the
bird comes out fully into
the open.
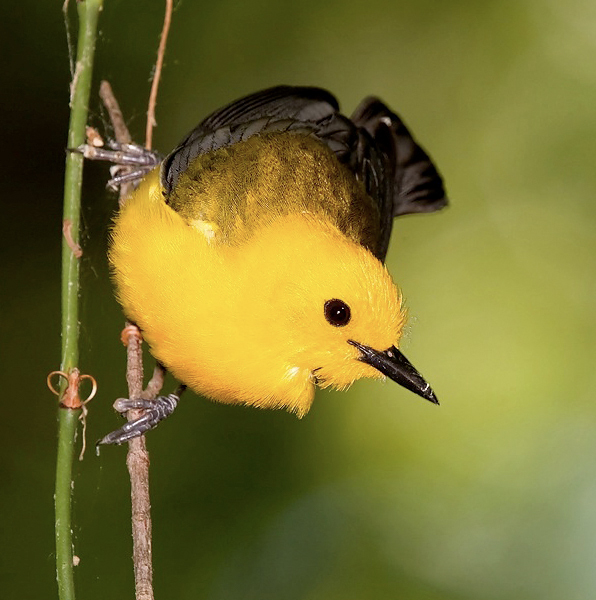
Fig. 8.9.25:
Capturing a warbler in a pleasing pose is a
simple matter of patience.
I followed this particular individual around for
a full eight hours as
it foraged on
its nesting territory. Of the many
thousands of photos I took
that day, probably
only 1% featured both a decent pose and an
acceptable background.
(I’ll also admit
that at the end of the day the bird was still
going strong, but I was
dead tired. Never
before had I been thoroughly whupped by a tiny,
three-inch bird!)
Let’s now
change gears once more, and consider the issue
of subject pose,
specifically as it applies to
warblers and other small songbirds. As
with many other aspects of
bird photography, the ideal pose for a
particular bird in a particular
setting can be highly dependent on personal
preference.
Nevertheless, there are a number of very basic
considerations that
apply fairly widely when shooting birds.
For warblers, the
constraints become more restrictive, since
these tiny birds tend to
have shorter extremities than, say, herons and
egrets with their long necks, long legs, and
angular heads.
Warblers tend to
be mostly oval-shaped, and there’s simply less
potential for birds with
such a
shape to assume novel poses.
Remember that the camera’s
imaging sensor—and any
images captured by it—are
strictly two-dimensional. Profile shots
thus tend to work well with many subjects,
since they align the
animal’s salient facial features for maximal
contrast against the
background, while also maximizing the
potential area that can be kept
in focus. This does not rule out any
value for non-profile shots,
however. Indeed, I personally prefer
shots in which the bird’s
head is tilted somewhat shy of a perfect
90-degree profile (i.e., is
not perfectly parallel to the imaging
plane).
These oblique poses often capture enough of
the bird’s
profile to give the overall impression of a
side shot, while in some
cases giving a better view of facial features
and at the same time
avoiding the impression of a cliché profile
shot.
In the case of birds
there’s also the issue of field
markings. This isn’t just
relevant for viewers who happen
to be
avid birders: the field markings of a species
are those visual
characteristics which set the bird off from
its relatives, and are
therefore often very striking in
appearance. Capturing a bird’s
field
markings with great effect can sometimes
offset the otherwise
detrimental effects
of an otherwise suboptimal pose. The
kinglet
shown below is a prime example. Poses in
which the bird is facing
almost directly into the camera tend not to be
favored by many viewers
(though there are certainly exceptions).
In this
case, however, such a pose has resulted in the
bird’s field markings
being strongly revealed, while also presenting
both eyes to the
viewer. The foreshortening of the beak—a
common shortcoming of
frontal poses—is somehow less offensive in
this case, possibly
because the bird’s actual beak is short to
begin with, or possibly
because the
angle of the head produces a strong facial
impression that renders the
beak less important.
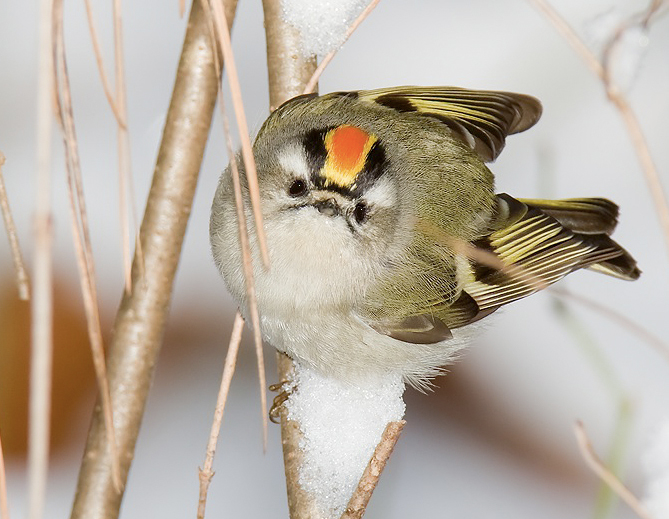
Fig. 8.9.26:
Capturing all of the prominent field markings of
the bird can
be exceedingly difficult with many
warblers. Though I pursued
this species
for several winters, this was the first shot of
a Golden-crowned Kinglet
(Regulus calendula) that showed the bright red
skull cap. Though
I avoid
frontal shots, due to foreshortening of the
beak, enough of the field
markings
were showing that I simply could not delete this
image.
The above
image also illustrates
the acrobatic nature of warblers.
Whereas human portraiture is
overwhelmingly concerned with vertical
postures, warbler bodies can
align at any angle in an image and still look
natural. It’s for
this very reason that shooting warblers
overhead is not always a
hopeless endeavor. For many birds,
shooting from below the bird
will in most cases result in a belly shot,
which most bird
photographers avoid, but for active warblers
you can literally obtain
any pose from the bird even when shooting
straight up, due to their
acrobatic nature. Note that when
shooting up you’ll often have
sky as a background, and in these cases manual
exposure is a
must. If you try to shooting in any of
the autoexposure modes in
these types of situations, the rapid changes
in background brightness
as you change viewing angles will likely
causes huge swings in subject
exposure, which is usually undesirable.
See sections 6.3 and 6.4
for
suggestions on operating the camera in full
manual mode.
One particular type of pose
which is generally very
popular for warblers is the singing
pose. An image depicting a
warbler in
full song can be a truly inspiring
thing. The main difficulties
are
getting the bird at the right angle, and
getting the shot when the beak
is open. The latter problem can be
solved by simply taking
repeated shots during the song bout and hoping
at least one captures
the bird with the beak wide open. In
terms of the angle, I just
try to make sure the bird isn’t facing too
directly at the camera.
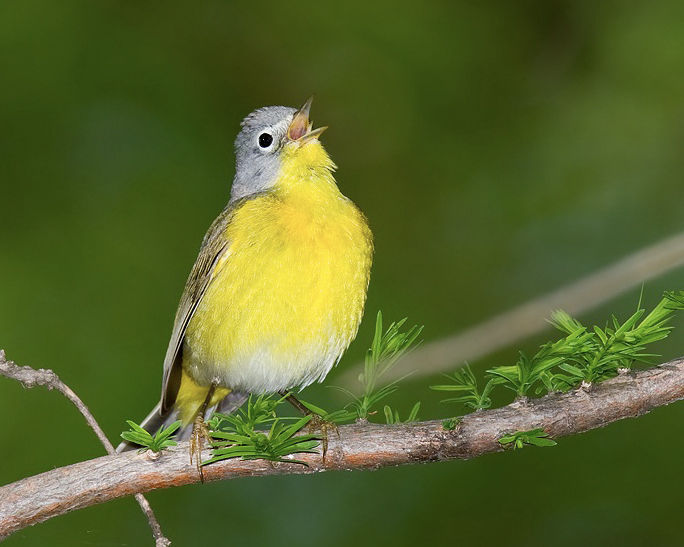
Fig. 8.9.27:
Photos of warblers engaged in inspired bouts of
singing are
to be treasured, whenever you can get
them. To improve my chances
of actually
capturing this bird with its beak open, I took
many shots in rapid
succession (though
not in high-speed drive mode, since that mode
makes effective use of
flash difficult).
I did not move into position to place the bird
at the desired angle,
since that’s usually
hopeless for restless birds like warblers.
I instead waited for
the bird to assume the
angle that I wanted. I also took many
shots at suboptimal angles,
in case the angle
never got better. Fortunately, the angle
did get better, and I
was able to simply
delete all those lower-quality photos taken
during the bird’s operatic
episode.
Much of
the foregoing assumes that
you’ve solved the problem of getting close to
your subjects—either by
employing astronomical focal lengths or by
traveling to a warbler
hotspot (such as a migrant trap). Keep
in mind that if you’re
having
trouble getting close enough to
forest-dwelling warblers to get
well-lit, detailed shots, there are species of
warblers that inhabit
lower, more open types of habitats. In
the eastern US, for
example, many field habitats attract Prairie
Warblers, Common
Yellowthroats, and Yellow-breasted
Chats. Marsh-dwelling birds
such as the Prothonotary Warbler also tend to
stay much lower and are
therefore more accessible than species that
stay high in the trees like
the Yellow-throated Warbler. Yet another
option is to pursue
birds inhabiting the same niche as, say, the Seiurus
waterthrushes, which spend
much of their time foraging down at the edge
of the water along rivers
and creeks.

Fig. 8.9.28: Not all warblers are
forest-dwellers. If shooting
warblers in forest settings
has frustrated you, consider pursuing a species
that instead frequents
open areas, such as
this Yellow-breasted Chat (Icteria virens), or
my personal favorite,
the Prairie Warbler
(Dendroica discolor). Field-dwelling
warblers tend not only to
present better angles, but
are also often better lit by natural sunlight.
Finally, let’s
very briefly preview some of the
post-processing issues that we’ll get
to in
chapters 10 through 13, specifically as they
relate to warbler
photography. First, let’s revisit the
issue of backgrounds.
Because warblers can be so difficult to
photograph, just getting a
sharp, well-exposed image of the bird itself
can be a major
accomplishment. If the background isn’t
ideal, you needn’t throw
away an image that may be your only decent
one. As we’ll see in
section 13.1, it’s
possible, with some effort,
to completely replace
the
background of a photo with the background from
another image.
Though this technique can be applied to any
bird photo, I’ve found more
uses of this technique for warbler photos than
for other types of
birds. For this reason, it’s a good
idea, when shooting warblers,
to take a few out-of-focus shots of the forest
where you’re shooting,
in case you need to use any of these to merge
into a warbler shot in
which the bird looks superb but the background
is terrible.
Merging in a background image taken in the
same location is sometimes
safer than merging in a background image taken
elsewhere, because the
lighting and color composition may be more
consistent.
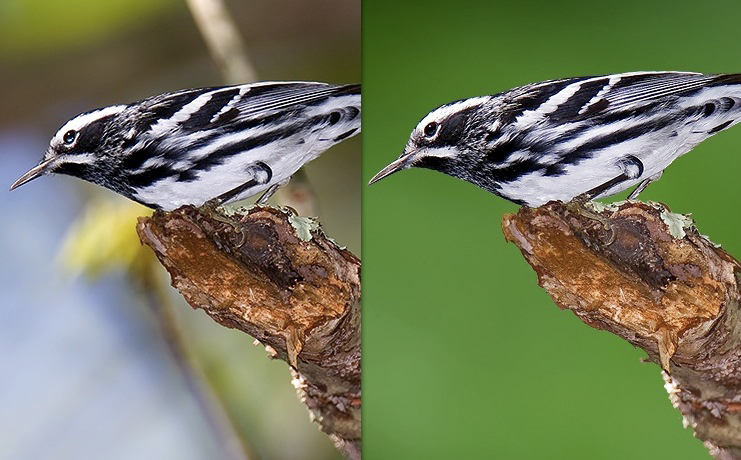
Fig. 8.9.29: If
you don’t like how the background looks in an
image, you can replace
it in Photoshop. This takes some work, but
for warbler
photography the ability to do so
is often a godsend. It’s hard enough just
getting the bird
perfectly in focus, with no motion
blur and well exposed. Also requiring the
image to have a perfect
background can get
ridiculous. If you’re independently
wealthy and can spend all day
shooting warblers, then getting
everything perfect—including the background—may
be feasible. For
the rest of us, replacing
the background in Photoshop is often the best we
can do. It’s
certainly better than nothing.
Another
thing
we’ll be addressing in section 12.6 is how to
make the bird stand out
more from the background, in those cases where
the bird blends in more
than you’d like. Though we’ll be
considering a number of
techniques for doing this, one that seems to
work well for colorful
warblers is to render them brighter than the
background, so that they
almost seem to glow with a light of their
own. The Cape May
Warbler shown below illustrates this
technique. Because this
species (like many warblers) is so very
colorful, the elevated
brightness and saturation can work well to
give the bird a special
prominence in the scene that, for some
viewers, won’t look too
unnatural. The technique requres care,
however, because it’s easy
to go too far and produce an image that simply
looks too
unnatural. Though I personally advocate
processing your images so
as to please your own aesthetic instincts
without worrying too much
about what
other people think (especially
other photographers), tastes do mature
over time, and you may find later that images
you thought looked great
when you originally processed them now look
artificial to you—i.e.,
over-saturated, over-sharpened, etc. For
that reason, it may be a
good idea to err on the side of being overly
conservative whenever
applying post-processing effects.
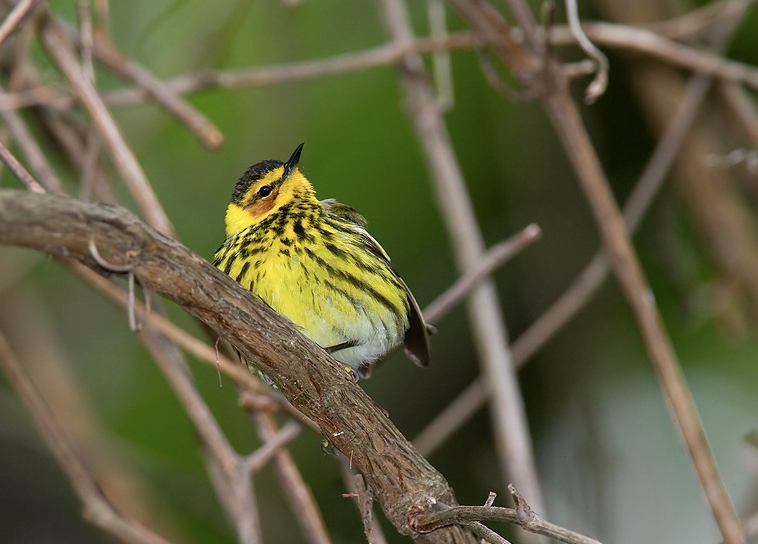
Fig. 8.9.30:
Photoshop can be extremely useful in making the
bird stand out
from its background. Since warblers tend
to be very colorful,
doing so via
saturation and brightness is often a good
approach. The mechanics
of actually
performing these augmentations in Photoshop are
discussed in detail in
Part III
of this book.
Improving
the
apparent sharpness of
warbler photos in post-process is a special
challenge. On the one
hand,
there’s a tendency to want to sharpen them too
much, because it’s often
difficult to see enough detail on these small
birds. On the other
hand, their feather patterns often create
moire effects, which
artificial sharpening only exacerbates.
The Prothonotary Warbler
shown below illustrates both of these
issues. This bird is indeed
over-sharpened. Some of the
over-sharpening, particularly in the
bright areas, may arguably enhance those parts
of the image by
exaggerating fine feather details that
otherwise would be lost.
Note that in this image there is an additional
factor at work: the use
of flash, which has exaggerated fine details
via the micro-contrast
phenomenon (section 4.3).
Though
micro-contrast can be very
useful for increasing the apparent sharpness
of the bird, it can make
sharpening in post-process trickier. In
this particular photo,
you can also see some prominent glare in the
blue feathers of the wing;
some over-sharpening is also apparent in this
region.
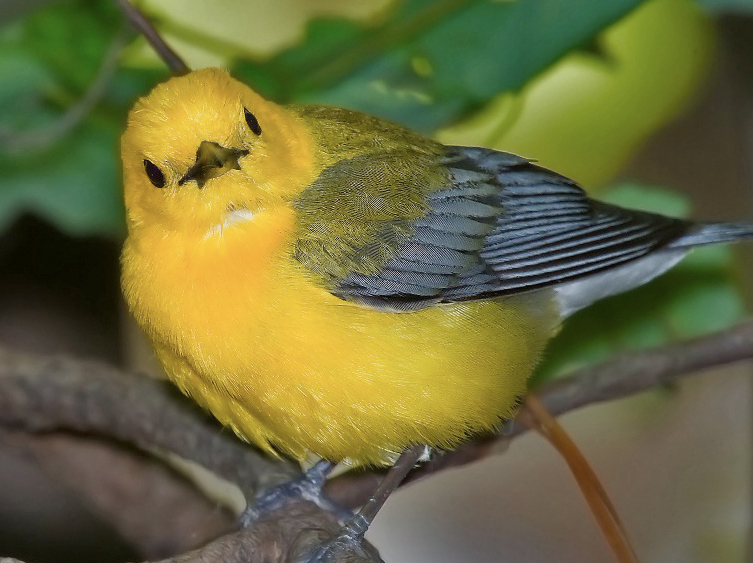
Fig. 8.9.31:
Sharpening warblers in post-process is a special
challenge. Their
small size makes it difficult to capture enough
detail, and though
sharpening in
post-process can help to exaggerate what detail
you are able to capture
in the field,
doing so without inducing unpleasant artifacts
can be very
difficult. In this case,
over-sharpening had been applied to exaggerate
details in the yellow
regions of the
bird’s plumage, though moire effects in the wing
coverts (as well as
some feather
glare) result, to the slight detriment of the
image. Sharpening
techniques are
discussed in detail in section 11.6.
The above image
also illustrates
the problem of moire in feather
patterns. For warblers, the wing
coverts and
back are typically the problem areas in
this regard; you can see in
this image the strong hashing or gridlike
pattern in the coverts, which
is just starting to exhibit digital
interference patterns.
This moire pattern is a natural feature of
this bird’s plumage, but it
still needs to be treated carefully in
post-process to avoid making it
stand out more than is desirable.
More generally, individual
species often have their own special
considerations that should be
taken into account during
post-processing. For example, I find
that sharpening Northern Parulas and Palm
Warblers is more difficult
than sharpening other warbler species, due
to the species-specific
structure of their feathers. These
are simply some things to keep
in mind when post-processing warbler
images.
Techniques for
post-processing bird images will be
discussed in great detail in Part III of
this book.
|