|
8.10
Photographing Birds in Flight
Surely, the most
celebrated technical challenge in bird photography must be that of
capturing crisp images of birds in flight—or BIFs (Birds
In Flight).
Though I personally find static portrait shots of birds at rest to be
just as pleasing aesthetically, there is no doubting the dynamic power
of a well-executed flight shot in the mind of the typical viewer.
Birds are, after all, the dominant flying vertebrates, so in some sense
the flight shot might be said to more fully capture the essence of the
living bird. In this section we’ll survey the general landscape
of BIF photography, with a special emphasis on both the aesthetic
considerations which primarily come into play during filtering and
post-processing of BIF images, and on the skills that need to be
developed to consistently capture quality flight shots in the
field. Note that these skills do take some practice, though in
many cases the end result may depend as much on luck as on skill.
The skills are still essential, however, since no amount of luck can
help you if you don’t at least know the basics.
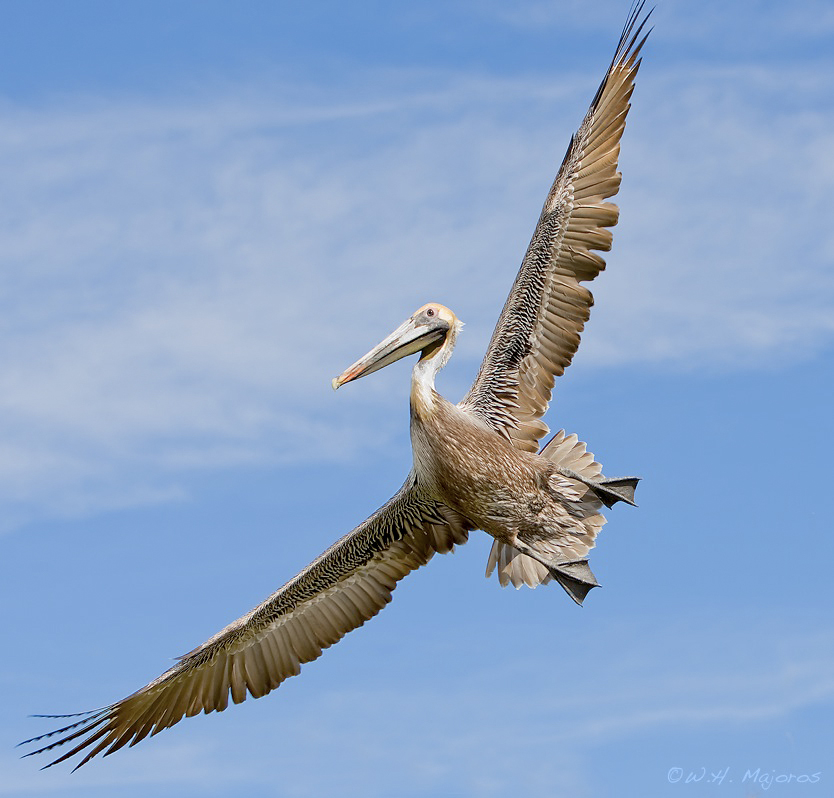
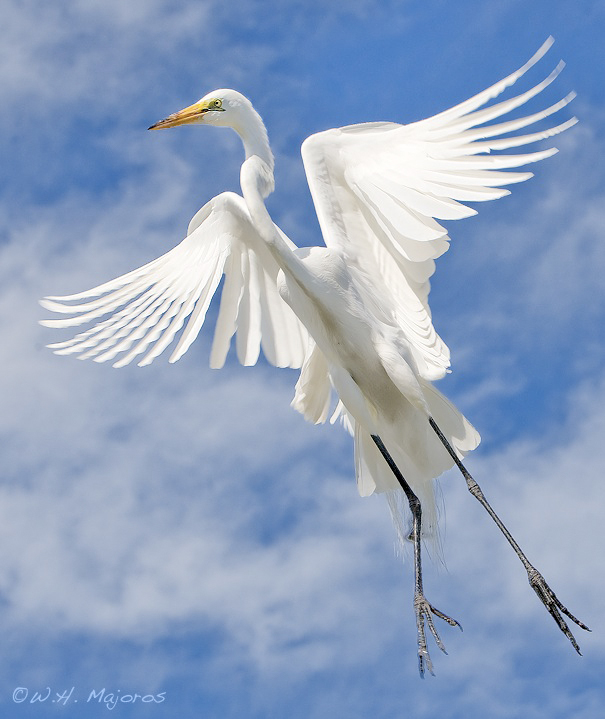
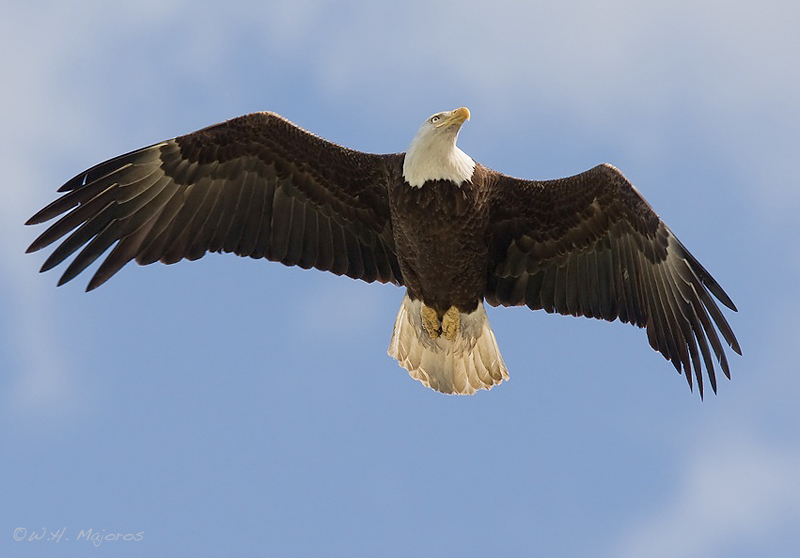
Fig. 8.10.1:
Birds in flight are among the most difficult of photographic subjects.
Many otherwise capable bird photographers struggle to obtain sharp,
well-exposed
images of flying birds in an aesthetically pleasing pose, with an
acceptable background.
Many of the tricks that photographers have discovered over the years
for satisfying all
these constraints will be outlined in this section of the
chapter. (Image: 70-200mm
f/2.8 zoom lens at 70mm, f/4.5, 1/640 sec, ISO 160. Flash on HSS
at +3 TTL FEC).
The most
fundamental issues when photographing birds in flight are motion, lighting, and pose. In addition, there are
special considerations regarding equipment choices and finding good
flight subjects. We’ll cover all of these topics in this section.
8.10.1
Motion
The main problem with photographing birds in flight is that they’re moving.
Recall that for stationary birds, to obtain a sharp image you only
needed to make
sure that the camera was kept still, the shutter speed was fast enough
(say, 1/160 sec or faster without IS), the aperture was set to a stop
or so below
wide open (to overcome optical flaws in the lens), and no intruding
elements in the scene (e.g., branches,
leaves) partially occluded the bird. Now you need to consider all
of
these things plus the fact
that the bird is moving. There are two aspects of subject motion
that affect image sharpness: (1) the motion of the whole bird relative
to the scene (or relative to the camera), and (2) the motion of the
bird’s extremities (primarily its wings) relative to the bird
itself. These two aspects affect flight photography in different
ways, as we’ll discuss next.
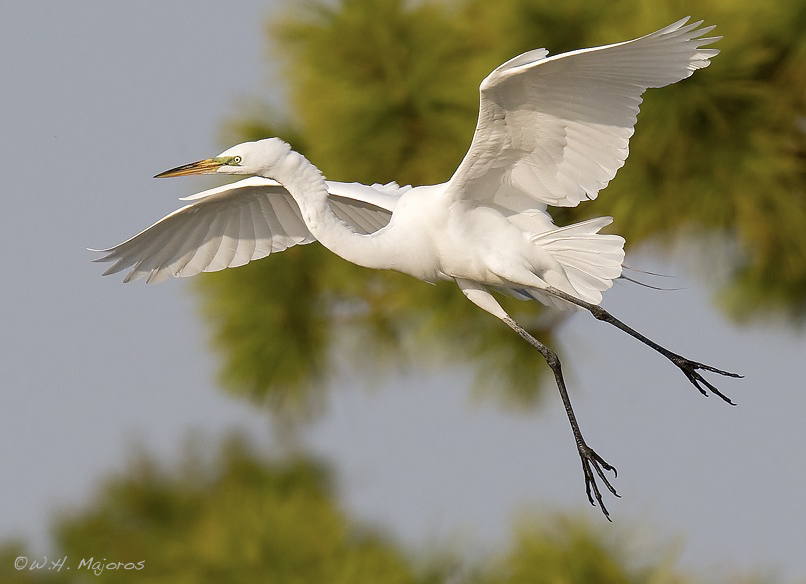
Fig. 8.10.2:
There are two aspects to bird motion: (1) motion of the bird relative
to the camera, and (2) motion of the bird’s limbs relative to its main
body. Freezing
both types of motion in the same photo requires mastery of several
techniques, which
are discussed below. (Image: 600mm f/4 lens at f/9, 1/800 sec,
ISO 320).
First, let’s consider the motion of the bird’s
extremities relative to its body. The flapping of the wings is
obviously the biggest concern in most cases. The first thing to
realize is that not all birds flap their wings at the same rate.
As all dedicated fans of Monty Python
surely know, in order to maintain airspeed velocity, an unladen swallow
needs to beat its wings 43 times per second (though this result has
been disputed by some
researchers). For some hummingbirds (which we’ll consider
later in this section), that number can be as high as 100 beats per
second or more. Larger birds, however, tend to flap their wings
much more slowly than this, and it’s large birds that, by and large
(with the exception of hummingbirds), tend to be most often
photographed in flight. Many larger birds such as hawks and
herons beat their wings only about twice per second, give or take half
a beat. Ducks, by comparison, can be relatively rapid flappers,
meting out 4 to 9 beats per second (give or take a few wing
beats). During periods of gliding, of course, all these speeds go
down to roughly zero beats per second. For flapping flight,
however, the question remains: how fast does the shutter speed on your
camera have to be in order to freeze the bird’s wings?
Before answering that question, it’s worth pointing
out that motion needn’t always be fully stopped when the goal is to
make aesthetically pleasing images of birds in action. The image
below is a case in point. Though the image suffers from numerous
defects (such as clipped highlights), it’s one of my all-time favorite
bird photos. In all the times I’ve gazed that this image, I’ve
never considered the motion blur in the wings to be an aesthetic defect
(though others may disagree on this point). I’ve often wished
that the head and beak were sharper, that the motion blur in the bird’s
right foot was absent, that the white areas retained more detail, and
that the background were a bit smoother, but I’ve never wished that the
wing blur could be reduced. The wing blur in this—and many other
images—serves the purpose of providing a visual cue to the viewer that
the bird was caught during the act of flapping flight. Motion
blur is, in fact, a tool that you can (sometimes) use to effectively
convey something about the dynamics of the scene being rendered.
It might even be (tenuously) argued that perfect stop-motion
photography is in some sense a perversion of reality, and that it’s
simply the shock induced in
the viewer—at seeing such a perverse image—that accounts for the
popularity of those types of photos. This is by no means meant to
criticize this genre of bird photographs, but merely meant to lend some
credence to the notion that some
motion blur in action shots can be acceptable—even preferable in some cases.
Fig. 8.10.3:
It’s not always necessary to perfectly freeze all motion.
Though this photo has several defects (such as the blown highlights
and the angle of the head), the slightly blurred wingtips don’t bother
me personally, since they convey information about the bird’s state.
(70mm, f/8, 1/640 sec, ISO 160, no flash).
A number of
enterprising bird photographers have taken this idea rather further in
exploring the artistic merits of bird photos subject to substantial
motion blur. The image below will serve as a mediocre example of
this approach. Not only is the background obviously blurred due
to panning of the camera
(we’ll discuss techniques for panning very shortly), but the entire
bird, and especially its wings, are extensively blurred due to a slow
shutter speed. This image obviously won’t win any photography
awards, but it does retain a certain dreamy quality reminiscent of the
works of certain abstract painters. To the extent that you’re at
all interested in bird photography as a form of art (rather than as a pure
documentation tool for scientific studies), the potential to make these
types of images should at least warrant a footnote in your mental
recesses—especially since they can often be achieved simply by using a
slow shutter speed (say, 1/30 sec, give or take) while compensating
with other parameters to maintain proper exposure. The larger
point is simply that motion blur need not be entirely eliminated in BIF
images, and this latter theme needs to be borne in mind while digesting
much of the material that follows.
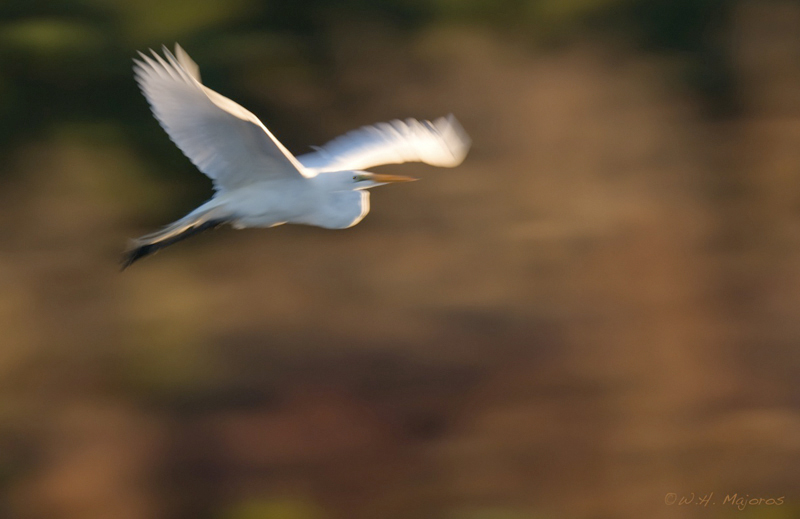
Fig.
8.10.4: Blurred BIF images can sometimes have a pleasant,
dreamy quality about them. These blurred images can look
truly exquisite when rendered large on canvas.
Now, assuming that you are in fact trying to
(largely) freeze the motion of your flying avian subject, the question
remains as to what shutter speed you’ll need to use in order to do
so. In my experience, large birds such as eagles and herons can
sometimes be satisfactorily frozen with shutter speeds as slow as 1/500
or 1/640 sec, though often you may need 1/800 or 1/1000 sec, and for
birds in a hurry you may need even faster speeds. If you read the
popular articles that have been published on the matter, most will
suggest an average speed of 1/1000 sec for general BIF photography,
with ranges typically being cited as 1/500 sec to 1/1600 sec.
I’ve personally found cases in which 1/1600 is necessary for freezing a
BIF, and indeed, I’ve found that this latter speed can be insufficient
to freeze even the head motions of warblers and shorebirds, not in flight, but simply foraging
from a standing or perched position. I’ve even found it
necessary, when photographing flying egrets (a fairly large bird, in
most cases), to employ speeds of 1/2000 sec or faster when at very
close range, so even higher speeds may be necessary for some species,
in some circumstances. The ideal thing to do is to simply try
several speeds on the birds you’re trying to capture, and to zoom in to
100% on your LCD to see if you can detect any evidence of motion
blur. If you do see motion blur—more motion blur than you think
will support the desired aesthetics of the image you’re trying to
craft—then you can simply increase the shutter speed and continue to
shoot your subject at progressively faster speeds until you get
satisfactory results. Doing so will, of course, place additional
constraints on your other exposure parameters; some recommendations for
addressing this latter issue will be given later in this section.
The other major consideration in freezing motion for
BIF photography is the movement of the whole bird, relative to the camera
(as opposed to the wings
relative to the bird’s body). Whereas the motion of the bird’s
wings required a sufficiently fast shutter speed, the forward motion of
the bird itself requires a less technological solution: carefully
controlled movement of your own body. The figure below will serve
as an example. In photographing this osprey in flight, because
the bird was traveling horizontally at a non-negligible speed, I needed
to pan my camera across the
scene while tracking the bird, and—fairly importantly—to continue
panning while shooting, so that the imaging sensor and the bird moved in synchrony during each and every
time interval for which the shutter was open (i.e., for each image
capture, of which only one of several is shown here).
Fig.
8.10.5: Tracking a bird in flight requires physical discipline.
Not only do you want to pan as smoothly as possible, but remember
to “follow through” by continuing
to pan even as the shutter releases.
Note that the background in this image has had a blur effect added
in Photoshop, to enhance the impression of rapid motion.
Smooth panning
is an essential skill for BIF photography—and not necessarily a
difficult one to acquire, though a bit of diligent practice will almost
certainly improve your results. The key is to delegate one part
of your body to do the swiveling as you track the bird, and to keep all
other limbs fixed relative to the swivel point during the imaging
sequence. In the vast majority of hand-held flight sequences,
this means rotating at your waist while keeping your upper torso
rigid. With only your waist doing any (relative) movement, you
can concentrate on both keeping the bird vertically stationary in the
viewfinder (via fine adjustments in your arms or upper torso) and also
keeping it horizontally stationary in the viewfinder as you track it
(using the muscles in your thighs and waist). The important thing
is that you develop a technique in which the same muscle group is used, for every BIF photo you take, to do
the panning. What you don’t
want is to track each BIF that you encounter using a complex,
on-the-fly improvisation of muscular movements that may result in jerky
motion. Note that proper technique can require a surprising
amount of muscular exertion, both in your thighs and waist as you
rotate and in your arms and shoulders as you strive to keep your upper
body rigid.
I recommend preparing for any BIF session by
planting your feet a comfortable distance apart (most authors suggest
shoulder-width) and practicing your panning motion by holding your
hand-held rig up to your face and horizontally swiveling strictly at
the waist. With a modest amount of practice you’ll identify the
muscle groups involved in this motion, and you can then begin to pay
more attention to these muscles during the actual act of
swiveling. Though general BIF photography encompases more than
simply left-to-right or right-to-left tracking trajectories, these are
a good place to start. Once you have the discipline down for
horizontal tracking, more general tracking should become more
intuitive. Just concentrate on remaining in complete control of
your movements, so that your imaging trajectory can be as smooth as
possible.
As many other authors have noted, a good “practice” subject for these exercises is
the common sea gull, which you’ll hopefully have access to at your
local lake, pond, hydroelectric dam, or seashore.
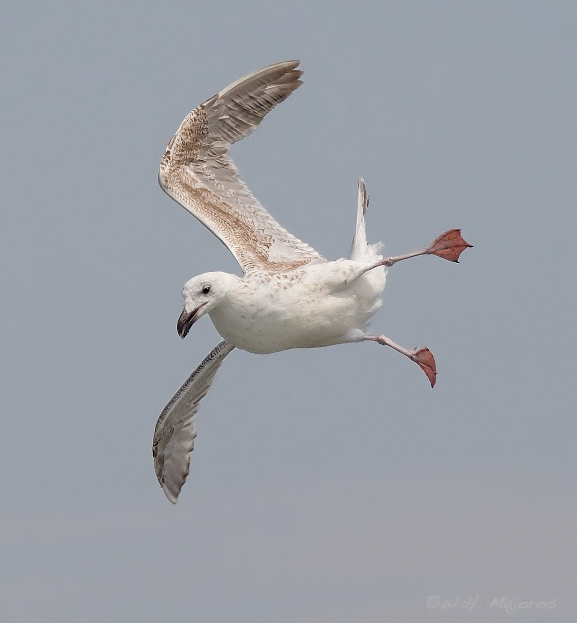
Fig. 8.10.6:
Gulls may be good practice subjects for BIF photography, but
that doesn’t mean they’re easy. I consider gulls to be valid
subjects in their
own right. This image was shot from the back of a ferry leaving
Cape May.
Gulls are by no means universally easy to shoot in flight. A
flock of gulls foraging below a hydroelectric dam can present a
dizzying array of poses and complex trajectories as they forage and
compete for food. Tracking a bird that isn’t flying straight can
be difficult, to say the least. The main two main issues are (1)
keeping the bird visible in the viewfinder, and (2) keeping the active
AF sensor on the bird’s head; these are obviously not
independent. We’ll now consider these issues and their potential
interactions.
Keeping the bird in the viewfinder is generally
easier when the bird is smaller in frame, and this of course is a
function of both focal length and distance to the bird (as well as bird
size). In terms of focal length, many photographers prefer
300-400mm for BIFs. A popular choice is a 400mm f/5.6 lens with a fast in-lens
focusing motor (i.e., not the
Nikon 80-400mm zoom) because these are generally small and lightweight,
so they’re easy to hand-hold for extended periods. For hand-held
work I personally prefer a 400mm f/4
lens, because I can easily use a 1.4× teleconverter if necessary.
When the birds are fairly close, 400mm—give or take 100mm—can indeed be
very effective at keeping the bird in the frame, though larger or
faster-moving birds can still prove challenging. In these latter
cases you might consider backing away from your subjects if possible,
both to reduce the size of the bird in the frame and to reduce the
angular velocities of birds passing across the frame.
For hand-held work, I recommend holding the lens by
placing your left hand underneath the lens hood (i.e., at the far end
of the lens), to maximize sensitivity of your hand movements in
controlling lens angle. Note also that if your lens has a
removable tripod collar
(section 4.2), it’s generally advisable to
remove it for hand-held
work, to reduce weight (unless you find that you can get a better grip
by grasping the collar or the lens foot).

Fig.
8.10.7: Though 400mm lenses are popular among BIF shooters, much
longer focal lengths are called for in some circumstances. This
shot of a juvenile
osprey who has just caught what may be his very first prey, was taken
with an 800mm
f/5.6 lens on a tripod with a gimbal head. Smooth panning with
tripod-mounted
lenses requires some effort, and lots of practice.
For birds at
larger distances, a 500mm or 600mm lens, possibly with a 1.4× teleconverter, can be useful,
though this will limit your mobility due to the need for a
tripod. (Some photographers shoot BIFs with a hand-held 500mm f/4 lens—this requires significant
strength and endurance, however, and is not for the faint of
heart). For tripod-mounted rigs, a smoothly panning head is
essential. The Wimberley is an ideal choice, though cheaper
alternatives exist, such as the Manfrotto gimbal (see section
4.2). The important thing is
that the head be loose enough for
smooth panning in any direction (i.e., left-to-right as well as
up-and-down). Though ball heads can be used for BIFs, they
require some strength when used with large, heavy lenses, and they can
allow your lens to flop over if you don’t tighten the head well enough
when walking away from your rig.
Not only are tripod-mounted rigs more difficult to
carry into the field and rapidly reposition when necessary, they
restrict your shooting angles more than hand-held lenses. This is
particularly true for birds that fly overhead, since many tripod heads
are limited as to their ability to tilt nearly straight up. I’ve
personally had cases where I had to detach my 600mm lens from the
tripod and hand-hold it in order to shoot a bird that was soaring
nearly directly above me (see the figure below for one example).
Another important consideration when shooting a tripod-mounted rig is
that you need to be careful, when panning over large angles, that you
don’t trip over a tripod leg as you walk around your rig. I’ve
twice had tripod legs (a Gitzo aluminum and an Induro carbon fiber) snap off when I bumped them with my
foot as I was trying to track a bird in flight (fortunately, I was able
to save my lens from falling to the ground both times).
Fig. 8.10.8:
Tripod-mounted rigs tend to limit your shooting angles, which can
be quite detrimental for BIF photography. When this kite suddenly
appeared
overhead, I realized my tripod’s head wouldn’t be able to tilt back far
enough,
so I quickly detached the 600mm lens from the tripod and shot this bird
hand-
held as it soared almost directly above me. (600mm, f/7.1, 1/640
sec,
ISO 320).
Don’t forget
that when you track the bird you want to keep not only the bird’s body
in frame, but also its wings. Clipping the wingtips is something
that many photographers get terribly upset about, though I personally
don’t (as long as the image looks otherwise fine to me). Reducing
the size of the bird in the frame (e.g., by backing away or using a
shorter focal length) will help to reduce the incidence of clipped
wingtips, but can also reduce the amount of detail visible in the
resulting image; your own preferences (and the effective resolution of
your camera and lens) will dictate how you’ll want to exploit this
tradeoff.
The use of a zoom lens can be convenient for BIFs,
though they’re not a panacea. Zoom lenses often have lower
optical quality than prime lenses. Keep in mind that the
advantage of zooms for BIFs lies in your ability to rapidly change
focal lengths, either between bouts of shooting or continuously while
tracking the bird. Adjusting the zoom level while tracking a bird
adds an additional level of complexity and requires more coordination;
you also need to be careful not to be zooming while taking shots, since
the changing magnification introduces a form of motion blur. Note
that the oft-cited advantage of zooms in finding the bird in the first place
(by zooming out to find the bird and then zooming in once you’ve found
it) seems to be an advantage appreciated primarily by novices, since
experience in finding and tracking birds with a fixed-focal-length lens
tends to negate the need for zooming to find the bird (though it can
still be useful for adjusting the size of the bird in frame as it
approaches the camera).
Fig. 8.10.9:
Prime lenses do limit your framing options. For this shot I had
no choice
but to clip the wings and the tail, because I wasn’t using a zoom lens.
The other challenging aspect of tracking BIFs is
keeping the AF sensor on the bird—and not just on the bird, but on the right part of the bird.
Ideally, you’d like to keep the sensor positioned on the bird’s eye,
since the eye is generally the most important part to keep in
focus. In many cases (perhaps most), however, the bird’s eye will
be too small to serve as an effective target in the viewfinder. A
more tractible target is the bird’s head, since this will often be
large enough to reliably keep under the AF sensor. If the head is
too small to effectively target, the bird’s torso will do instead,
though it’s important to try to avoid focusing on the wings. If
the depth of field is shallow enough, focusing on a wing can result in
the bird’s head being too out of focus.
In practice, it’s often difficult enough just to
keep the AF sensor positioned on the bird. If the bird is
approaching the camera, it’s usually not too difficult to keep the
sensor centered on the bird’s head (though in the case of birds
approaching rapidly you may find that your camera’s “predictive” AF
system isn’t always as smart as the manufacturer may claim). When
the bird is flying across the frame it’s often more difficult, due to
the wings catching the AF system’s attention. For large
focal-length BIF photography at longer distances, the resulting depth
of field can render this issue less important (remember: DOF increases
with distance), and you can obviously increase the DOF by stopping down
the aperture if possible. As you’ll certainly be shooting in continuous AF mode (“servo”—section 6.5),
taking repeated
shots can help too, as shot-to-shot variation in the focus can increase
your chances of getting one with the focus dead-on.
When the background isn’t completely clear, keeping
the AF sensor positioned precisely over the bird at all times becomes
more important, since many cameras will give up on the bird and switch
to focusing on the background if given the chance. On some
cameras there are menu settings (sometimes called “custom functions”) that can be used to modify the
camera’s tendency to switch focus to the background. One of these
is the “focus sensitivity” setting which determines how long
the camera will delay before switching to a new AF target when the
current target goes out of focus (i.e., when the AF system determines
that a large change to the focusing element is required to reestablish
optimal phase concordance—see section 2.6).
A low “focus sensitivity” setting can give you a better
chance of getting the AF point back on the bird before the camera
refocuses to the background. Another option, for some cameras, is
to allow the AF system to enable additional AF assist points surrounding your selected point;
this way, if the selected AF point drifts off of the subject, as long
as an “assist” point is still over the subject
the system may keeps its attention on the bird. Note that these
special options don’t work equally well on all cameras, or in all
shooting environments, so some experimentation is necessary to find out
what works well for the type of bird you’re trying to shoot, in the
environment where you’re trying to shoot it.
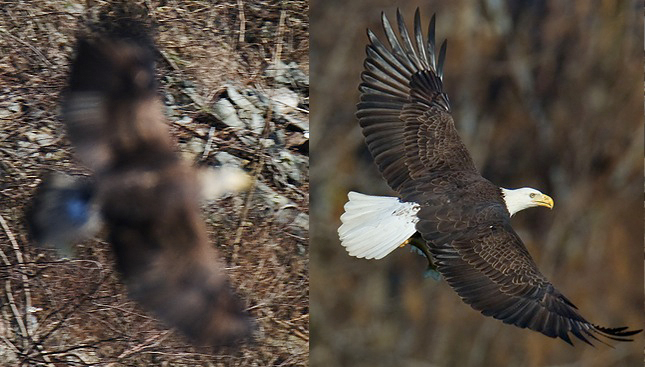
Fig. 8.10.10:
Left: when I let this bald eagle drift off of its AF point, the
camera refocused on the rocks in the background. Right: By
enabling AF
point expansion, I found that the camera was better able to keep the
bird in
focus even if it drifted momentarily off of the selected AF point.
Once the AF
system decides to refocus on the background, it can be exceedingly
difficult to get the subject back in focus, because the bird will often
be rendered so out of focus in the viewfinder that you can’t even be
sure that the lens is still pointed at the bird. Photographers
have come up with a number of techniques for getting the bird back in
focus in these situations. One, if your lens features full-time manual override (section
3.8.1), is to disable the AF
system by removing your finger from the
shutter release, and then to focus manually until the bird becomes
visible in the viewfinder again. You needn’t obtain a precise
focus manually, since you can re-engage the AF system once you’re
confident that you’ve got the AF sensor positioned on the bird
again. The manual-refocusing approach can be very difficult to
use effectively, since you may need to track the bird visually (i.e.,
not through the viewfinder) in order to get the lens pointing at the
bird again.
Another approach that many photographers have
discovered is to point the camera at an object a similar distance from
the camera as the bird, engage the AF system to achieve a focus at that
distance, and then disengage the AF and quickly point the lens back at
the bird. At that point you can try to re-establish focus of the
subject via AF. Depending on the speed of your camera’s AF system
and your lens’ focusing motor, this may or may not be faster than
adjusting focus manually. If your lens has a focus limiter switch (section
3.8.2). this can help to
improve the focusing speed by reducing the
range that the focuser needs to move through as the camera searches for
a new focus.
The above technique—focusing at an object the same
distance as the bird—can sometimes be used continuously when shooting
birds hunting over water. When tracking an eagle or osprey diving
toward a fish in the water, many AF systems will abandon the bird in
favor of the water as soon as the bird gets close enough to the
surface. If you can predict fairly accurately where the bird will
hit the water, you might be able to pre-focus on that spot in the water
instead; given a sufficiently wide DOF, the bird may well turn out
sharp enough in the resulting image. Another example is when
tracking skimming birds such as Black Skimmers (Rynchops niger). For the
photo shown below, I kept my AF point focused on a point in the water
just ahead of the bird. Focusing on the bird itself caused too
many problems due to the wings getting in the way; focusing on the
predicted trajectory of the bird’s beak through the water worked well
in this case.
Fig. 8.10.11:
Shooting birds flying low over water is very tricky. Many
cameras will try to switch the focus to the water behind the
bird. For this
image I instead focused on a point in the water directly ahead of where
the bird was flying, and then cropped off-center in post-process.
Up to this
point we’ve implicitly assumed that you’ll be selecting a single AF
point to use for focusing on the bird. Other options on many
cameras include enabling all AF points or enabling a specific pattern,
such as a ring or cluster of points centered in the middle of the
viewfinder. Enabling multiple points can sometimes help to avoid
losing the subject, as with the AF “assist” points mentioned earlier.
In some situations, however, enabling multiple points can increase the
chance that the AF system will see something that it finds more
interesting than the bird and decide to focus on that instead.
For that reason, many photographers select only a single AF point to
use when shooting BIFs. The center point is an obvious choice,
especially since this point is more sensitive than the others on some
cameras (though this may be true only at certain maximum apertures,
such as f/2.8).
Using the center point does place constraints on your composition,
though if the bird is small enough in the frame you may be able to crop
to a better composition later in post-process. Some photographers
switch between two off-center points—one on the left and the other on
the right—as they engage birds flying right-to-left or left-to-right,
though this can be tedious in environments with many birds.
An important technique that must be mentioned is the
“bumping” method popularized by the
well-known professional bird photographer Jim Neiger. Jim’s
approach to shooting BIFs involves keeping the bird only roughly in
focus during tracking, rather than employing continuous servo during
the bird’s entire trajectory. Whenever the bird starts to go too
far out of focus, Jim “bumps” the focus button to re-acquire a
rough focus on the bird. The point is simply to keep the bird
focused well enough to avoid losing it in the viewfinder. When
he’s finally ready to start actually capturing images, he uses the “push through” technique mentioned in section
8.9 to both acquire AF and take the
shot in the same instant, with a
single press of the shutter release button. To find out more
about Jim’s technique, consider taking one of his popular workshops.
Fig. 8.10.12:
Capturing the ideal pose is difficult when shooting BIFs.
One way to improve your chances of capturing the ideal pose is to take
lots of photos in the field, which you can then sift through
later. For the
shot above, what I like is that most of the bird is well-lit, the eye
is clearly
visible, and the head is shown in strong profile without being perfectly
perpendicular to the lens axis. The background of the original
image
was too plain, however, so I rendered artificial clouds in Photoshop.
A popular practice in BIF photography is to spray-and-pray (section 6.6), by
using continuous drive mode
to shoot a rapid series of shots. For cameras having a maximum
drive speed of 5-10fps (frames per second), a series of continous
images obtained by holding down the shutter release button can result
in a large number of different poses, which you can then sort through
later to find the ones worth keeping. This can be very effective,
though with some caveats. First is the issue of blackout. Every time a shot
is taken, the camera’s main mirror flips up, resulting in a blackout
both for the AF system and for the human looking through the
viewfinder. For high frame rates it’s possible that the AF system
may lose precise focus, and even that the human operator may lose the
bird from the viewfinder. Another issue is that you’ll
occasionally find that the frame rate of your camera matches the
flapping rate of the bird, so that every shot (or every other shot)
catches the bird in essentially the same pose. For these reasons,
some photographers opt to instead fire off single, well-timed shots
manually rather than using continuous drive mode. Note also that
use of a high frame rate can fill up your camera’s memory buffer,
temporarily freezing your camera and creating the potential for losing
good opportunities. As mentioned previously, however, it’s also
possible to engage the continuous drive sporadically, taking only two
or three shots per burst.
It’s worth reiterating briefly that AF performance
is affected by the maximum aperture of your lens. As explained in
section 2.6, phase-based AF systems use light
from opposite edges of
the main aperture, and for larger apertures the ability of these
phase-based systems to accurately assess focus is increased. This
is relevant not only when deciding which lens to purchase for BIF
photography, but also in deciding whether to use a teleconverter.
Recall that a 1.4× TC reduces the aperture’s
effective (maximum) diameter by almost 30% (i.e., 1-1/1.4=0.2857), and a 2× TC reduces it by 50%.
Though you can compensate for the loss of light intensity by adjusting
other exposure parameters accordingly, this does nothing to help the AF
system regain the lost sensitivity that results from reducing the
angular width of the aperture. The use of a TC will thus tend to
slow focusing speed, and this can sometimes be a critical factor in
obtaining sharp images of birds in flight.
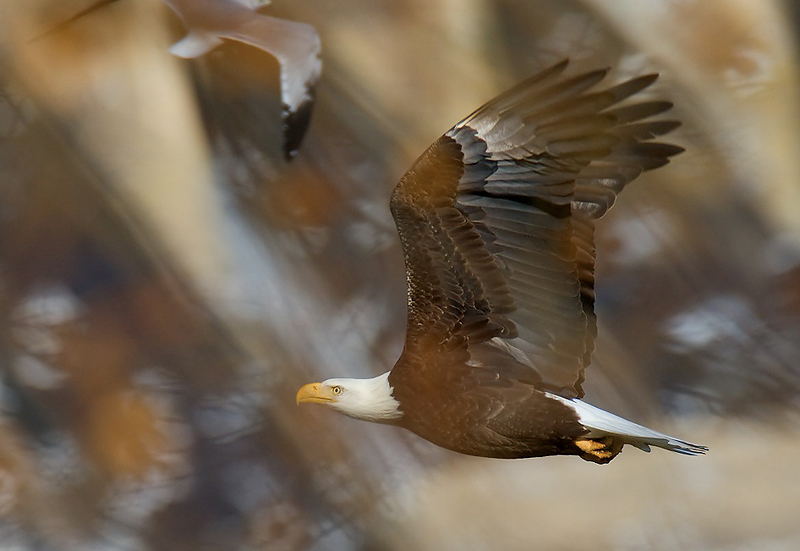
Fig. 8.10.13:
Eagle photographed through foliage. When a BIF flies behind a
tree,
you’ll often find that your AF system loses the bird. In this
case I was lucky that
my camera kept tracking the bird even after it flew behind some dead
leaves. Though
the foliage is largely out-of-focus, thereby lending a strange,
otherworldly quality to
the image, remember that your AF sensor typically sees OOF objects
better than you
can, due to the smaller aperture of the AF sensor point. So don’t
blame your “stupid
camera” if it gets
confused and shifts focus to something that you can’t even see in
the viewfinder!
Another thing
to be aware of is the potential liability of image stabilization (IS—section 3.5)
for birds in
flight. Though some lens models feature a “panning mode” or “mode 2” that can in theory be used when
tracking moving subjects, most pros simply turn IS off entirely when
shooting BIFs. In order to freeze the motion of BIFs you’ll
typically be using a fairly fast shutter speed, and this usually
renders IS useless. The problem with IS is that it can slow down
the AF system’s acquisition of the subject, and this applies not only
to the initial acquisition but also any attempt to re-aquire the
subject after the camera shifts the focus to the background.
8.10.2
Lighting
Lighting can be an especially
frustrating issue when shooting birds in flight. Due to the
distances typically involved, flash tends to be less useful than for
closer, more stationary birds. Thus, BIF shooters rely more on
natural light, which is more difficult to control. On cloudless
days the BIFs will be illuminated by direct sunlight, which is
problematic during much of the day when the sun is overhead and your
view of the bird consists largely of a poorly-lit underside.
Fig. 8.10.14:
It’s an unfortunate fact that a large proportion of BIF shots end up
backlit. One thing you can do is to expose for the unlit ventral
side of the bird,
and then shoot only when no part of the bird that you can see is lit by
direct
sunlight (so as to avoid clipping highlights). For the image
above, the bird’s
left shoulder is lit by direct sunlight, which kept me from increasing
the exposure
of the bird’s underside.
Bird photographers have employed a
number of approaches to mitigating this problem. One approach is
to shoot only at sunrise and sunset, when the sun is low in the sky and
the birds will be lit from the side rather than from above. This
strategy assumes you have something else to do during the mid-day
hours, which may not sit entirely well for those recreational shooters
on vacation to a popular birding site, or simply those enjoying their
precious away-from-work hours on the weekends.
It’s still possible to do direct-sunlight BIF
photography during the day, however, as long as the sun isn’t directly
overhead—which during certain times of the year (depending on your
geographical location) it often won’t be, even at mid-day. At
these times, you can still get BIF shots with the underside of the bird
well illuminated by waiting for the bird to bank—i.e., to tilt its body axis so
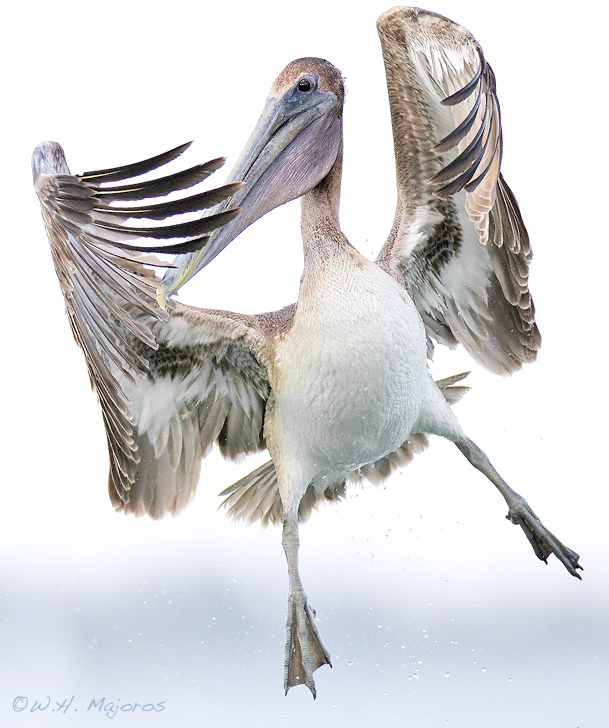
that its underside is presented to the sun. The very first figure
above (Figure 8.10.1) is a prime example. I was having great
difficulty getting shots of pelicans coming in to land in the small
cove where I was shooting, because they were all top-lit. When
this bird banked to adjust its course, the sunlight lit up the bird’s
belly and left wing; the right wing was less well exposed, but some
adjustment in Photoshop helped to lessen the difference between the two
wings (section 11.3 describes post-processing
techniques that can be
applied to these types of tasks).
The image below is another—more extreme—example of
banking. This bald eagle executed a nearly vertical banking
maneuver, allowing the sunlight streaming down from a fairly high angle
to light up most of its ventral side. For strongly flapping birds
and a reasonable angle of sunlight, the up-flap can sometimes result in
some decent illumination of the bird as well.
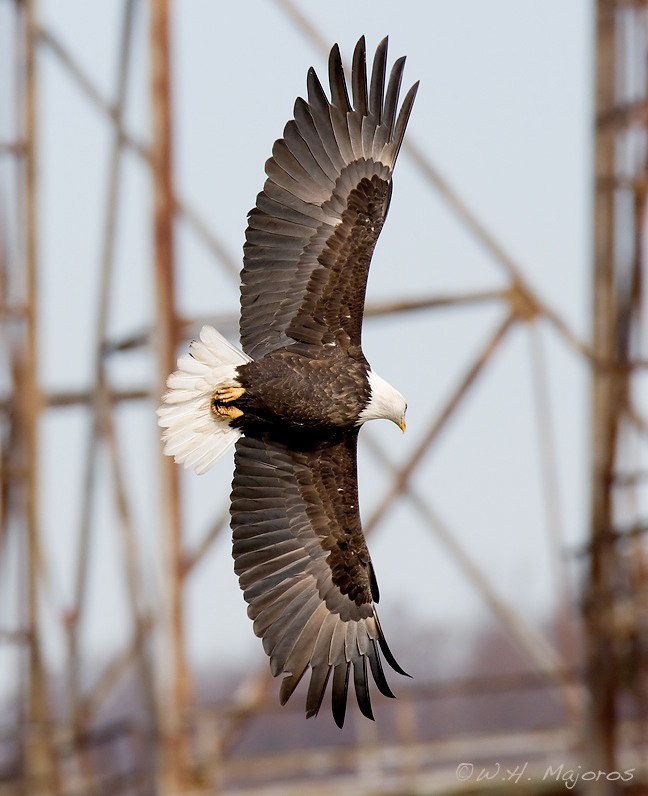
Fig. 8.10.15:
Banking poses are ideal when shooting BIFs in direct sunlight.
Though I don’t like the fact that the bird is facing away from the
camera and
that the background is cluttered with anthropogenic artifacts, I
somehow like
the composition of this image. Art is rarely rational.
For some birds, the position of
the wing—up versus down—can have significant exposure
consequences. Many birds have lighter underwing feathers than in
the rest of their plumage. If you set your exposure parameters
for the dorsal plumage (i.e., when the bird is perched), you may
experience over-exposure when the bird raises its wing to catch the
sunlight. If you know that your subject has such a “wing flashing” plumage pattern, you’ll likely
want to be more careful in setting your exposure parameters, to avoid
over-exposure on the up-flaps. The Black-crowned Night Heron (Nycticorax nycticorax) shown below
has a slightly over-exposed underside—particularly in the under-wing
plumage—because I had originally set my exposure parameters based on
the bird when perched. When it suddenly took to flight I
successfully tracked it and obtained this relatively sharp image, but
later wished I had turned down the exposure a notch or two when the
bird flew, due to the brighter underside that is more fully revealed in
flight.
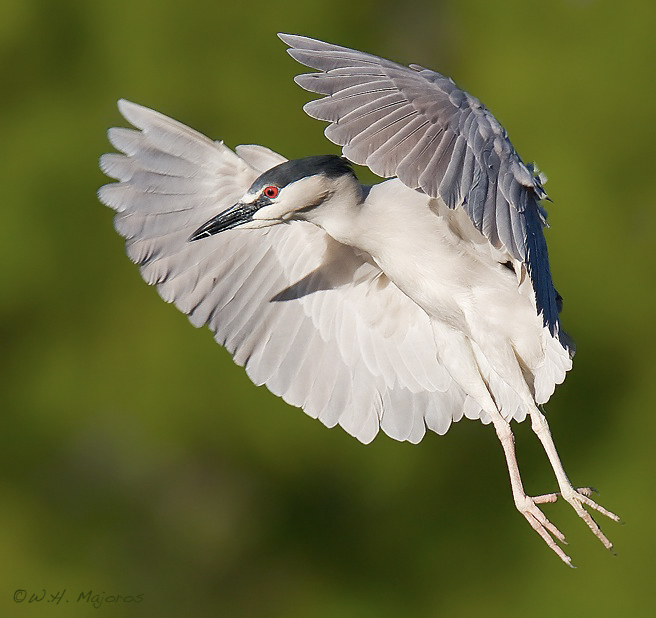
Fig. 8.10.16:
Be careful of wing flashing and similar effects. Because I set
my exposure parameters when this bird was perched, the photos I then
captured
when it took to flight ended up being slightly over-exposed when the
bird’s white
underside was more fully revealed to the camera. If you think the
bird you’re shooting
might take to flight, make a mental note to adjust your exposure up or
down a notch or
two as necessary, if the bird’s underside is brighter or darker than
the part of the plumage
that you used to set your exposure parameters.
As with
non-flight photography of foraging birds moving from branch to branch,
it’s a good idea to keep two exposure profiles in mind: one for when
the bird is in the sunlight, and another for when it’s in the
shade. Although at mid-day many BIFs tend to remain un-shaded
much of the time, when the direction of sunlight is more horizontal
there may be ample opportunities for the bird to fly into and out of
shadow areas during a bout of flying. As described in section
8.9, handling this is sometimes as
simple as switching between two ISO
values via quick turns of a parameter dial. When the bird goes
from sunlit to shaded, an adjustment of, say, +5 clicks (thirds of a
stop of light) may be needed; when the bird later emerges from the
shadow back into the sunlight, a quick adjustment of -5 on the same dial should result
in a return to the sunlit profile and presumably an appropriate
exposure.
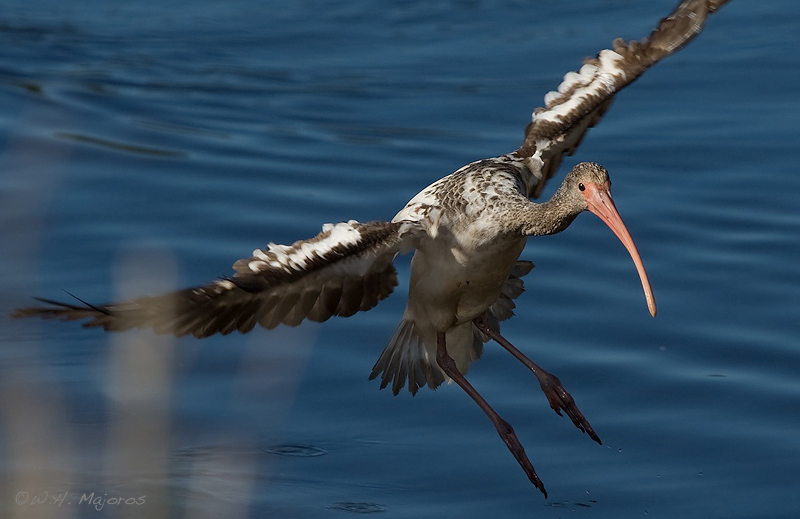
Fig. 8.10.17:
BIFs that fly between sunny and shady areas require quick thinking.
I try to keep two profiles in mind: a sunny profile and a shady
profile. In most
cases this just means two ISO settings that I need to juggle as the
bird moves in
and out of the sunlight. Check your camera’s user manual to see
if it allows you
to reprogram your main parameter dial, so you can have it mapped to
whichever
exposure parameter you’ll need to most rapidly change during intense
shooting.
As has been
mentioned several times elsewhere in this book, there are situations
when it’s useful to take multiple shots of the bird in rapid
succession, at different exposure levels. This is called exposure bracketing. Some
cameras allow you to take two, three, five, or even seven shots of a
scene, very rapidly in series, at progressively brighter exposures over
the series. Novice photographers often use this feature as a “safety net” in case they’ve dialed in an
incorrect exposure setting. More experienced shooters sometimes
use this feature for HDR (high
dynamic range—section 13.3) applications, though HDR imaging
for bird photography is still relatively underexplored. The
problem is that birds move—especially birds in flight. That
largely precludes automatic merging of multiple exposures by the
computer (the dominant form of HDR approaches today). It’s
possible, however, to merge multiple exposures of a bird manually in post-process (as we’ll
show in section 13.3).
The ability to merge multiple exposures manually
opens up an interesting avenue for BIF photography, particularly in the
case of birds that are partially illuminated by direct sunlight.
If you can capture multiple images of the bird in which some images
expose the bright portions well and others expose the darker portions
well, then it may be possible, in some cases, to merge the best parts
of the differently exposed photos into a single image that captures
detail in both bright and dark areas of the bird. Methods for
doing so (in the case of stationary birds) will be demonstrated in
section 13.3, using the Clone tool, layer masks, and texture cloning in Photoshop.
Note that these are fairly advanced techniques, but with some
experience you may find that they will help you reclaim detail in your
BIF photos that would otherwise be lost due to the limited dynamic
range of your camera’s imaging sensor.
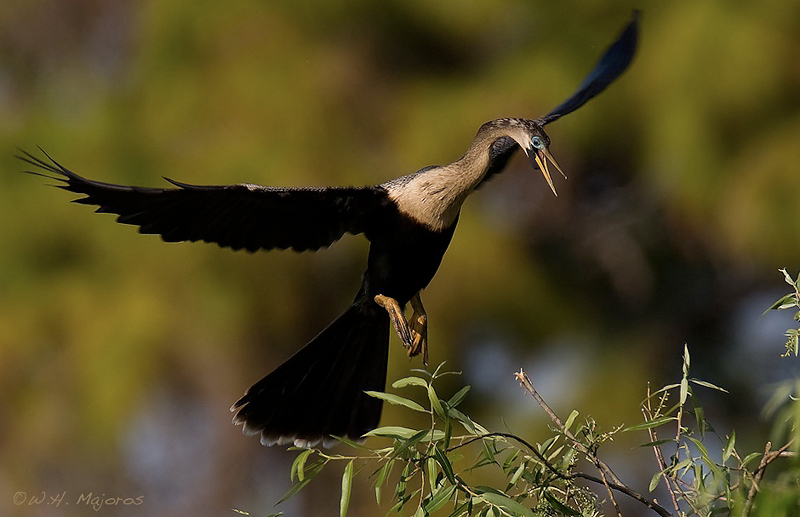
Fig. 8.10.18:
BIFs partially illuminated by direct sunlight will generally
have underexposure problems, and there’s little you can do about
it. One
possibility is to use exposure bracketing and then painstakingly clone
detail
from one exposure to another, as we’ll see in section 13.3. I
didn’t do that here.
(840mm, f/9, 1/640 sec, ISO 200, no flash).
Now let’s talk
about flash. Though flash is an enormously useful tool for many
birding situations, for many BIF scenarios it’s less useful. The
problem is that BIFs are often simply too far away for the flash light
to reach the subject and have a noticeable effect on the
exposure. Since you’ll typically be using a shutter speed faster
than your camera’s maximum sync speed,
you’ll generally need to use high-speed
sync mode (HSS—section 7.2), which
reduces effective flash
output and range due to the inefficiency of having to emit multiple
pulses of light rather than just one. Even with a flash extender,
substantially affecting the bird’s exposure via HSS flash at the
typical distances involved in large-focal-length BIF shooting is
rare—often, it’s just enough to induce eye shine, which you’ll then
need to fix later in post-process (section 11.4).
One special case is when the BIF is a
hummingbird. As we described in section 7.7,
effective
hummingbird photography typically involves the use of one or more flash
units to freeze the bird’s motion. Whereas most DSLR’s can shoot
at speeds of up to 1/4000 or 1/8000 sec, flash durations can be as
short as 1/40000 sec—an order of magnitude
faster. Unfortunately, because the flash “power” setting on most flash units
actually equates to flash duration,
obtaining a sufficiently short flash duration can result in an
inadequate flash output intensity. Many hummingbird photographers
employ multiple, synchronized flash units in order to achieve a higher
flash intensity without increasing flash duration. This typically
involves setting up the multiple flash units around a hummingbird
feeder or other place where the bird is expected to make an
appearance. The same technique has been used by some
photographers at songbird nests to capture the parent arriving at the
nest with food for the chicks.
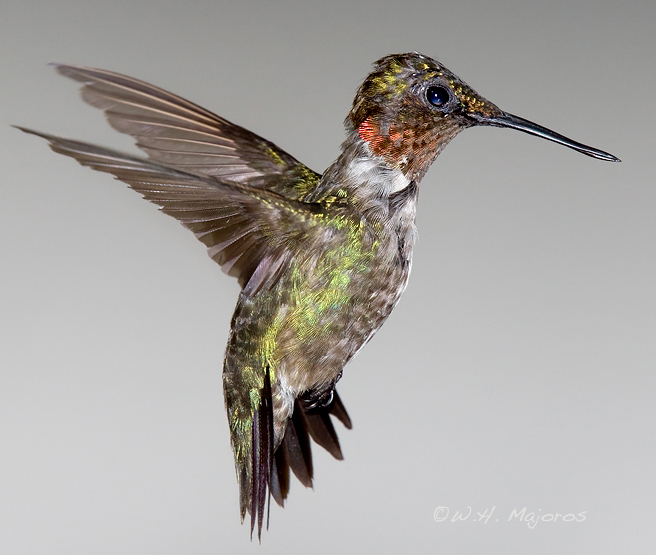
Fig. 8.10.19:
Hummingbirds are a special case in BIF photography. The best
hummer shots are typically set up, using close-up photography with
multiple
flash units to provide enough power to illuminate the bird while still
freezing
motion due to a short flash duration. For this image I was
shooting out my
front window (no glass or screen) with a single flash unit and a very
large
flash extender. Note that the wingtips are slightly blurred,
possibly due to
motion (or shallow DOF).
8.10.3
Subject Pose
Though there’s typically precious
little time to consider the issue of the ideal subject pose during the
heat of intense BIF shooting, during post-processing (especially during
filtering—section
12.3) you’ll hopefully have more
time to consider such issues.
One thing you’ll likely find is that as you get more photos of the same
individual or species, you’ll become more selective of which poses
you’ll accept—whether during shooting in the field or when deciding
later which images to keep or delete from your computer’s hard
drive. The general composition principles discussed at length in
section 8.1 can apply to birds in flight as
well as birds at rest, but
there are a few special considerations worth briefly outlining in the
case of BIFs.
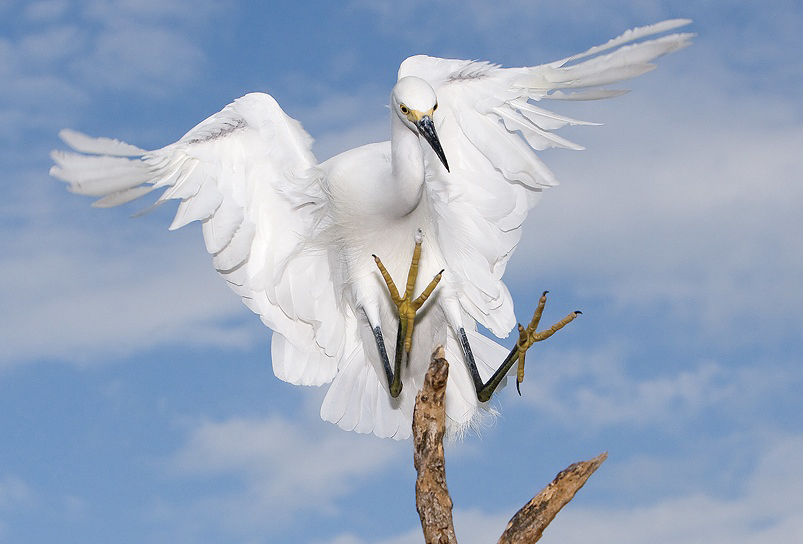
Fig. 8.10.20:
BIF poses are generally not planned ahead of time—by the
photographer or the bird. (600mm, f/5, 1/1000 sec, ISO 800, FEC
+3)
The most
obvious concern when choosing BIF poses is the position of the
wings. Both wings-up and wings-down poses can work, though
individual circumstances—including factors such as species, lighting,
and angle—will often dictate a preferred positioning of the
wings. Because I detest rules, when in the field I try to capture
at least a few images of even those configurations that convention
would normally proscribe. Remember that public opinion in art is
highly ephemeral, and what should matter most to you, especially
concerning your own art, is what you yourself find most pleasing.
Nevertheless, there are a few rules of thumb that
can perhaps help the novice to more quickly construct a portfolio of
pleasing images. First, when a wings-up configuration results in
poorly-exposed underwing surfaces, a wings-down posture may well look
better, if the dorsal wing surfaces are well illuminated. Having
the wings extended straight out toward the camera often doesn’t work so
well—though there are certainly exceptions. Having the head shown
in profile (or nearly so) is often a bonus for BIF shot, and in
general you don’t want the bird to be facing away from the camera
(though again, exceptions do exist). On the other hand, having
the bird face directly toward the camera often leads to problems (such
as foreshortening of the beak), though in specific cases it might look
fine.
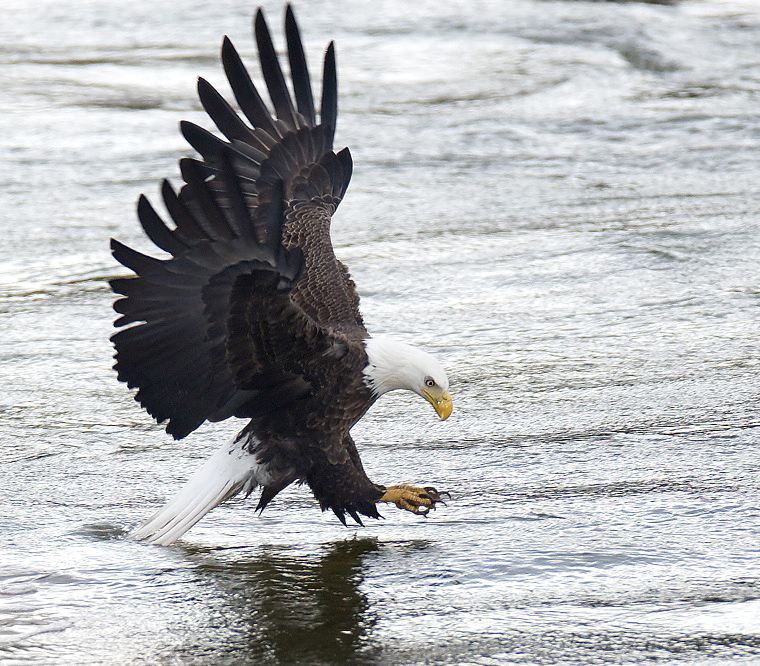
Fig. 8.10.21:
The question of wings-up versus wings-down depends on
what’s going on in the rest of the image. For this bird I had
other shots
showing the wings down, but since I wanted the legs to be fully
visible I opted for the shot with the wings up. There aren’t any
simple
rules—just shoot as much as you can in the field and then decide later
which shots to keep, based on their overall visual impact.
The key is, ultimately, to try to view the image in
a state of mind in which you’re thinking more like an innocent viewer of art rather than a creator of it (and most definitely
not like a photographer would
view it!).
One perennial question for BIF shots is whether to
position the subject with the greater amount of space in front of the bird or behind it. Most authors won’t
hesitate to insist that the greater amount of space should be in front
of the bird, so that the bird “has space to fly into”. In many cases this is good
advice. However, there are certainly cases in which this is not
the optimal framing of the bird (in my opinion). When there is
more space in front of the bird, many viewers will likely be drawn
(perhaps subconsciously) to the question of where the bird is flying to. When the greater amount
of image space is instead allotted to the area behind the bird, the question
likely posed in most viewers’ minds is: where is the bird coming from? Which scenario is
preferable to you may depend on the subject, the background, and
possibly other factors. Just be open-minded when framing your
subject. And if you don’t have time for that in the field (which
many of us don’t), then try to leave ample space on either side of your
BIF to allow appropriate cropping in post-process to achieve either
framing in the final image.
In the majority of cases, BIFs can be productively
classified in terms of whether their direction of flight is primarily parallel to the lens axis (i.e.,
flying toward you or away from you), or perpendicular to it (i.e., flying
transversely, across the frame). Both scenarios can be promising,
and the techniques outlined up to this point should help you in many of
these cases to improve your chances of an aesthetic capture. A
number of special cases exist, however, which deserve some elaboration
as to their potential and optimal exploitation. We’ll finish out
this section by briefly enumerating some of these.
First we’ll consider the dive pose. The name should be
self-explanatory, especially in conjunction with the figure below.
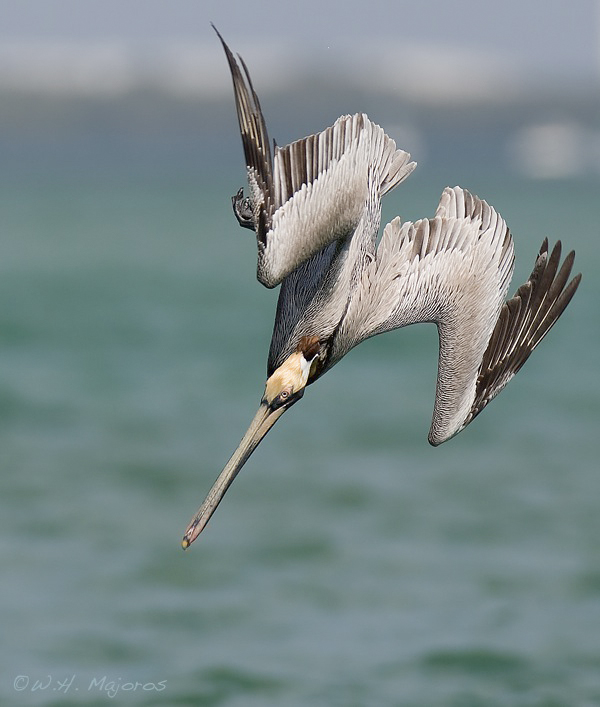
Fig. 8.10.22:
Dive poses are extremely difficult to capture well.
I personally depend overwhelmingly on luck in these cases. For
this
diving pelican I was able to compound my luck because the flock
continued to dive at roughly the same distance for about an hour.
(840mm, f/7.1, 1/1600 sec, ISO 640, no flash).
Dives—of any species—are as difficult to capture as they are
dramatic. The above photo took considerable effort to capture as
a sharp image, due to the great speed with which the bird was traveling
during the dive. To obtain this photo I spent about an hour
shooting pelicans diving repeatedly off the coast of Sanibel Island in
Florida. The birds were diving fairly close to shore, though I
still found it necessary to use a focal length of 840mm (600mm f/4 lens + 1.4× TC) to retain enough detail in
the bird at that distance. Tracking the bird during the descent
was difficult in the extreme. These birds flap lazily along a
horizontal trajectory and then suddenly pull their wings inward and
turn vertically for the dive. Whenever a bird I was tracking did
this I waited just a quarter-second (to give the AF system time lock on
to the newly presented dorsal profile of the bird) and then fully
engaged my camera’s 10fps continuous drive mode to snap off as many
shots as possible before the bird hit the water. Most of these
shots turned out to be useless, but a few resulted in sharp photos, of
which the above image is one.
Photos of birds chasing each other tend to be very
popular with the general public, though they can be difficult to
capture in crisp images, due to the usually erratic flight paths of the
chaser and the chased. Making things even more challenging is the
fact that in many of the shots you’ll take from such a sequence, only
one of the two birds will be in a good pose (as in the image below,
where the bird being chased is facing away from the camera). One
option in such cases is to merge poses from different images taken
during the same sequence, a technique we’ll explore in section
13.3. Note that merging poses
from different photos results in an
image which is no longer an accurate record of real events, and that
fact should be made clear to your viewers with an appropriate
caption. In the image below, no merging was performed though a
boring sky was spruced up with some artificial clouds; techniques for
rendering artificial clouds will be discussed in section 13.2.
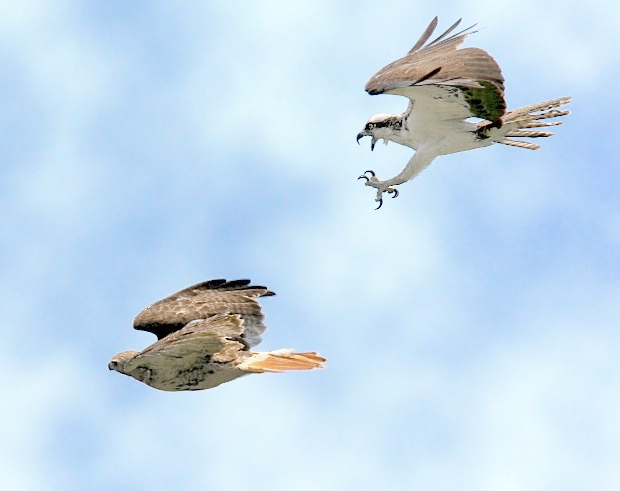
Fig. 8.10.23:
General viewers love drama. Even if your photo is lacking in
image quality (as this one is), if it shows some interesting or even
dramatic
real-world behavior, it can be a success with the general public.
(Artificial
clouds were added to the sky in this image).
Another special case is that of a bird coming in to
a perch. For the image below, there was one prominent perch that
numerous egrets had been utilizing over several days. Whenever
any bird appeared above the bushes I began shooting it at 10fps until
it passed by me or perched on one of the bare branches nearby.
This bird went for the “preferred” perch, and I was able to get a
handful of images as it closed in on the branch, of which only one is
shown below. For me, because I was there and knew how the shot
was achieved, the image isn’t terribly exciting, but for many
viewers seeing this for the first time it’s quite “the cat’s
meow”.
Fig. 8.10.24:
Staking out a popular perching site can be very rewarding,
if you can catch action shots of birds coming in to perch.
(70-200mm f/2.8
lens at 79mm, f/9, 1/2500 sec, ISO 640).
As another example of a
bird coming in to a perching location, the osprey below was
photographed while on final approach to its nest (the nest is not
shown, but was just a few inches below the image’s lower edge).
Though the image is not perfect, it does represent the culmination of
many thousands of photos taken at this nest site during a single
nesting season. This image likewise resulted from the use of
high-speed drive mode (10fps). Additional post-processing
improved the exposure of the bird’s ventral side, since the bird was
back-lit. Just remember when you see a striking bird pose in
another photographer’s portfolio that (1) the image may well be
omitting important things just beyond the image’s edge (such as the
bird’s nest or some other perching substrate), and (2) the image may
well have taken the photographer many tens or hundreds of hours in the
field to obtain.
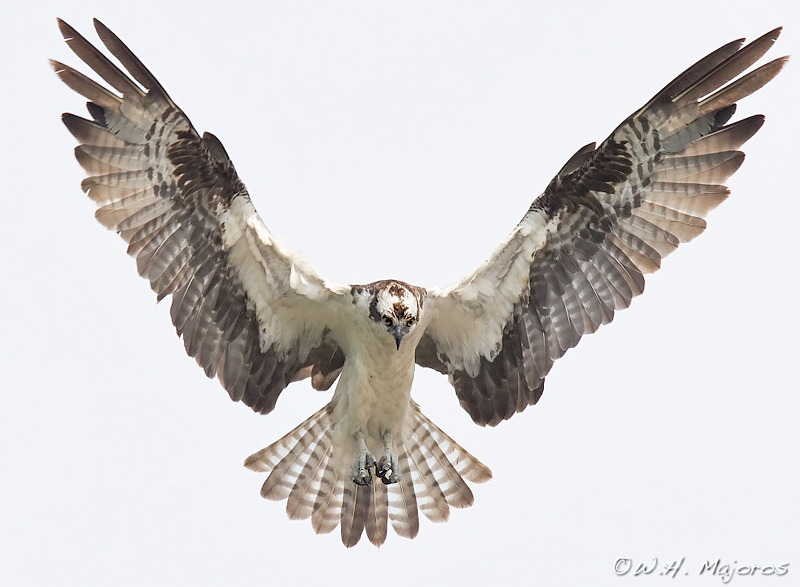
Fig. 8.10.25:
For your shots of birds approaching a perch, consider cropping out the
perch in postprocess. The result can be quite dramatic, because
some context has been
removed from the image, thereby opening up possibilities for the
viewer’s mind to explore.
This bird was coming in to land on its nest, but because I cropped out
the nest, some viewers
may imagine that the bird is about to pounce on a fish. Bird
photos that readily inspire the
imagination of the viewer are very special indeed.
The next
category is the landing pose,
which is really just a generalization of the perching category discussed
above. Perching and landing poses can sometimes be anticipated by
identifying a location in which birds are likely to land, whether based
on prior experience or simple logic (e.g., one of the only exposed
sandbars in the immediate vicinity, with numerous birds searching for
such sites to let down). In some cases it may be useful to pre-focus on the landing
substrate—either manually or via autofocus—in anticipation of a bird
rapidly arriving on the scene. When you are able to identify a
likely destination site for BIFs, it’s recommended that you consider
what the ideal angle would be for photographing birds arriving at the
site. The ideal angle may depend on the lighting (i.e., the
direction from which direct sunlight will strike the subject), the wind
(since most birds seem to prefer to face into the wind when landing),
and any elevation difference between the landing substrate and your
lens.
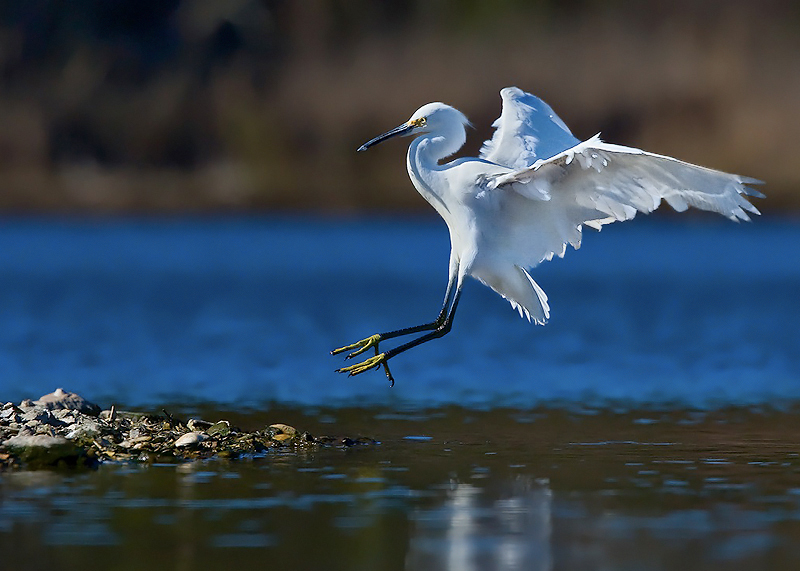
For the landing image below, I employed the
tried-and-true technique of getting low at the water’s edge so that the
watery terrain would be compressed into a narrow band (see section
8.2), while also counting on the
birds to approach from the right so
they’d be illuminated by sunlight shining down from the left.
(Fortunately, I wasn’t eaten by an alligator while lying there on my
belly at the water’s edge—never take unnecessary risks in
the field that may result in bodily harm to yourself or others!
When I realized that alligators were nearby, I quickly moved to higher
ground.)
Fig. 8.10.26:
Landing sequences are great opportunities for getting some
interesting poses.
In addition to landing poses, launching poses should be
considered fair game when on a BIF stakeout. These are also
referred to as jump shots,
and are popular among raptor (and other) photographers. The image
below shows an egret launching itself into flight from a wading
position. Predicting when your subject is about to launch itself
into flight is not easy, though there are some cues that can sometimes
help. For birds on land (or perched in a tree), slicing (the falconer’s term for
avian defecation) can be a good predictor of restlessness, which may
lead to sudden flight. Other cues in the environment can
sometimes be informative, such as the bird you’re watching suddenly
looking around nervously or taking notice of another bird passing by or
a predator coming into view in the distance. For those novice
bird photographers with only a very limited amount of experience
actually watching birds, know
with certainty that there are many behavioral cues that in time you’ll
develop a sense for as you become more experienced in observing your
subjects.
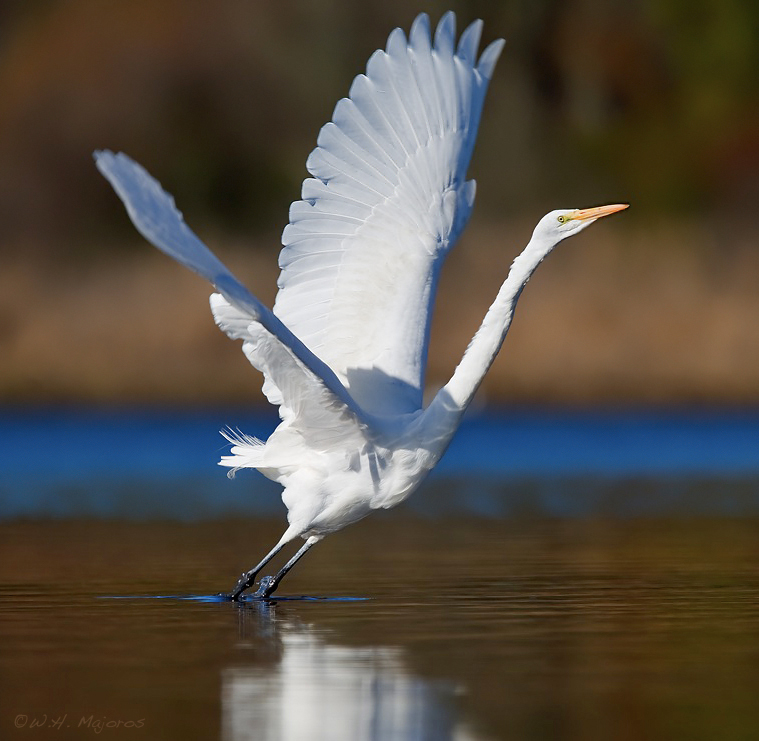
Fig. 8.10.27:
Launching, or “jump shot” images can be
just
as dramatic as in-flight shots of BIFs. The common denominator
seems to be the spreading of the wings, which strongly differentiates
them from static portrait shots for many viewers.
Though birds flying away from the camera typically
make poor BIF subjects, those landing
while faced away from the camera can sometimes still produce a striking
image with some aesthetic value. An important fact is that many
birds when landing will slow their wing beat and extend the wings
generously so as to maximize drag and minimize impact. This can
afford a very nice view of a bird’s dorsal plumage if the subject is
facing away from the camera. Note in passing that for the image
below I’ve employed the D-PIE
technique (Differential Processing of
Image Elements) in post-process, to enhance the variability,
color, and contrast in the bird’s plumage. Instruction in the use
of this technique for artistic post-processing of bird images is given
in Part III of this book.
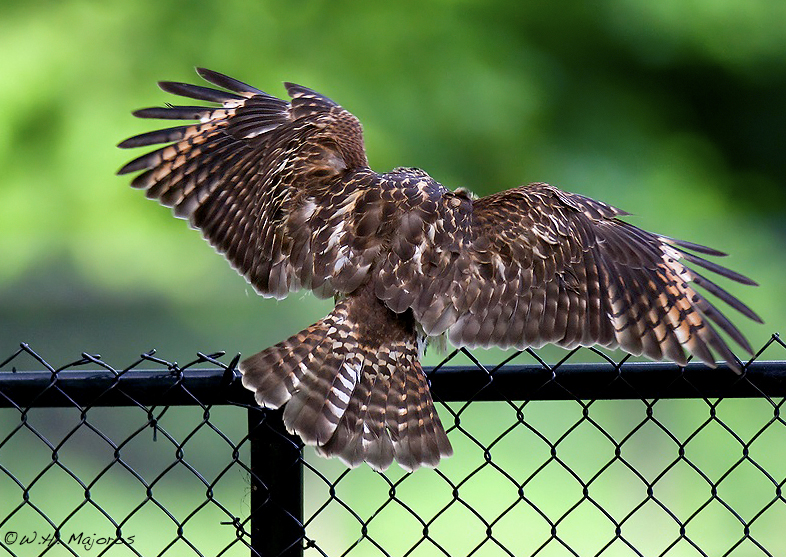
Fig. 8.10.28:
Dare to break the rules. Though most authors will
tell you not to shoot birds facing away from the camera, in special
cases these types of poses can still work. What I like about this
image
is the the apparently wide dynamic range in the bird’s dorsal plumage;
this effect has been augmented in post-process (see text).
A final category that we’ll mention here is the flocking pose. The propensity
for individual birds to take part in vast flocks that can move in
remarkable synchrony is surely one of the great wonders of
nature. Flock photography is a special discipline all of its own,
of which we can barely scratch the surface here. If this is
something that interests you, then I recommend looking into a trip to Bosque del Apache in New Mexico, Lake Mattamuskeet in North
Carolina, or Bombay Hook in
Delaware. At these sites, during the right times of the year
(primarily winter), you can photograph flocks of hundreds of thousands
of birds in dramatic scenes. The modest image below shows a flock
of gulls swarming in front of a hydroelectric dam in Maryland.
This photo was snapped only because of the fortuitous lighting, which
resulted in the flock being illumated by sunlight while the background
was left in shadow (due to cloud patterns).
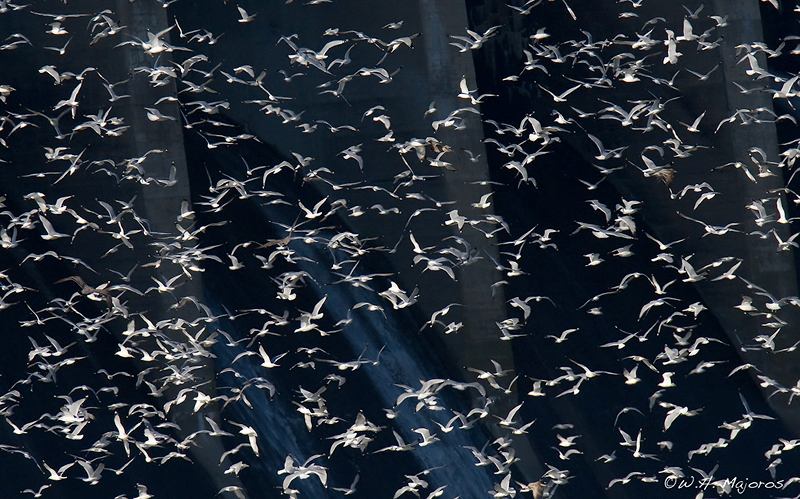
Fig.
8.10.29: If one BIF is good, several hundred can be better! Flock
photography is an art form of its own. Someday I hope to become
good at it.
8.10.4 Finding BIF Subjects
Whenever you see a great BIF photo on the internet, you should ask
yourself several questions: where did the photographer find that BIF
opportunity, how many shots did s/he have to take before getting that
particular image, where could you go to get similar (or at least
comparable) images, and what BIF opportunities might exist even in your
own neighborhood that you’re not even aware of?
The honest truth is that many of the very best BIF
photos that you’ll see are attributable less to the photographer’s
skill than to either sheer luck or the wisdom of the photographer in
deciding to travel to a particular location where BIF shots tend to be
far easier to obtain than in most people’s backyards. Though it’s
entirely possible that a prime BIF photography locale may be located
within an easy drive of your home, for many bird photographers a
longer-distance trip is generally in order if s/he wants to
substantially enlarge his or her portfolio of quality BIF shots without
investing years of effort to do so. A number of such destinations
exist, and can be identified with as little effort as an hour or two on
Google. Once you’ve identified such a site and committed to
taking a trip to that location, a read through section 8.8 may be
useful in planning your trip.
For those photographers who are largely limited to
local trips for obtaining their BIF photos, there are some
possibilities that you should consider. First, remember that many
bird species nest communally, and many more roost communally. Though
communal nesting or roosting sites may not be common in your area, all
you really need is one such site that you can access (during the right
season and at a reasonable distance). These sites can be very
productive for BIF photography, since birds can be expected to be
coming and going at the site at all times of day in the case of nest
sites, or during morning and evening hours in the case of roosting
sites.

Fig. 8.10.30:
Finding subjects for BIF photography can be a real challenge, depending
on
where you live. This image resulted after a friend gave me a tip
about a hawk nest near his
house. I ended up spending many, many hours at the nest site
following the chicks as they
grew and developed the many skills that hawks need to survive—including
flight. I think it’s
fitting that this bird was learning to fly while I was learning to
photograph birds in flight:
this bird and I made a great team together!
Other promising
sites for BIF photography are ponds and lakes (for ducks and other
water birds), raptor nests, hydroelectric dams (for eagles and gulls),
wetlands, and flowers and hummingbird feeders (in the case of
hummingbirds). More generally, any bird that you can photograph
in your own locale could provide a BIF photo if you’re able to exploit
your knowledge of the bird’s diurnal patterns: when it typically
arrives at the site where you usually observe it, when it typically
leaves, and what behavioral cues may allow you to predict when it’s
likely to suddenly take to flight.
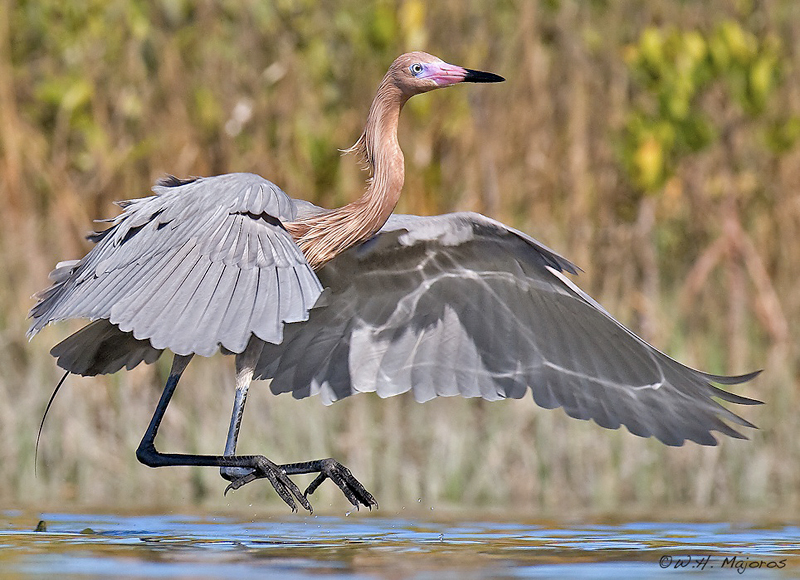
Fig. 8.10.31:
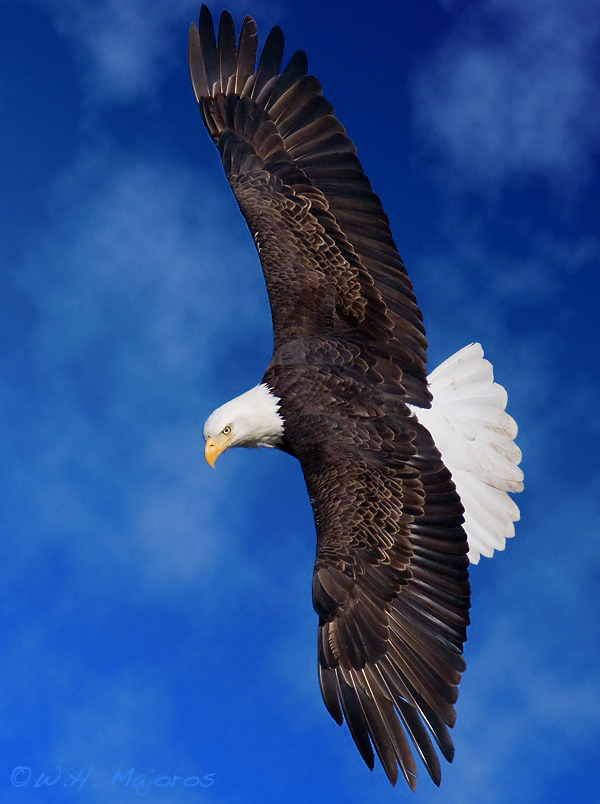
If finding BIFs proves difficult in your neighborhood, consider taking
a trip to a birding hotspot where BIFs may be more prevalent. For
this photo taken
at Fort Desoto in Florida, I was happy to be photographing a Reddish
Egret (a rare
species where I live) and to be photographing a BIF at the same time.
(600mm, f/9, 1/1250 sec, ISO 640, FEC +3)
|
|
|